The first time I built a DIY worm tower, I honestly thought I had made a fancy plastic pipe for worms to live in. That was about it. I wasn’t expecting much.
But after a few months, I started noticing something. The soil around my vegetables looked better, the plants seemed happier, and I was throwing less kitchen scrap into the trash. That got my attention.
I’ve been messing around with homesteading, backyard gardening, composting, and permaculture for more than 10 years now. I’ve tried big compost bins, little buckets, piles of leaves, chicken manure, and probably every strange kitchen-scrap idea you can imagine.
The DIY worm tower became one of my favorite little projects because it doesn’t need much space, doesn’t cost much money, and you can build one in an afternoon.
And if you’re gardening in a small urban backyard, this thing can be really handy.
So lemme show you how I built mine, what I put inside it, what went wrong, and the things I wish somebody had told me before I started.
What Exactly Is a DIY Worm Tower?
A DIY worm tower is basically a pipe, bucket, or other container that sits down into your garden soil. You put composting worms and small amounts of food scraps inside it.
The worms eat the organic material and turn it into worm castings.
Those castings are rich organic material that can become part of the soil around the tower.
The idea is pretty simple: instead of carrying all your kitchen scraps to a compost pile, you bring the scraps right into the garden.
It’s a small-scale composting system.
I especially like it for raised beds and backyard gardens where space is limited.
You don’t need a giant compost bin taking up half your yard.
Why I Decided to Build One
My first reason was actually pretty boring.
Kitchen scraps.
We were throwing away vegetable peels, lettuce ends, coffee grounds, and other little bits almost every day. I already had a compost pile, but sometimes I didn’t feel like walking all the way across the yard with one tiny bowl of scraps.
Lazy? Maybe.
Efficient? That’s what I told myself.
Then I started reading about worm towers and thought, “Why not?”
I had an old piece of plastic pipe sitting in the garage, so I decided to give it a try.
My first tower wasn’t pretty. Not even close.
But it worked.
And that’s usually enough for me.
How I Built My DIY Worm Tower
You don’t need much.
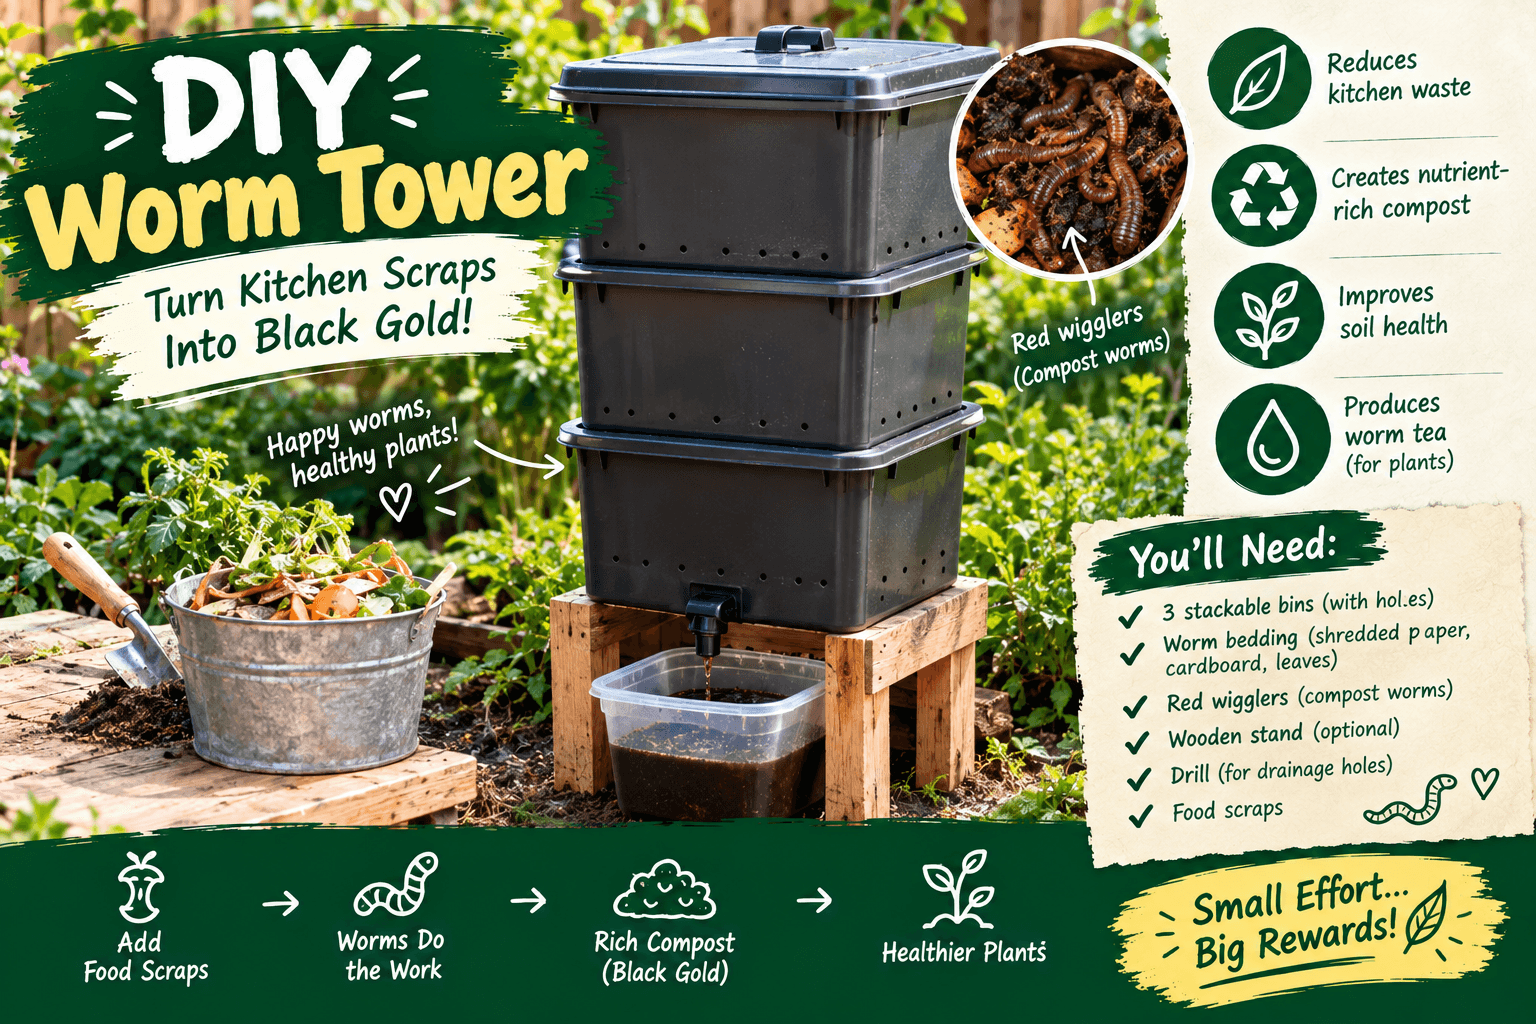
Here’s what I used for my basic version:
- A wide plastic pipe or large plastic container
- A drill
- Composting worms
- Shredded cardboard
- A little garden soil
- Vegetable and fruit scraps
- Water
- A lid or cover
For the pipe version, I used a piece of wide plastic pipe and drilled plenty of small holes around the lower section.
The holes are important because the worms need access to the surrounding soil.
I buried the pipe several inches into the garden bed, leaving the top sticking above the soil.
Then I added some damp shredded cardboard, a handful of soil, and the worms.
That’s pretty much it.
No complicated plumbing.
No electricity.
No expensive equipment.
Just a tube in the dirt full of hungry worms.
Choosing the Right Worms
This part confused me at first.
Not every worm you find in your backyard is the best choice for a worm tower.
For composting, people commonly use composting worms such as red wigglers.
They’re good at eating decomposing organic material and are commonly used in worm composting systems.
I made the mistake once of digging up regular earthworms and throwing them into a homemade compost setup.
They survived for a while, but it wasn’t really the same thing.
The worms you use matter.
If you’re buying worms, look for composting worms rather than just grabbing whatever worms you find after a rainstorm.
What I Put Inside My Worm Tower
Here’s where I learned a few lessons.
The worms aren’t asking for a five-star restaurant.
They like simple stuff.
I usually add small pieces of:
- Vegetable scraps
- Fruit scraps
- Lettuce
- Carrot peels
- Melon rinds
- Coffee grounds in moderation
- Crushed eggshells
- Small amounts of cooked vegetables without lots of oil
I cut bigger pieces into smaller chunks.
This helps them break down faster.
One time I dumped a whole bunch of watermelon rind into mine because I had way too much watermelon.
Bad idea.
A week later, I opened the lid and got hit with a smell that made me question every gardening decision I’d ever made.
The problem wasn’t the watermelon itself. I simply added way too much at once.
That’s one of the biggest lessons with a worm tower:
Don’t treat it like a garbage can.
Worms have limits.
What NOT to Put in a DIY Worm Tower
I keep some things out of mine.
Don’t go dumping meat scraps, bones, lots of greasy food, dairy products, or heavily processed leftovers into your worm tower.
Those materials can create odors and attract unwanted pests.
I also don’t add piles of salty food or anything with lots of oil.
And be careful with citrus. Small amounts may be tolerated, but I don’t make citrus a major part of my worm feeding.
My rule is pretty simple:
If it looks like something you’d happily put into a normal compost pile, think about it first. Then add only a little.
The worms don’t need a mountain of food.
How Much Food Should You Add?
This is where beginners can get themselves into trouble.
When I started, I kept thinking, “These worms must be hungry.”
So I’d add more scraps.
Then more.
Then I’d check the tower every day.
Don’t do that.
Start small.
Add a handful of scraps and see how quickly they’re disappearing.
If old food is still sitting there, don’t add more.
The worms need time to process the material.
Temperature, moisture, worm population, and food size all affect how quickly things break down.
Your worm tower isn’t a race.
Keeping the Worm Tower Moist
Worms need moisture, but they don’t want to live in a swimming pool.
I usually keep the bedding damp, kind of like a wrung-out sponge.
If you squeeze a handful and water pours out, it’s too wet.
If everything feels dry and dusty, it’s too dry.
Shredded cardboard works great for helping control moisture.
I tear it into small pieces, wet it, squeeze out the extra water, and put it around the food scraps.
During hot weather, I check the tower more often.
This is especially important if your garden gets strong afternoon sun.
A little shade can help.
Does a Worm Tower Smell?
A healthy worm tower shouldn’t smell like a rotten garbage pile.
Mine usually has a mild earthy smell.
If yours smells terrible, something is probably off.
Usually, I would first check whether you’re adding too much food.
Then I’d look at moisture.
Too much wet food packed together can create a nasty mess.
Adding dry shredded cardboard can help.
Also, don’t bury huge chunks of food in one place.
Spread things around a little.
I learned this after one particularly nasty cleanup session.
Trust me, I learned the hard way.
Where Should You Put a Worm Tower?
I like putting mine directly into a productive garden bed.
You can use one near vegetables, herbs, flowers, or other plants.
Just don’t put it somewhere that’s going to become completely flooded after every rain.
You also want to think about temperature.
Worms don’t love extreme heat.
If your garden bed gets brutally hot, some shade during the hottest part of the day can help.
For an urban homestead, you can also experiment with putting a worm tower in a raised bed.
That’s one of the reasons I like this system so much.
It fits into small spaces.
Can a DIY Worm Tower Help Your Garden?
Yes, but don’t expect magic overnight.
The worms break down organic material and produce castings. The surrounding soil can benefit from the additional organic material and biological activity.
But a worm tower isn’t a replacement for all your soil-building work.
I still use compost.
I still mulch.
I still add leaves and other organic materials where appropriate.
For me, the worm tower is just another little tool in the toolbox.
That’s how I think about permaculture too.
You don’t need one miracle trick.
You build a bunch of small systems that work together.
My Favorite Thing About Worm Towers
Honestly?
Convenience.
I’ve got a bowl of vegetable scraps in the kitchen.
Instead of putting it in the trash, I can walk outside, open the tower, add a little, cover it with cardboard, and walk away.
That’s it.
No giant compost pile.
No turning a huge bin.
No fancy machine humming in the corner.
Just worms doing their thing.
And because the tower is right in the garden, the whole system feels connected.
Kitchen scraps go to worms.
Worms create castings.
The garden grows food.
Food comes back into the kitchen.
And the cycle starts again.
That’s the kind of simple homesteading system I really enjoy.
A Few DIY Worm Tower Mistakes to Avoid
If you’re building your first one, here’s what I’d watch out for.
Don’t overfeed the worms
This is probably number one.
More food doesn’t mean more compost.
Start small.
Don’t let it dry out
Especially during hot weather.
Check the bedding occasionally and add a little water if needed.
Don’t make it a trash can
The worms aren’t there to dispose of every leftover meal in your refrigerator.
Keep the food appropriate and add reasonable amounts.
Don’t put the tower in terrible soil
The whole point is to connect the worms and organic material with your garden.
Give the tower a good location where plants can benefit from the system.
Don’t keep digging everything up
I used to check mine constantly.
I’d open it.
Move things around.
Look for worms.
Close it.
Then do it again the next day.
Leave them alone!
Worms aren’t pets. They don’t need daily inspections.
Can You Build One for a Small Urban Garden?
Absolutely.
Actually, I think this is where a DIY worm tower makes the most sense.
If you have a tiny backyard, raised bed, patio garden, or small urban homestead, space is valuable.
You might not have room for a huge composting area.
A narrow worm tower can take up very little space.
You can grow tomatoes, peppers, herbs, greens, or other vegetables around it.
Just make sure local rules and garden conditions allow the materials and setup you’re using, especially if you’re gardening in a shared or rented space.
Frequently Asked Questions
Can I make a worm tower without buying expensive equipment?
Yep.
You can build a basic version with inexpensive or recycled materials. The main thing is making sure the container is suitable for garden use and has enough openings for the worms and soil organisms to move through.
How often should I feed my worm tower?
There’s no perfect schedule.
I check it every few days and only add food when the previous material is being broken down.
If you still see lots of untouched food, wait.
Will a worm tower attract rats or other pests?
It can if you put too much food in it or add the wrong materials.
That’s another reason I don’t use mine as a dumping ground. Keep food buried, don’t overload the tower, and use a secure cover.
Would I Build Another One?
Yep.
Actually, I’ve built more than one now.
Not because the first one failed.
Because I realized how useful they can be.
My garden has changed a lot over the years. I’ve gone from containers to raised beds, tried different composting methods, experimented with permaculture ideas, and learned that the simplest systems are often the ones I keep using.
A DIY worm tower is one of those systems.
It’s cheap.
It’s simple.
It doesn’t take much room.
And you get to turn some kitchen scraps into something useful instead of throwing them away.
Just don’t make the mistake I did and feed your worms half a watermelon at once.
Your nose will remember that mistake longer than your garden will.
If you’re starting a small backyard or urban homestead, give it a try. Start small, watch what happens, and adjust as you go. That’s really how most of my homesteading projects have worked.
And if your first DIY worm tower isn’t perfect, don’t worry about it. Mine wasn’t either. That’s part of learning this stuff.