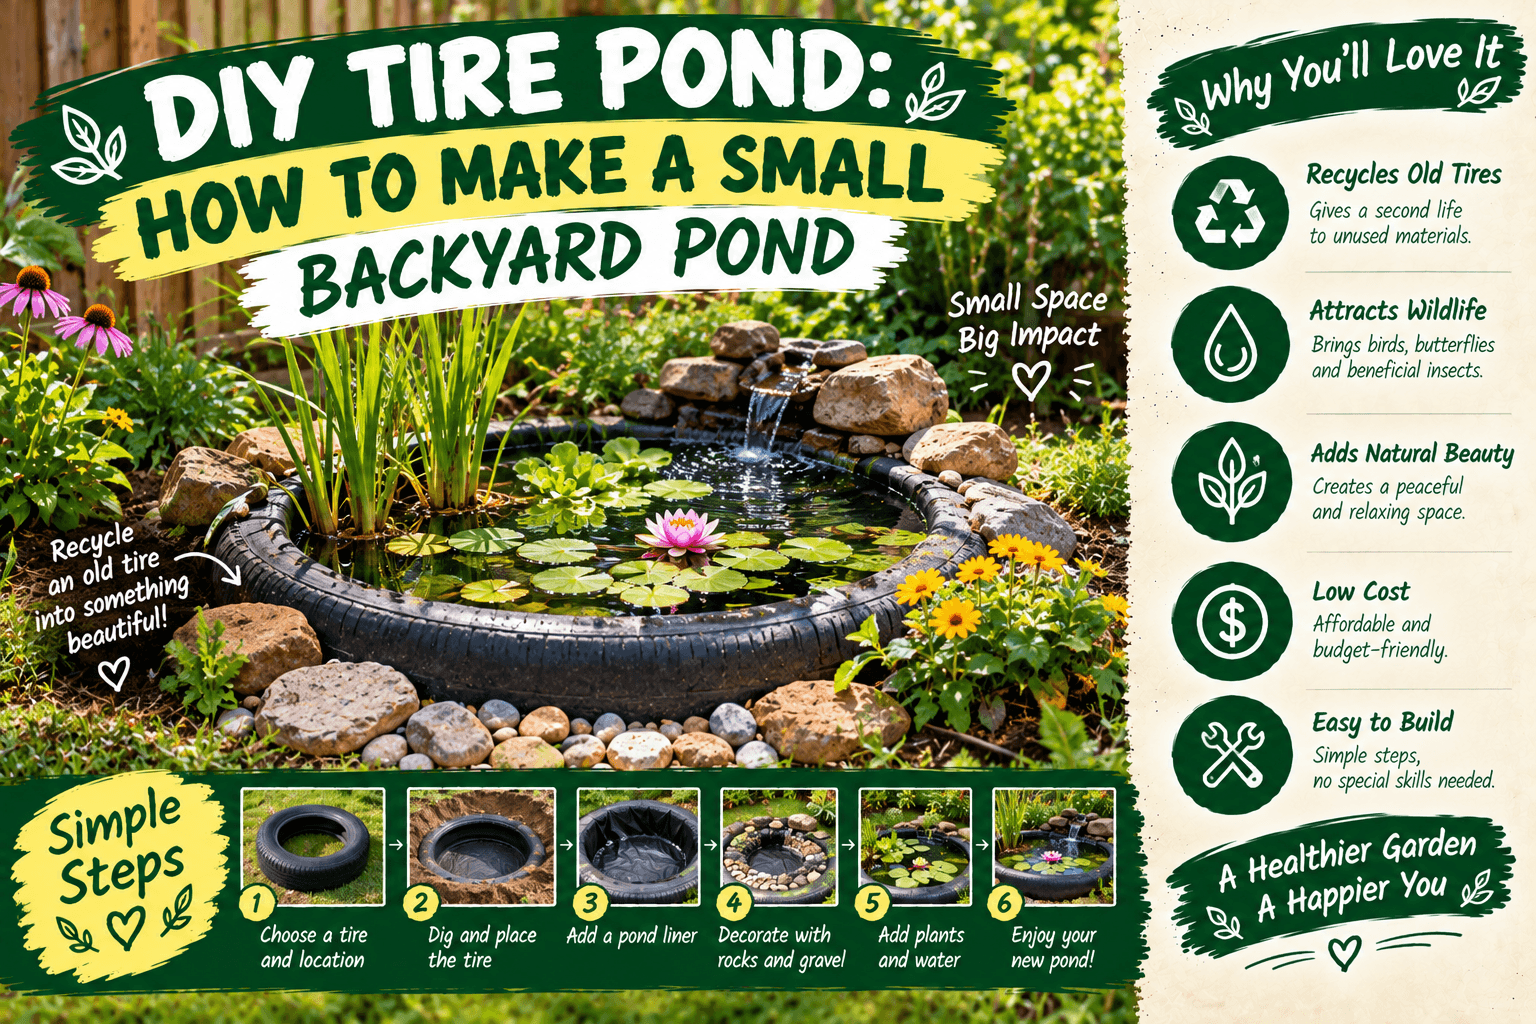
DIY Tire Pond: How I Turned an Old Tire Into a Little Backyard Pond
I never thought an old tire sitting behind my shed would become one of the nicest little features in my backyard. But that’s exactly what happened when I decided to build a DIY tire pond.
And I’ll be honest, the first version looked pretty rough.
It was basically a hole, an old tire, a piece of liner and way too much enthusiasm.
My wife looked at it and asked, “Are you actually going to make that look nice?”
Fair question.
The funny thing is, after a little work, it actually turned out pretty good. I added some rocks, a few plants and cleaned up the edges. Eventually it became a little water feature that brought birds, insects and plenty of curious looks from the neighbors.
If you’ve got an old tire and a small backyard, you can make something similar without building a giant pond or spending a fortune.
So lemme show you how I did mine, what I’d change next time, and a few things I wish somebody had told me before I started digging.
Why Build a DIY Tire Pond?
For me, it was mostly about using what I already had.
Homesteading has taught me to look at old stuff a little differently.
An old bucket can become a planter. A broken pallet can become a garden project. A leftover piece of lumber can become a shelf.
And an old tire?
Well, it can become a small pond.
A tire pond is also a good project if you don’t have room for a traditional backyard pond. You can make one fairly small and place it in a garden, near a seating area or somewhere that needs a little more life.
It doesn’t have to be fancy.
How Big Should Your Tire Pond Be?
The size depends on the tire you have.
I’ve seen people use everything from small car tires to huge tractor tires. For a first project, I’d personally keep it manageable.
Remember, once you fill a pond with water, it gets heavy. Very heavy.
So don’t put a large tire pond on a deck, balcony or questionable structure just because you like the look of it.
Mine went directly into the backyard soil.
Start with a tire size you can safely handle. You can always build another one later. Trust me, one little pond is enough work for your first weekend.
Where Should You Put a DIY Tire Pond?
I almost put mine right underneath a big tree.
It looked perfect there.
Then I thought about all the leaves.
Yeah… no thanks.
I moved it to a spot where it got some sunlight but wasn’t directly underneath a tree canopy.
Think about what will fall into the pond, how much sun it gets, where you’ll get water for topping it up, and how you’ll access it for cleaning.
You also want the area around the pond to be safe. Don’t put it somewhere that creates a walking hazard or where children or pets could easily fall into it.
What You’ll Need for a DIY Tire Pond
You don’t need a truckload of supplies.
Here’s what I used for my basic version:
- One clean, used tire
- A pond liner or suitable waterproof liner
- Shovel
- Level
- Some smooth rocks or stones
- Clean water
- Suitable aquatic or moisture-loving plants
- Gloves
- Optional decorative gravel
That’s about it.
I didn’t buy an expensive pond kit. The goal was to make a small backyard water feature, not build a resort swimming pool.
Step 1: Prepare the Tire
First, give the tire a good cleaning.
Mine had been sitting outside for a while, so it was full of dirt, leaves and some mystery goo that I really didn’t want touching my hands.
Gloves are your friend here.
Wash the tire and let it dry before putting it in place.
You also want to inspect it. If the tire is falling apart or has sharp exposed material, don’t use it for a project where people, pets or children might come into contact with it.
Step 2: Dig the Hole
This was the part that made me question my life choices.
Dig a hole slightly wider than the tire.
You want the tire to sit securely and fairly level.
Don’t worry about making the bottom perfectly beautiful. The important thing is that the tire sits firmly and doesn’t wobble.
Use a level if you have one.
I didn’t the first time.
I thought my eyes could tell if it was level.
My eyes were wrong.
Very wrong.
Water has a funny way of exposing your bad measuring skills.
Step 3: Put the Tire in the Ground
Once the hole is ready, set the tire inside.
Check the level again.
Then walk around it and make sure it isn’t rocking.
Add or remove soil underneath as needed until it sits securely.
This step is worth taking your time with because fixing a crooked pond after it’s full of water is a pain.
Step 4: Add the Pond Liner
This is the part that actually holds the water.
Lay the liner inside the tire and push it down into the center.
Don’t stretch it super tight.
Let the liner follow the shape of the tire.
You’ll have extra material around the top. That’s fine. Don’t cut everything immediately.
I made that mistake once with another water project. Cut too much and suddenly you’ve got a piece that’s too short.
Smooth out major folds, but don’t obsess over every wrinkle. Once you add water and rocks, most of it won’t even be noticeable.
Step 5: Add Water Slowly
Here’s another little trick I learned.
Don’t fill the pond as fast as possible.
Add water slowly and watch the liner.
As the weight increases, the liner can shift. If something looks wrong, this is the easy time to fix it.
Once it’s full, check the edges again.
Make sure the water isn’t flowing toward your house or another place where you don’t want standing water.
How I Hid the Tire
This is where the ugly tire started becoming a garden feature.
I used rocks around the outside edge.
A few larger stones helped hide the rubber, while smaller stones filled in the gaps.
You don’t need to cover the whole thing.
Just soften the edges so it looks like it belongs there.
I also planted some greenery around the outside.
That’s one of my favorite tricks in backyard projects. If something looks too manufactured, plants usually help.
What Plants Can You Put Around a Tire Pond?
This depends a lot on your climate.
Around the pond, I like plants that enjoy the moisture but aren’t going to completely take over the area.
You can look at suitable native moisture-loving plants in your area, along with appropriate aquatic plants if you’re putting anything directly into the water.
Don’t buy a random pond plant without checking how large it gets.
I learned that one too.
A tiny plant can look harmless at the garden center and turn into a monster later.
Should You Put Fish in a DIY Tire Pond?
Personally, I wouldn’t rush into this.
A small tire pond has limited water volume, which means temperatures and water conditions can change quickly.
That’s not the same as having a proper larger pond designed for fish.
I prefer using a small tire pond mainly as a water feature and habitat for insects and visiting wildlife rather than trying to turn it into a miniature fish farm.
If you’re considering fish, do your homework for your climate and the specific species first.
What About Mosquitoes?
Ah yes, the tiny flying vampires.
Standing water can become a mosquito problem if it’s neglected.
I don’t want a cute backyard pond that turns into a mosquito nursery.
Keep an eye on the water, remove leaves and debris, and don’t let the pond become a forgotten bucket of stagnant water.
Depending on your setup, circulation or other appropriate mosquito-management methods may help.
If you have young children around, remember that even a small amount of water can be a drowning hazard. Supervision and a safe location matter more than making the pond look pretty.
My Biggest DIY Tire Pond Mistake
I made the pond too exposed.
It looked great from the patio, but it was sitting in a spot where leaves and debris blew directly into it.
After a windy week, I was scooping leaves out of the pond every other day.
Eventually I added more plants around one side and moved a couple things nearby to reduce the amount of debris blowing straight into the water.
It got much easier to maintain.
How I Keep My Tire Pond Clean
I don’t spend hours cleaning it.
Every so often I check the water and remove leaves or anything else that doesn’t belong there.
I keep an eye on algae too.
A little natural growth doesn’t bother me. But if the whole thing starts turning into green soup, something needs attention.
I also check the liner and the edges of the pond from time to time.
Small problems are easier to fix before they become big problems.
DIY Tire Pond: My Simple Build Process
Pick a safe, practical spot with suitable sunlight and access for maintenance.
Remove dirt and inspect it carefully before using it.
Make a stable space where the tire can sit securely.
Check the tire from several directions before adding water.
Position the liner carefully and leave extra material around the edge.
Fill slowly, then hide the edges with suitable stones and plants.
Can a Tire Pond Fit Into a Permaculture Backyard?
I think it can, especially if you treat it as one small part of the garden rather than the entire project.
Water features can provide another little habitat in a backyard. They can also make a garden feel more alive.
I like putting projects like this near areas where I already have plants, compost and other garden activity.
You don’t need a huge homestead to think this way.
Even a small urban backyard can have little systems working together.
Is a DIY Tire Pond Worth the Work?
For me, yes.
But I wouldn’t build one because you think it will be completely maintenance-free.
It’s still a pond.
Water gets dirty. Leaves fall. Plants grow. Things happen.
The difference is that a tire pond is small enough that you can usually manage it without turning the project into a full weekend job every month.
And honestly, sitting outside with coffee and watching birds come investigate the water is pretty hard to beat.
Mini FAQ About DIY Tire Ponds
Yes. That’s one of the reasons I like the idea. A single tire can create a very small water feature without needing a large excavation. Just choose a safe location and remember that even small ponds need maintenance and safety precautions.
If you want the tire to hold water, you’ll generally need a suitable waterproof liner or another properly designed waterproof container system. The liner should be installed carefully so it isn’t damaged by sharp edges or stones.
I wouldn’t automatically add fish to a small tire pond. The water volume is limited and conditions can change quickly. For a simple backyard project, I prefer plants and natural visitors instead.
What I’d Do Differently If I Built Another One
First, I’d pick the location even more carefully.
Second, I’d have all my rocks and plants ready before filling the pond.
And third, I’d check the level about five times.
I’m serious about that last one.
A crooked tire pond might seem like a tiny problem until you fill it with water and see that the waterline is noticeably higher on one side.
Then you start digging again.
Ask me how I know.
My Final Thoughts on Building a Tire Pond
I like backyard projects that don’t require a huge budget.
That’s probably why this little pond became one of my favorite projects.
It took an old tire that wasn’t doing anything and turned it into something useful and actually pretty nice to look at.
It also reminded me of something I keep learning over and over with homesteading: you don’t need everything to be perfect.
Start with what you’ve got.
Make it safe. Make it practical. Then improve it as you learn.
If you’ve got an old tire sitting around, a small backyard and a weekend to spare, a DIY tire pond might be a fun little project to try.
Give That Old Tire a Second Life
Don’t worry if your first attempt isn’t magazine-perfect. Mine definitely wasn’t.
Start small, make sure the location is safe, use a proper liner, keep an eye on the water, and let your garden slowly grow around it.
That’s how most of my backyard projects happen anyway. A little experimenting, a couple mistakes, and hopefully something useful at the end.
If you build your own DIY tire pond, I’d love to hear how it turned out. And if something goes wrong, don’t worry… I’ve probably already done it.