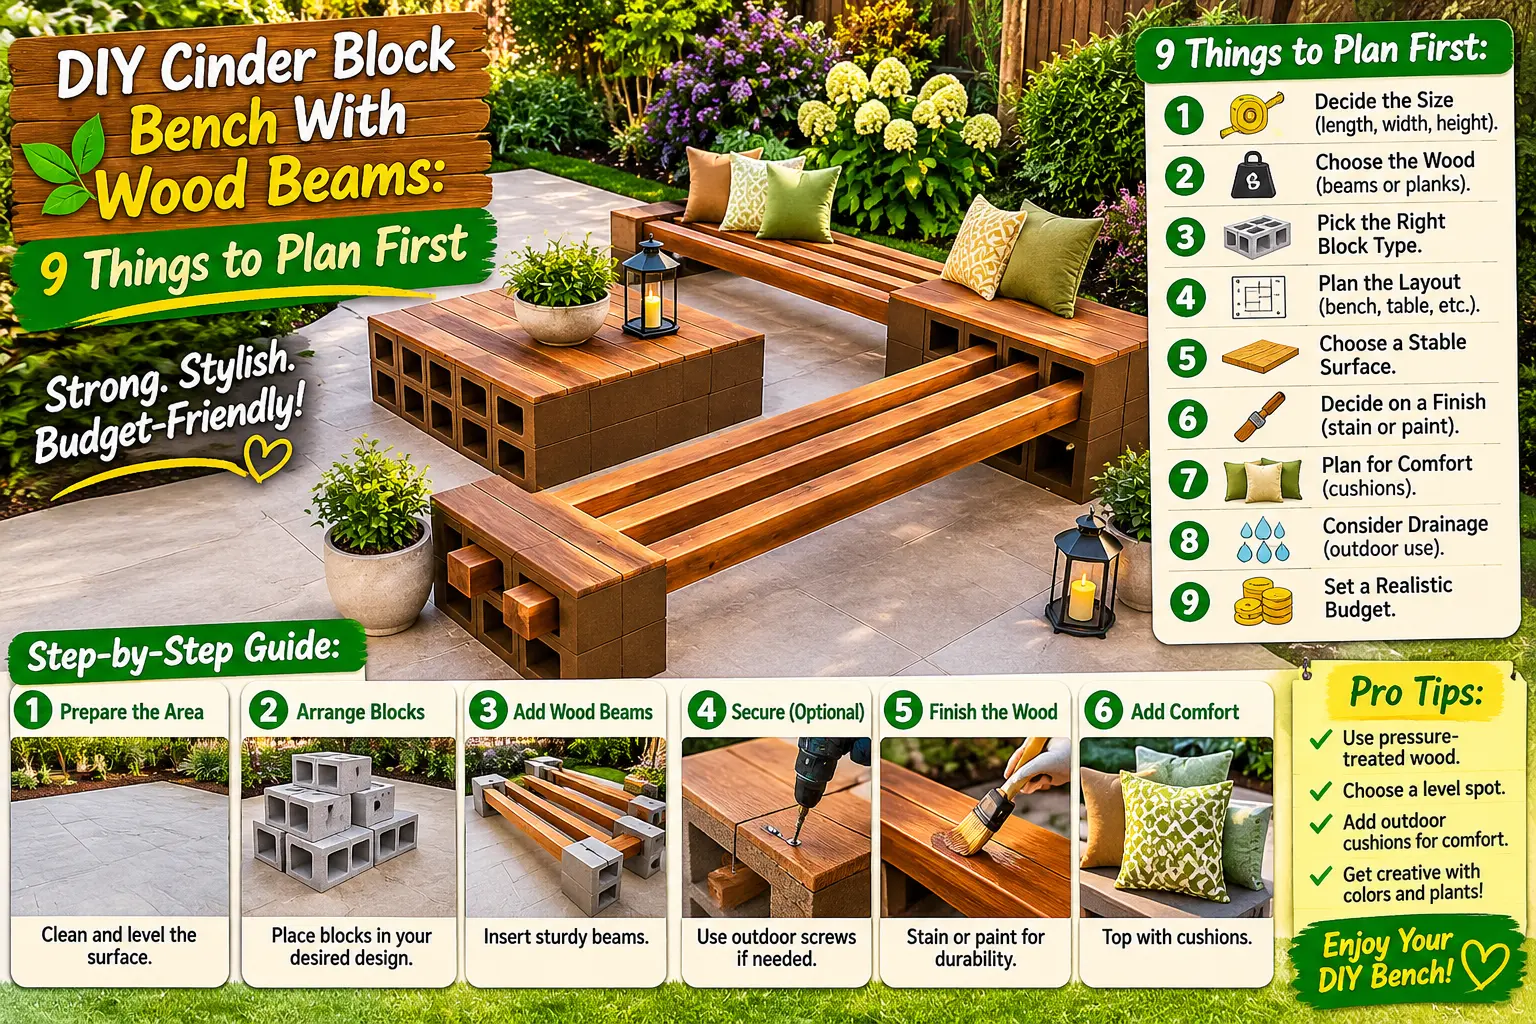
A cinder block bench with warm wood beams can turn a plain patio into a simple outdoor seating area with a modern-rustic look. The concept is appealing because the materials are familiar and the design looks easy: stack concrete blocks at each end, pass wood beams between them, and add a matching table.
But the finished photograph hides the details that determine whether the bench feels solid after one season or starts shifting, rocking, splitting, and trapping water.
Quick answer
Start with a flat structural base, build block supports that cannot rock or slide, use exterior-rated lumber sized for the actual span and load, and positively secure the wood so it cannot pull out of the masonry openings. Keep wood ends dry and make the finished seat comfortable enough for real use—not just attractive in a photo.
What This Patio Bench Design Is Doing
The inspiration image uses three simple elements:
- Concrete masonry blocks as the side supports
- Long wood beams as the seat
- A matching low block-and-wood table
The repeated materials make the seating area feel coordinated without needing complicated woodworking.
That visual idea is worth borrowing. The hidden support details are the part that should be redesigned for your patio.
1. Start With a Flat, Stable Base
A heavy outdoor bench is only as stable as the surface under the blocks.
The inspiration image appears to be built on a finished patio, which is much more predictable than loose soil or mulch.
Good locations include:
- A sound concrete patio
- Level pavers over a properly prepared base
- Another hardscape surface designed to carry outdoor furniture
Avoid placing the blocks directly on soft topsoil where one end can settle more than the other after rain.
2. Do Not Assume Loose Blocks Are Automatically Stable
Concrete blocks are heavy, but weight alone does not prevent every type of movement.
A bench support can experience:
- Sideways pushing when someone sits down
- Uneven loading when one person sits on an end
- Children climbing on the seat
- People pulling the bench while cleaning the patio
- Thermal and moisture movement outdoors
Concrete masonry guidance for actual dry-stack construction relies on specific alignment, support, bonding, grouting, or interlocking details depending on the system. Standard loose blocks stacked decoratively should not automatically be assumed to provide the same performance.
Do not use the Pinterest photo as a structural plan. We cannot see whether the blocks are bonded, anchored, reinforced, or mechanically connected.
3. Measure a Comfortable Seat Height First
Do not let the dimensions of the masonry block automatically determine the final seat height.
Most patio seating feels comfortable when the finished seat is somewhere around ordinary chair height, but the exact target depends on:
- The thickness of the beams
- Whether cushions will be added
- The height of the table
- Who will use the bench
Mock up the height with temporary blocks or scrap lumber before committing to the final layout.
4. Beam Span Matters More Than Appearance
The long wood members in the image look substantial, but you cannot choose beam thickness from appearance alone.
A seat beam needs to resist bending under concentrated human loads.
Required size depends on:
- Unsupported span
- Wood species
- Wood grade
- Beam orientation
- Number of beams
- Expected load
- Outdoor moisture conditions
A longer bench may need an additional center support rather than simply using the same beams across a much larger opening.
5. Do Not Rely on Friction to Hold the Wood in Place
One of the most common DIY versions of this project simply slides beams through the hollow cores of concrete blocks.
That may look secure when nobody is sitting on it, but the wood can still:
- Slide lengthwise
- Twist
- Lift
- Move as the wood shrinks and swells
Plan a positive connection or restraint appropriate to the actual design rather than expecting a tight fit in the block opening to remain tight forever.
6. Use Wood Intended for Outdoor Exposure
Outdoor bench beams repeatedly absorb and release moisture.
Penn State notes that wood responds continuously to surrounding humidity by gaining or losing moisture. That movement can change dimensions and contribute to checking, twisting, or cracking if the material and details are poorly suited to the environment.
Choose lumber appropriate for exterior exposure, such as:
- Exterior-rated preservative-treated lumber where appropriate
- Naturally durable species suitable for your climate
- Properly finished exterior lumber
7. Pay Special Attention to the Beam Ends
The ends of the beams in this design sit close to or inside masonry.
That area can dry slowly after rain.
Penn State guidance on exposed lumber notes that cracked and weathered beam ends can become entry points for moisture and insects.
Avoid trapping the wood in a pocket that stays wet for long periods.
Follow the lumber manufacturer’s recommendations for sealing cut ends and maintaining outdoor finishes where applicable.
8. Leave Small Drainage Gaps Between Seat Beams
The multiple narrow beams shown in the inspiration photo have another advantage: small gaps between them allow water to drain instead of sitting across one broad flat surface.
Do not make the gaps so wide that they become uncomfortable or catch objects, but leave enough room for:
- Rainwater drainage
- Wood movement
- Cleaning
- Airflow
9. Round or Sand Every Seating Edge
Construction lumber often has sharp edges and splinters that are fine in framing but uncomfortable on furniture.
Before finishing the bench:
- Sand the top surfaces
- Ease sharp corners
- Remove splinters
- Check for protruding fasteners
- Inspect the ends for cracks
What About the Matching Coffee Table?
The low center table uses the same visual language and can make the seating area feel intentional.
A table generally carries lower dynamic loads than a bench, but it still needs a stable base and flat top.
Avoid creating a top that rocks whenever someone sets down a drink.
Should the Blocks Be Painted?
They can be, but use a finish intended for exterior masonry.
The blocks need to be clean and sufficiently dry, and any coating should be applied according to its surface-preparation instructions.
Dark brown, charcoal, or black can visually hide standard gray block and create a more furniture-like appearance.
A Better Build Order
- Choose the patio location.
- Measure the desired finished seat height.
- Choose the finished bench length.
- Determine a suitable beam span and support layout.
- Prepare a level hard base.
- Build or secure the masonry supports.
- Cut and prepare exterior wood.
- Seal cut ends where required.
- Install the beams with positive restraint.
- Check the entire bench for rocking or movement.
- Sand and finish the seating surfaces.
- Add cushions only after the structure is stable.
What the Pinterest Design Gets Right
- Uses a small number of repeating materials
- Creates clean modern lines
- Leaves drainage gaps between seat slats
- Coordinates bench and table materials
- Uses heavy visual bases with warmer wood seating
- Works well on a hard patio surface
What the Photo Cannot Tell You
| Visible in the Photo | Hidden Detail You Still Need |
|---|---|
| Stacked blocks | How the blocks resist sliding and overturning |
| Wood through block openings | Beam span and positive restraint |
| Thick timber appearance | Species, grade, structural capacity, exterior suitability |
| Flat patio | Actual condition and bearing capacity of the base |
| Dark block finish | Coating compatibility and weather resistance |
7 Common Cinder Block Bench Mistakes
1. Building directly on soft soil
Uneven settlement can make the bench rock or twist.
2. Assuming the block weight prevents movement
The support arrangement still needs to resist sliding and tipping.
3. Choosing beams by appearance alone
Span, wood grade, moisture exposure, and loading determine what is suitable.
4. Letting wood sit wet inside masonry
Detail the ends so they can dry and inspect them periodically.
5. Relying only on a tight fit
Wood changes dimensions outdoors. Use a positive restraint system.
6. Leaving sharp corners and splinters
This is furniture, so the surfaces need to be comfortable to touch.
7. Making the bench too long without center support
As the span increases, bending becomes much more important. Add support or redesign the beams rather than simply extending the same detail.
Cinder Block Bench FAQ
Can you make an outdoor bench from cinder blocks?
Yes, concrete masonry and exterior wood can be combined into outdoor seating, but the support layout, base, beam span, and connections still need to be stable and suitable for human loads.
Do you need to glue the blocks together?
Do not assume ordinary loose stacking is sufficient. The appropriate bonding or anchoring method depends on the block arrangement and design. Use a method intended for the actual masonry system rather than treating construction adhesive as a universal structural solution.
Can wood simply slide through cinder block holes?
It may form part of a design, but the fit alone does not prove adequate beam support or resistance to sliding and twisting. Plan a positive connection or restraint.
What wood should I use?
Use lumber appropriate for exterior exposure and the required structural span. Species, grade, treatment, dimensions, and local moisture conditions all matter.
Can the bench stay outside all year?
Outdoor-rated materials can remain outside, but inspect the wood finish, beam ends, masonry, and connections periodically. Climate and freeze-thaw conditions affect long-term maintenance.
Should there be gaps between the wood beams?
Small gaps help rainwater drain and allow for wood movement. Keep them narrow enough for comfortable seating.
The Bottom Line
A block-and-wood patio bench can be an attractive DIY landscaping project because it uses simple shapes and durable-looking materials.
The Pinterest image is useful for the visual concept: dark masonry, warm wood, repeated lines, and a matching low table.
What you should not copy blindly is the hidden structure. The bench still needs a stable base, secure masonry supports, properly sized exterior lumber, and a connection that keeps the beams from moving.
Keep the look. Engineer the support details for the actual patio and the people who will use it.
Sources
- Concrete Masonry & Hardscapes Association — Surface Bonded Concrete Masonry Construction
- Concrete Masonry & Hardscapes Association — Design and Construction of Dry-Stack Masonry Walls
- Penn State Extension — Understanding Equilibrium Moisture Content
- Penn State Extension — Guidance on Weathering of Exposed Lumber and Beam Ends