The first time I tried how to grow ginger in water, I honestly thought it was going to be one of those easy kitchen experiments where you stick a piece of ginger in a glass, forget about it for a few days, and suddenly you’ve got a jungle growing on your windowsill.
Well… not exactly.
I learned pretty quickly that ginger isn’t like a green onion where you can keep the roots sitting in water and expect endless new food. Ginger is a rhizome, which is basically an underground stem, and the new plant grows from buds or “eyes” on that rhizome. You can use water to encourage a ginger piece to wake up and start growing, but keeping the entire rhizome permanently submerged isn’t the best way to grow a big ginger harvest. Ginger eventually wants a growing medium with good drainage.
Still, starting ginger in water can be a fun little project, especially if you live in an apartment, have a small urban homestead, or just want to watch those little buds come alive before moving the plant into a pot.
And trust me, watching a piece of grocery-store ginger suddenly grow a green shoot is pretty darn satisfying.
What You Actually Need to Grow Ginger in Water
You don’t need much for this experiment.
That’s one reason I like it.
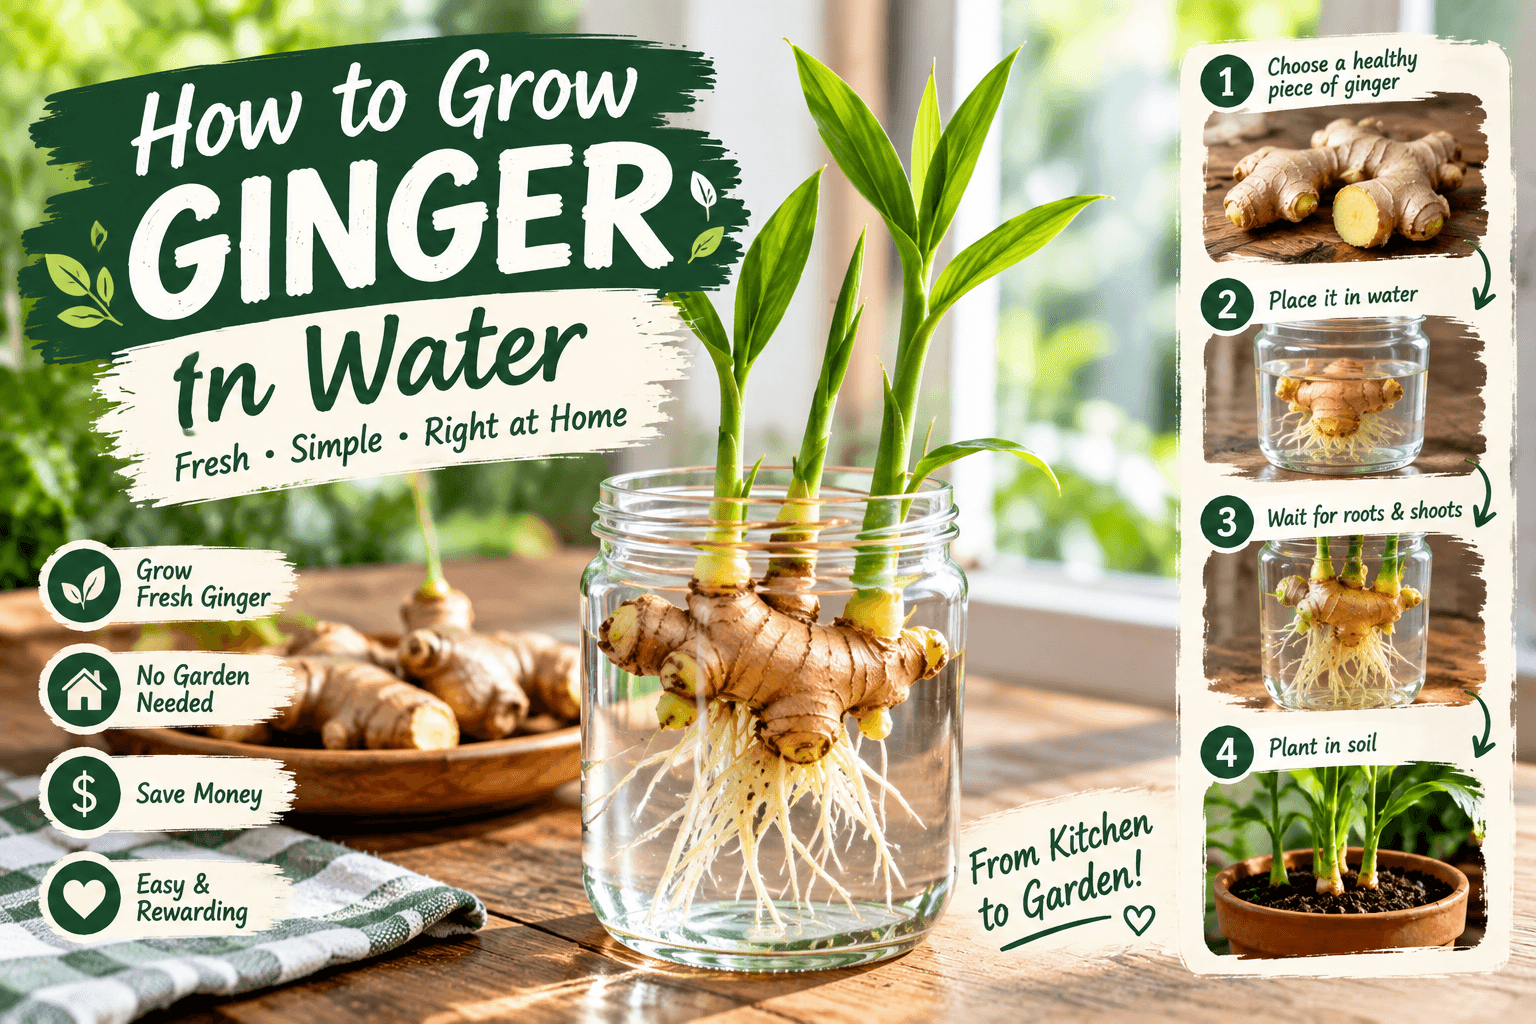
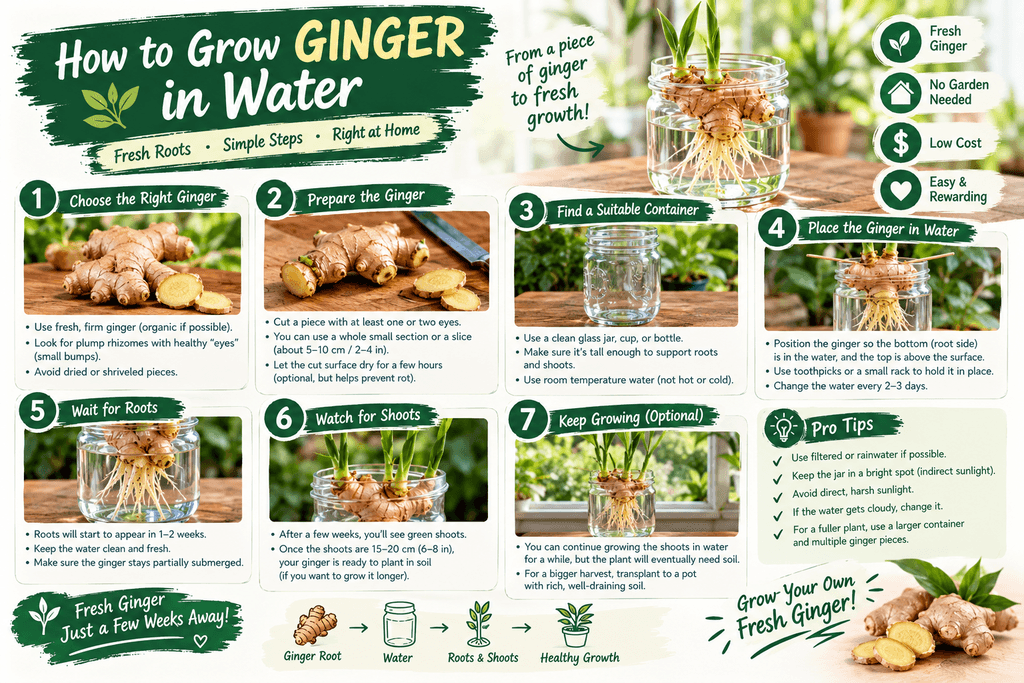
I start with a fresh ginger rhizome from the grocery store. I look for one that’s firm, plump, and has several little bumps or eyes on it. I don’t want anything soft, moldy, shriveled, or covered with dark rotten spots. Extension guidance also recommends choosing healthy rhizomes with visible buds because those buds are where new shoots develop.
Then I grab a shallow container, a clean glass or jar, and some clean water.
That’s basically it.
I don’t fill the whole container with water and drown the ginger. That’s where I made one of my early mistakes.
I thought, “Well, if some water is good, more water must be better.”
Garden logic doesn’t work that way.
Ginger likes moisture, but the rhizome can rot when conditions stay too wet. UF/IFAS specifically warns that ginger needs regular moisture but doesn’t tolerate soggy roots.
Pick the Right Ginger From the Grocery Store
This is probably the most important part.
Walk into the grocery store and don’t just grab the first piece of ginger you see.
Look at it.
You want a piece that feels firm when you gently press it. Look for small growth buds. They look like little knobs or points on the surface. Some pieces already have tiny greenish or pale shoots starting, and those are especially interesting because the ginger has already decided it’s time to grow.
I’ve had much better luck starting with plump ginger than with an old, dried-out piece.
One time I grabbed a piece that looked fine from the outside but was soft underneath. I put it in water anyway because, well, I was hopeful.
A few days later it smelled terrible.
That little experiment ended in the compost pile.
Lesson learned.
Don’t try to rescue rotten ginger. Start with healthy material.
Ginger sold for cooking can be used as planting material, although specialist planting rhizomes may offer more predictable results.
How to Prepare Ginger for Water
If you’ve got a large ginger rhizome, you don’t need to use the entire thing.
You can cut it into smaller sections, but each section should have at least one healthy growth bud. Extension recommendations commonly use pieces around 1–3 inches depending on the growing method, with buds needed for new shoots.
I like keeping my first pieces fairly chunky.
Why?
Because I’m not trying to win a contest for smallest piece of ginger.
I want enough healthy rhizome to support the first growth.
If you cut the ginger, let the cut surface dry for a few days before planting it. This helps reduce the chance of rotting. UF/IFAS recommends allowing cut rhizome pieces to dry or cure before planting.
For a simple water-starting experiment, I’d rather use an intact small piece that already has a few eyes than cut up my whole ginger supply.
Save some for cooking.
You’ll thank yourself later.
So How Do You Actually Grow Ginger in Water?
Here’s the simple part.
Put your ginger piece into a shallow container and add enough water to keep the lower part of the rhizome moist.
Don’t completely submerge it.
I want the upper surface and buds exposed to air while the bottom gets access to moisture.
Think of it like sitting on the edge of a swimming pool.
You want your feet wet.
You don’t want to sleep underwater.
Place the container somewhere warm with bright, indirect light. Avoid putting the ginger directly against a hot window where the water can heat up and the rhizome can become stressed.
Then be patient.
That’s the part gardeners hate.
We want results tomorrow.
Plants don’t care.
Change the Water and Watch for Problems
I don’t let the water sit forever.
If it becomes cloudy, smells bad, or develops slime, something isn’t right. Dump it out, clean the container, rinse the ginger carefully, and start again with fresh water.
Don’t ignore a bad smell.
A healthy plant experiment should not smell like something died behind the refrigerator.
Also watch the ginger itself.
If it becomes mushy, black, or obviously rotten, I’d throw that piece away rather than trying to save it.
This is one of those times where being sentimental about a $2 piece of ginger isn’t worth it.
Start again.
When Will Ginger Start Growing?
This is where I need to warn you about something.
Ginger can be slow.
Don’t expect a green shoot in two days just because you saw somebody online do it.
Ginger is a warm-season, long-season plant. Extension information notes that sprouting can be slow and uneven, particularly when temperatures aren’t warm enough. In controlled pre-sprouting systems, shoots may take a month or two to appear.
So if nothing happens for a while, don’t immediately assume you’ve failed.
Give it warmth and patience.
But don’t confuse patience with ignoring obvious rot.
There’s a difference.
If the ginger is firm and healthy, wait.
If it’s turning into mush, quit.
When the Little Green Shoot Appears
This is my favorite part.
One morning you’ll walk past the container and suddenly notice a little green point sticking out of the ginger.
It looks almost ridiculous.
You start checking it every few hours.
“Yep, still growing.”
Then the shoot gets taller.
And taller.
Pretty soon you’ve got a little ginger plant sitting on your kitchen counter.
That’s when I usually move toward the next stage: planting it in a container with well-drained growing medium.
This is important because water is great for getting the process started, but ginger isn’t normally grown as a permanently submerged plant. The edible rhizomes develop underground, and ginger does best in moist but well-drained soil or growing media.
Moving Ginger From Water Into a Pot
When your ginger has started producing a healthy shoot and roots, it’s time to give it a real home.
I like a wide container rather than a tiny narrow pot.
Ginger’s underground rhizomes expand sideways, so you want room for them to develop.
Use a good-quality, well-drained potting mix. Don’t pack it down like you’re building a sidewalk.
Plant the rhizome shallowly, with the growing buds positioned upward. UF/IFAS recommends planting ginger rhizomes roughly 1–2 inches deep depending on the production system.
Then water it.
Keep the growing medium moist, but don’t leave the plant sitting in water.
That’s the whole balancing act.
Moist.
Not swampy.
Ginger Likes Some Shade
This surprised me when I first started growing ginger.
I used to think more sun was always better.
That’s not true for everything.
Edible ginger generally performs well in partial shade, and UF/IFAS notes that ginger can struggle when exposed to too much intense sunlight, with leaves developing brown tips under excessive sun stress.
So if you’ve got a backyard garden, think about a location with gentle morning sun and some protection from harsh afternoon heat.
If you’re growing in a container, this is easy because you can move the pot.
That’s one reason I love container gardening.
If you put something in the wrong place, you can sometimes just pick it up and move it.
Try doing that with a fruit tree.
You’ll need a chiropractor afterward.
Don’t Expect a Giant Ginger Harvest Quickly
This is another thing I wish I knew earlier.
Growing ginger is not a fast-food crop.
The plant needs time to develop its underground rhizomes. Depending on what you’re harvesting for, ginger can take several months. UF/IFAS describes roughly five months for young “baby” ginger and around seven to ten months or more for more mature rhizomes, depending on the production system and conditions.
So if you’re looking for something you can grow today and harvest next weekend, ginger isn’t it.
Grow radishes.
Grow lettuce.
Grow some herbs.
Ginger requires patience.
But there’s something pretty cool about putting one little grocery-store rhizome into a pot and eventually digging up a bigger cluster of ginger underneath the soil.
That’s the payoff.
My Biggest Ginger Mistakes
I’ve made a few.
The first was too much water.
The second was putting it somewhere that was too dark.
The third was getting impatient.
The fourth was planting it in a container that was too small.
And the fifth was expecting every piece of ginger to grow.
They don’t.
Some pieces simply won’t cooperate.
That’s gardening.
You can do everything reasonably well and still have one plant decide it wants to become compost.
Don’t take it personally.
Can You Grow Ginger Completely in Water?
This is where I want to be honest.
If by “grow ginger in water” you mean start a ginger rhizome in water and watch it sprout, yes, that’s a fun experiment.
If you mean keep the ginger permanently sitting in water and produce a large harvest, that’s not the method I’d recommend for a home grower.
Ginger’s edible part is an underground rhizome, and successful production generally uses well-drained soil or another suitable growing medium rather than keeping the rhizome submerged.
You might see beautiful hydroponic ginger systems online, and those are possible with the right equipment and management.
But that’s different from putting ginger in a glass of water on your kitchen counter.
Don’t confuse the two.
Can I Grow Ginger in an Apartment?
Absolutely.
This is actually one of the reasons I like ginger for urban homesteading.
You don’t need a huge backyard.
You can start the rhizome indoors and eventually move it into a container. A sunny or bright sheltered area can work, depending on your climate and light conditions.
If you have a balcony, patio, or small garden, a container can be enough.
Just remember that ginger likes warmth and moisture, but it also needs good drainage.
A container with no drainage holes is basically a bathtub.
Don’t plant ginger in a bathtub.
I know somebody will try it.
What Can You Do With Homegrown Ginger?
Once you’ve grown ginger successfully, you have plenty of options.
Fresh ginger is fantastic in stir-fries, soups, sauces, tea, marinades, and homemade drinks. You can also preserve it, dry it, freeze it, or use young ginger when it’s tender.
I like keeping some in the freezer.
That way, when I need ginger for cooking, I don’t have to run to the store every time.
And there’s something satisfying about pulling out ginger that you actually grew yourself.
It might not look perfect.
Mine certainly doesn’t.
But it tastes good.
And that’s what matters.
My Simple Ginger Routine
If you’re trying how to grow ginger in water for the first time, don’t overcomplicate it.
Here’s what I’d do:
- Start with a firm, healthy ginger rhizome.
- Look for several visible buds or “eyes.”
- Use a shallow container with clean water.
- Keep only the lower portion moist rather than drowning the whole rhizome.
- Give it warmth and bright, indirect light.
- Change dirty or cloudy water.
- Watch carefully for rot.
- Once it begins rooting and sprouting, move it into a well-drained container.
- Keep the soil moist but not waterlogged.
- Give it plenty of time to develop.
That’s it.
No expensive grow room.
No complicated equipment.
No need to turn your kitchen into a laboratory.
Frequently Asked Questions
Can I grow ginger from store-bought ginger?
Yes. Fresh grocery-store ginger can be used as planting material if the rhizome is healthy and has viable buds. Extension guidance specifically notes that grocery-store ginger can be planted.
How long does ginger take to grow?
It depends on your growing conditions and whether you’re harvesting young or mature ginger. Expect several months rather than several weeks. Mature rhizomes commonly require a long growing season.
Does ginger need full sun?
Not necessarily. Ginger generally does well in partial shade, particularly where intense afternoon heat can stress the plant.
Why is my ginger turning soft in water?
The most likely problem is excess moisture combined with poor airflow or an unhealthy rhizome. Remove the soft or rotten piece and start again with healthy ginger. Ginger doesn’t like staying waterlogged.
Can I keep growing ginger after harvesting it?
Yes. Healthy rhizome pieces can be saved for another growing season. Choose healthy sections with buds and handle them carefully so they don’t rot.
Give It a Try
If you’ve got a piece of ginger sitting in the refrigerator right now, go take a look at it.
Maybe it’s already got little eyes starting.
Don’t throw it away.
Put it aside and give this experiment a try. How to grow ginger in water is a simple way to watch the first stage of growth, especially if you’re new to gardening or you’re working with a small urban space. Just remember that water is best treated as a starting point, not a substitute for the well-drained growing conditions ginger needs for a real harvest.
And don’t get discouraged if the first piece doesn’t work.
Mine didn’t.
Then another one did.
That’s gardening for you. You try, you mess up, you learn something, and then you try again.
If you get a ginger shoot growing on your kitchen counter, take a picture of it. There’s something oddly exciting about seeing that first little green shoot appear.
And yes, you’ll probably check it every morning with your coffee.
I still do.