DIY Backyard Bowling Alley: How I Built One at Home
Want a fun project for your backyard? A DIY backyard bowling alley can be a lot easier to build than you might think. You do not need a huge yard or a fancy setup. With some basic materials, a little work, and enough space, you can make a simple bowling lane right at home.
I decided to try it after seeing my kids roll a ball across the yard one afternoon. It was supposed to be a quick game. Instead, we ended up spending most of the afternoon trying to knock over old plastic bottles.
That got me thinking. Why not build a real lane?
So I started looking around the backyard. I had some leftover boards, a few pieces of outdoor wood, and plenty of tools that were already sitting in my shed.
The result was not perfect. Honestly, my first lane had a few bumps that made the ball do some very strange things. Still, everyone had fun.
That is the whole point.
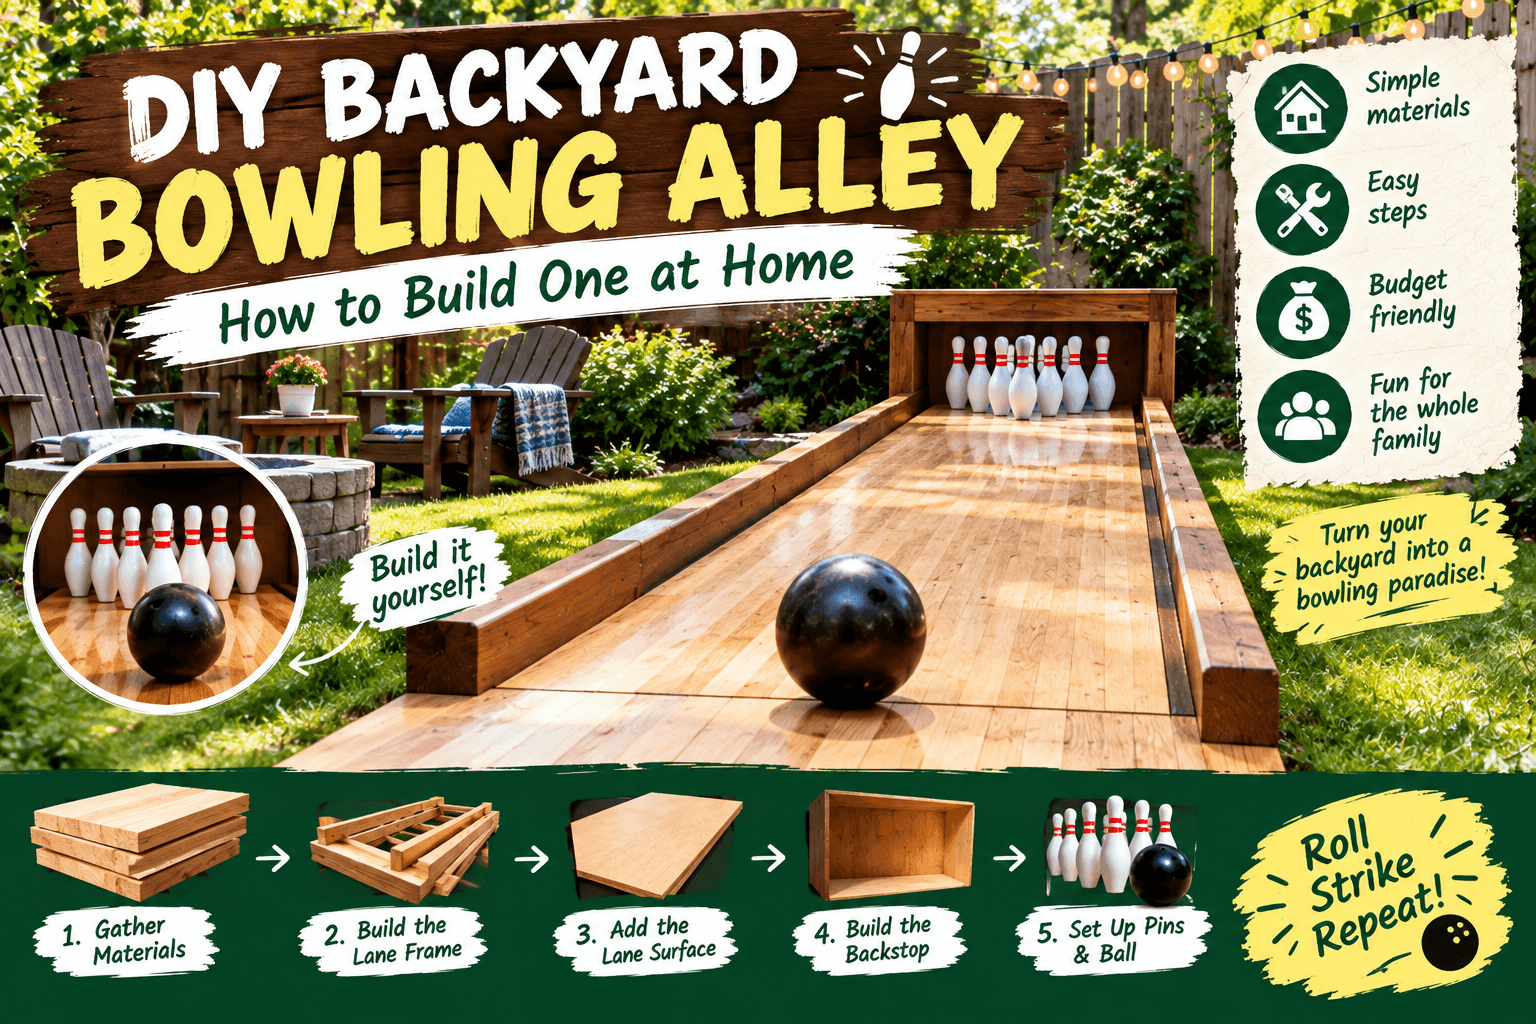
In this guide, I will show you how to build a DIY backyard bowling alley with simple materials. I will also share what worked, what did not, and what I would change next time.
How Much Space Do You Need?
First, look at the space you have before buying anything.
A full-size bowling lane is much longer than most backyards can handle. You do not need to copy one exactly, though. A shorter backyard lane works just fine for family games.
For a simple home setup, try to find an area that is:
- Long and fairly straight
- Level or close to level
- Free from large rocks and tree roots
- Easy to reach from the house
- Wide enough for players to stand safely
Even a shorter lane can be fun. In fact, a compact lane may be easier for younger kids.
What You Need for a DIY Backyard Bowling Alley
You can build a basic lane without buying expensive bowling equipment.
Here are the main things I used:
- Outdoor boards or treated lumber
- Wood screws
- Gravel or crushed stone
- Sand
- Outdoor plywood or decking boards
- Wood stakes
- A level
- A tape measure
- A shovel
- A drill
- A rake
- Bowling pins or plastic pins
- A bowling ball
Of course, your list may change based on the size of your lane.
You can also reuse materials. I like doing this whenever I can because backyard projects can get expensive fast.
Step 1: Mark Out the Lane
Start with the layout.
Use a tape measure and mark both sides of the lane with stakes. Then run a string between the stakes. This gives you a straight line to follow.
Take your time here. A crooked lane will cause problems later.
Once the lines are marked, walk along the entire area.
Look for roots, rocks, holes, and soft spots. Remove anything that could cause the lane to move or sink.
If the ground slopes badly, you may need to remove some soil from the higher side.
Step 2: Prepare the Ground
Next, clear the grass and loose soil from the lane.
You do not need to dig a huge hole. However, you want a firm base that will not move every time someone walks near the lane.
After removing the grass, rake the area smooth.
Then add a layer of gravel or crushed stone. Spread it evenly and pack it down.
This layer helps with drainage. It also gives the lane a stronger base.
Step 3: Make the Bowling Lane
Now comes the fun part.
Place your outdoor boards, plywood, or decking material over the prepared base. The goal is to create a smooth surface for the ball.
If you are using several boards, make sure the joins are tight.
Also, check the surface with a level as you work.
A tiny slope may not look like much. Once you roll the ball, though, you will notice it right away.
Keep the Surface Smooth
For a better roll, sand rough areas before using the lane.
Do not leave screws sticking up. Make sure every board is secure.
For an outdoor project, you also need to think about rain. Water can damage untreated wood and cause it to bend.
Using outdoor-rated materials will help your lane last longer.
Step 4: Build Simple Side Rails
Side rails are useful because they help keep the ball on the lane.
They do not need to be tall. A simple wooden edge can work well.
Attach the rails along both sides of the lane. Keep them low enough that players can easily reach over them if needed.
For kids, side rails can make the game much more enjoyable. Beginners will not spend half the game chasing balls across the yard.
Step 5: Create the Bowling Area
At the end of the lane, you need a place for your pins.
Build a small flat platform or use a sturdy piece of outdoor material.
Then mark the area where the pins will stand.
You can use real bowling pins if you already have them. However, plastic pins work great for a backyard setup.
You can even make your own pins from plastic bottles.
Step 6: Add a Simple Starting Line
Now mark the place where players should stand.
You can paint a line on the wood or attach a small strip of outdoor tape.
Leave enough room behind the line so players can step back safely.
This small detail makes the setup feel much more like a real bowling lane.
Step 7: Test Your DIY Backyard Bowling Alley
Before inviting everyone over, test the lane yourself.
Start with a slow roll.
Watch how the ball moves.
If it turns sharply, stop and find out why.
Sometimes the problem is an uneven board. Other times, the base underneath has moved.
Fix those small problems now. It is much easier than taking the lane apart later.
How I Made Mine More Fun
Once the basic lane was ready, I started adding little extras.
For example, we created a simple scoreboard using an old piece of wood. We also added outdoor lights so we could play in the evening.
That turned out to be one of my favorite parts.
There is something pretty funny about standing in your backyard at night, holding a bowling ball, while your neighbor wonders what on earth you are building.
We also made different rules for different players.
- Kids could use a lighter ball.
- Adults had to bowl from farther back.
- Everyone got two rolls per round.
- A strike earned a silly victory dance.
The last rule was not optional.
How to Protect the Lane From Weather
Because this is an outdoor project, weather matters.
Rain, snow, heat, and moisture can all damage outdoor wood.
Therefore, protect the wood with an outdoor finish that is suitable for your materials.
Also, check the lane after heavy rain. Look for standing water, loose boards, or areas where the ground has shifted.
If you live somewhere with harsh winters, you may want to cover the lane or store removable parts during the cold months.
Common DIY Backyard Bowling Alley Mistakes
I made a few mistakes while building mine. Hopefully, you can avoid them.
Making the Base Too Soft
This is probably the biggest one.
A soft base can make the lane move over time. Pack the ground and gravel well before installing the surface.
Skipping the Level
Your eyes can fool you.
A lane may look flat but still have a small slope. Use a level as you build.
Using Weak Wood
Cheap indoor wood may not handle outdoor weather very well.
Whenever possible, use materials made for outdoor use.
Making the Lane Too Long
More length does not always mean more fun.
A shorter lane can work better in a small backyard. It also takes less time and money to build.
Can Kids Use a Backyard Bowling Alley?
Yes. A backyard bowling alley can be a great family activity.
For younger kids, use lightweight plastic balls and pins. You can also move the starting line closer to the pins.
Most importantly, keep the area clear while someone is bowling.
With a few simple changes, the same lane can work for kids and adults.
Can You Build a Bowling Alley on Grass?
You can build a temporary setup on grass, but the ball will not roll as smoothly.
Grass can also become muddy after rain.
For a better DIY backyard bowling alley, create a firm base first. Then install a smooth lane surface above it.
If you only want a temporary game, though, you can simply mark a lane on the grass and use plastic equipment.
How Much Does a DIY Backyard Bowling Alley Cost?
The cost depends on what you already have.
If you can reuse wood and other materials, you may be able to build a simple lane without spending much.
On the other hand, a larger lane with better outdoor materials will cost more.
Start small if you are unsure.
You can always improve the lane later.
My Final Thoughts
Building a DIY backyard bowling alley does not have to be a huge project. You can start with a simple design and improve it over time.
The most important parts are a firm base, a smooth lane, safe side rails, and a good place for the pins.
After that, have some fun with it.
Add lights. Make a scoreboard. Invite friends over. Let the kids decorate the pins.
And if your first ball rolls sideways into the flower bed, don’t worry. Mine did too.
That is part of building things yourself.
DIY Backyard Bowling Alley FAQ
What is the easiest way to make a backyard bowling lane?
The easiest option is a short lane made from outdoor boards or another smooth outdoor surface. Build it on a firm, level base and add simple side rails.
Can I make a backyard bowling alley on a small budget?
Yes. Reusing outdoor wood and making your own pins can lower the cost. A shorter lane also needs fewer materials.
Do I need real bowling pins?
No. Plastic pins or decorated bottles can work well for a family backyard game.
How long should a backyard bowling alley be?
There is no single length you must use. Build the lane around the space you have. A shorter lane can still be a lot of fun.
Ready to Build Your Own?
If you have an empty part of your backyard, this could be a fun weekend project. Start with a simple lane, test it, and make changes as you go.
You do not need a perfect bowling alley. You just need a safe place to roll a ball, knock down some pins, and have a good time.
That is what backyard projects are all about.