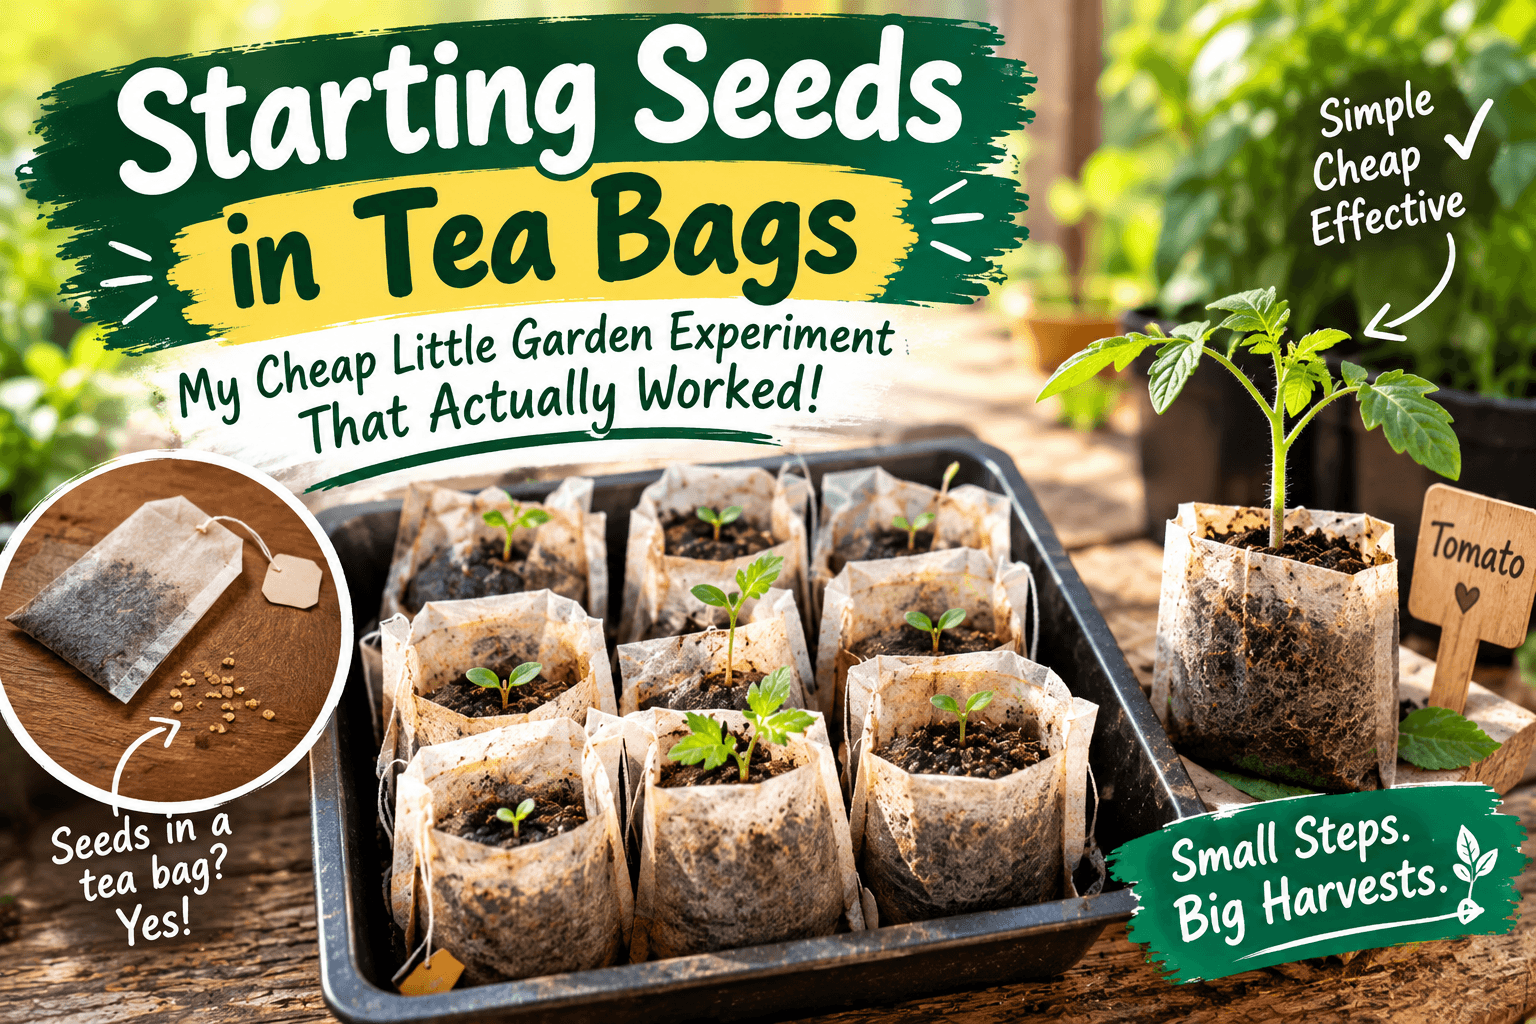
Starting Seeds in Tea Bags . I’ve tried a lot of strange ways to start seeds over the years. Egg cartons, toilet paper rolls, yogurt cups, old nursery pots, and even a cracked plastic container I probably should have thrown away.
But starting seeds in tea bags caught my attention because I drink a ridiculous amount of tea.
One day I was sitting at the kitchen table with a pile of used tea bags and a packet of lettuce seeds. I thought, “Well, what’s the worst that can happen?”
Turns out, quite a few things can go wrong. But with a little care, this can be a fun, cheap way to experiment with starting seeds, especially if you have a small urban garden, backyard garden, balcony, or just a sunny windowsill.
And before anybody gets too excited, I want to make one thing clear: not every tea bag is suitable for growing seeds. Some contain plastic fibers, staples, strings, flavorings, or other materials you don’t want sitting around your seedlings.
So let me show you what I learned, including the part where I made a bit of a mess.
Why I Starting Seeds in Tea Bags in the First Place
I wasn’t trying to invent some amazing new gardening method.
I was trying to save money.
That’s pretty much how most of my homesteading experiments start.
Seed-starting trays aren’t terribly expensive, but when you’re starting dozens of little plants every spring, the costs add up. Then you need potting mix, labels, trays, and somewhere to put everything.
Meanwhile, I had a kitchen full of used tea bags.
The idea seemed simple enough: use a tea bag as a tiny seed-starting container.
It worked for some plants better than others.
That’s the honest answer.
First, Pick the Right Tea Bags
This is probably the most important part of starting seeds in tea bags.
I don’t use just any tea bag.
Some modern tea bags contain plastic or synthetic fibers. Others have staples, strings, tags, glue, or coatings.
I prefer plain paper-style tea bags without staples or unnecessary plastic.
And I don’t recommend burying anything in your garden that you’re not confident will break down naturally.
If you’re unsure what your tea bag is made from, don’t use it for this experiment.
A regular small biodegradable paper bag is a much better choice.
Also, don’t use a tea bag that’s full of strongly flavored tea, sugar, milk, or anything else that could attract insects or mold.
We’re growing plants here, not making a tiny compost buffet for ants.
Should You Use a Fresh or Used Tea Bag?
I’ve tried both.
For me, a used tea bag makes more sense because the whole point is reusing something that would otherwise go into the trash or compost pile.
But I don’t want it soaking wet.
That’s where I made my first mistake.
I planted seeds in a tea bag that was still dripping wet.
A couple days later, it smelled like something had died in my kitchen.
Not exactly the fresh garden smell I was hoping for.
Now I let the used tea bags cool and drain first.
If they’re very wet, I gently squeeze out some excess moisture.
Don’t squeeze them bone dry either.
You want them moist, not swimming.
How I Prepare the Tea Bag for Seeds
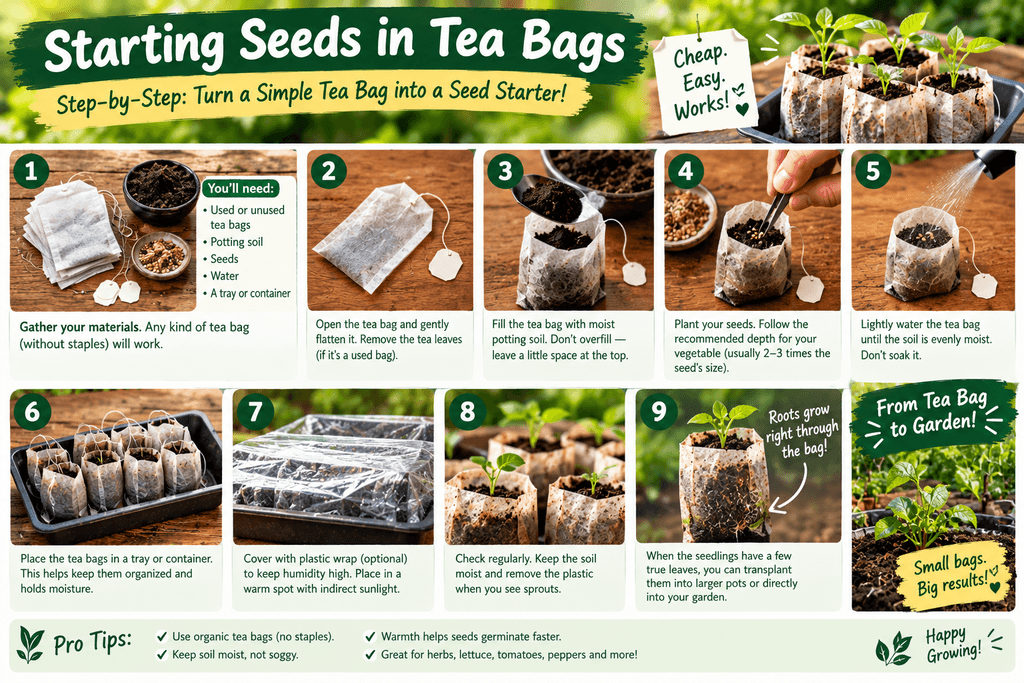
Here’s the basic way I do it.
First, I remove the string and paper tag.
If there’s a metal staple, I remove that too.
Then I open the top carefully.
Don’t rip the entire bag apart.
I want the tea bag to stay mostly intact because it acts like a tiny little container.
I usually leave some of the original tea inside.
Then I add a small amount of fine seed-starting mix.
And yes, I said seed-starting mix.
I don’t fill the bag with heavy backyard soil.
That stuff can be too dense for tiny seedlings, and you’re working with a very small container.
A lightweight seed-starting mix gives the roots a better chance.
What Seeds Work Best?
This is where I had to experiment.
Small seeds generally make more sense because a tea bag is tiny.
Some of the ones I’d try include:
- Lettuce
- Spinach
- Kale
- Basil
- Chives
- Parsley
- Some flowers
- Small herb varieties
I especially like using the method for herbs and leafy greens.
I wouldn’t choose a tea bag for something that wants a huge root system right away.
A pumpkin seed, for example, would probably look at that little tea bag and laugh.
Starting Seeds in Tea Bags Step by Step
Once you’ve got your tea bags prepared, the actual planting is pretty simple.
Step 1: Prepare Your Tea Bags
Remove the tag, string, and any staples.
Make sure the bag itself is suitable for this purpose.
Set it inside a shallow tray so it doesn’t fall over.
I like putting several tea bags together in one old food container or seed tray.
Step 2: Add Seed-Starting Mix
Add enough moist seed-starting mix to give the seed something to grow in.
Don’t pack it down like you’re building a driveway.
Just gently settle it into place.
Step 3: Plant the Seed
Follow the planting depth recommended for your particular seed.
For tiny seeds, I barely cover them.
Some seeds actually need light to germinate, so don’t automatically bury every seed deeply.
That’s another beginner mistake I made.
I used to think deeper was better.
It isn’t.
Step 4: Add a Tiny Bit of Water
Use a spray bottle or very gentle watering method.
A normal watering can can blast the seed right out of the tea bag.
Ask me how I know.
Actually, don’t.
It was embarrassing.
Step 5: Put Them Somewhere Warm and Bright
Place the tray somewhere suitable for germination.
A bright windowsill can work for many seedlings, but don’t assume every seed wants the same temperature or amount of light.
Once the seedlings emerge, they’ll need enough light to grow strong instead of tall and floppy.
The Biggest Problem I Had: Mold
Moisture is useful when you’re germinating seeds.
Too much moisture is trouble.
A tiny tea bag doesn’t have much room for air circulation, and if you keep it constantly soaked, mold can show up quickly.
That’s why I don’t keep the tea bags sitting in water.
I want the growing medium moist but not dripping.
If I see mold starting, I back off on watering and improve airflow.
A small fan on a low setting can help in a larger seed-starting setup, but don’t blast delicate seedlings around like they’re standing in a hurricane.
What About the Tea Leaves?
This is one of the reasons I find the idea interesting.
Used tea leaves contain organic material, and eventually they can break down.
But I don’t treat used tea leaves like some magical fertilizer.
That’s important.
The amount of nutrients you’re getting from one little tea bag isn’t going to replace good potting mix or proper plant nutrition.
Think of the tea leaves as part of the reused material, not the entire growing system.
Your seedlings still need the right environment.
Don’t Use Tea Bags That Have Added Ingredients
This one should be obvious, but I’ve seen people get creative with kitchen scraps.
If your tea contains sugar, milk, syrup, oils, or other additions, don’t use it for starting seeds.
Plain tea is what I’d stick with.
And if it’s a heavily flavored tea, I’d rather throw the contents into the compost and use a clean biodegradable seed-starting container instead.
No reason to invite fruit flies into the house.
I’ve had enough battles with those little things.
When Should You Move the Seedling?
This is where the tea bag stops being useful.
A seedling doesn’t care that you think its tiny tea home is adorable.
It wants room for its roots.
Once the roots begin filling the small growing space or the seedling has developed several true leaves, I move it into a larger container.
I gently handle the seedling and surrounding root ball.
Don’t yank it by the stem.
The stem is not a handle.
I learned that one years ago with tomato seedlings.
Can You Plant the Whole Tea Bag?
Sometimes, yes, if the tea bag is truly biodegradable and free from plastic or other materials that shouldn’t go into the soil.
But I still like checking the bag before doing this.
If it looks like synthetic mesh or contains plastic fibers, I don’t bury it.
If you’re using a plain paper bag that is suitable for composting, planting it along with the seedling may be possible.
But remember that roots need to escape easily.
If the material is too tough or doesn’t break down, it could restrict the roots.
When in doubt, I remove the bag.
The little bit of waste isn’t worth damaging a plant I’ve spent weeks growing.
My Favorite Part About This Method
The best thing isn’t actually the money.
It’s the convenience.
If you’ve got a handful of tea bags, a little seed-starting mix, and some seeds, you can get started without buying a bunch of special equipment.
This is especially handy for:
- Small urban gardens
- Apartment balconies
- Windowsill gardening
- Beginner gardeners
- Kids’ gardening projects
- DIY homesteading experiments
- Starting a few herbs
- Reusing household materials
You don’t need 200 seedlings.
Sometimes you just need six basil plants and four lettuce plants.
That’s where this idea makes sense.
A Mistake I Wouldn’t Repeat
One spring I started way too many seedlings indoors.
Everything was growing.
Everything.
My wife walked into the room and asked if we were opening a greenhouse.
There were trays everywhere.
The problem wasn’t getting seeds to germinate.
The problem was finding enough light and space for everything afterward.
That’s something I wish more beginner gardeners understood.
Starting seeds is easy compared with keeping seedlings healthy.
Don’t start 100 plants if you only have room for 20.
Unless you enjoy giving plants away to everybody you know.
Which, honestly, isn’t the worst problem to have.
Keep Your Tea Bag Seedlings Organized
Here’s a simple trick that saved me some headaches.
Label everything.
Even if you think you’ll remember.
You won’t.
Especially when you’ve got several varieties that all look almost identical.
I use little homemade labels and write:
- Plant name
- Variety
- Planting date
That’s enough.
You can also keep a small notebook for your garden.
I’ve been doing this for years, and those notes are surprisingly useful when planning the next season.
Is Starting Seeds in Tea Bags Better Than Seed Trays?
Not necessarily.
I wouldn’t tell you to throw away your seed trays.
Proper seed-starting trays are easier when you’re starting lots of plants.
They’re designed for drainage, root growth, and moving seedlings around.
Tea bags are more of a DIY, reuse-what-you-have gardening experiment.
That’s why I like them.
They’re cheap, fun, and useful for small batches.
But they have limitations.
The containers are tiny.
They can dry out quickly.
They can also stay too wet.
And not every tea bag is suitable.
So don’t expect them to replace every other seed-starting method.
My Simple Routine Now
When spring rolls around, this is roughly what I do:
I save a few suitable paper tea bags.
I remove the strings and tags.
I prepare a lightweight seed-starting mix.
I plant a few seeds.
I put the tea bags in a shallow tray.
I keep the mix lightly moist.
Then I check them every day.
Not every five minutes.
I’ve learned my lesson.
Once seedlings emerge, I make sure they’re getting enough light and aren’t becoming tall and weak.
Then, when they’re ready, I transplant them into bigger containers or the garden.
That’s it.
No fancy equipment.
No complicated system.
Just a little patience.
Frequently Asked Questions
Can you really grow seeds in tea bags?
Yes, you can experiment with starting small seeds in suitable biodegradable tea bags. The method works best for small seedlings and short-term starting rather than keeping plants in the bags for a long time.
What kind of tea bags should I use?
Use plain paper-style bags that are suitable for composting or soil use and don’t contain plastic mesh, staples, or other unwanted materials. If you’re unsure what the bag is made from, use another container.
Are used tea leaves good fertilizer for seedlings?
I wouldn’t depend on them as fertilizer. Used tea leaves are organic material, but seedlings still need a suitable growing medium and proper care. Don’t treat a tea bag as a complete fertilizer system.
Would I Do It Again?
Yep.
But I’d use starting seeds in tea bags for the right situation.
I wouldn’t try growing every vegetable this way, and I wouldn’t pretend it’s better than proper seed trays.
For me, it’s a simple little homesteading trick that makes sense when I have a few seeds to start and some suitable tea bags sitting around.
The bigger lesson is actually something I learned years ago: you don’t always need to buy something new to start growing food.
Look around your kitchen.
Look around your backyard.
There might already be something useful sitting in the trash or recycling bin.
That’s one of the things I love about homesteading. You start seeing possibilities everywhere.
Just remember to keep your seedlings warm, give them good light, don’t drown them, and don’t bury plastic tea bags in your garden.
And if you try starting seeds in tea bags, start small. Try five or ten seeds first and see how it goes in your own conditions.
If you get stuck, ask me. I’ve probably already messed it up once myself.