
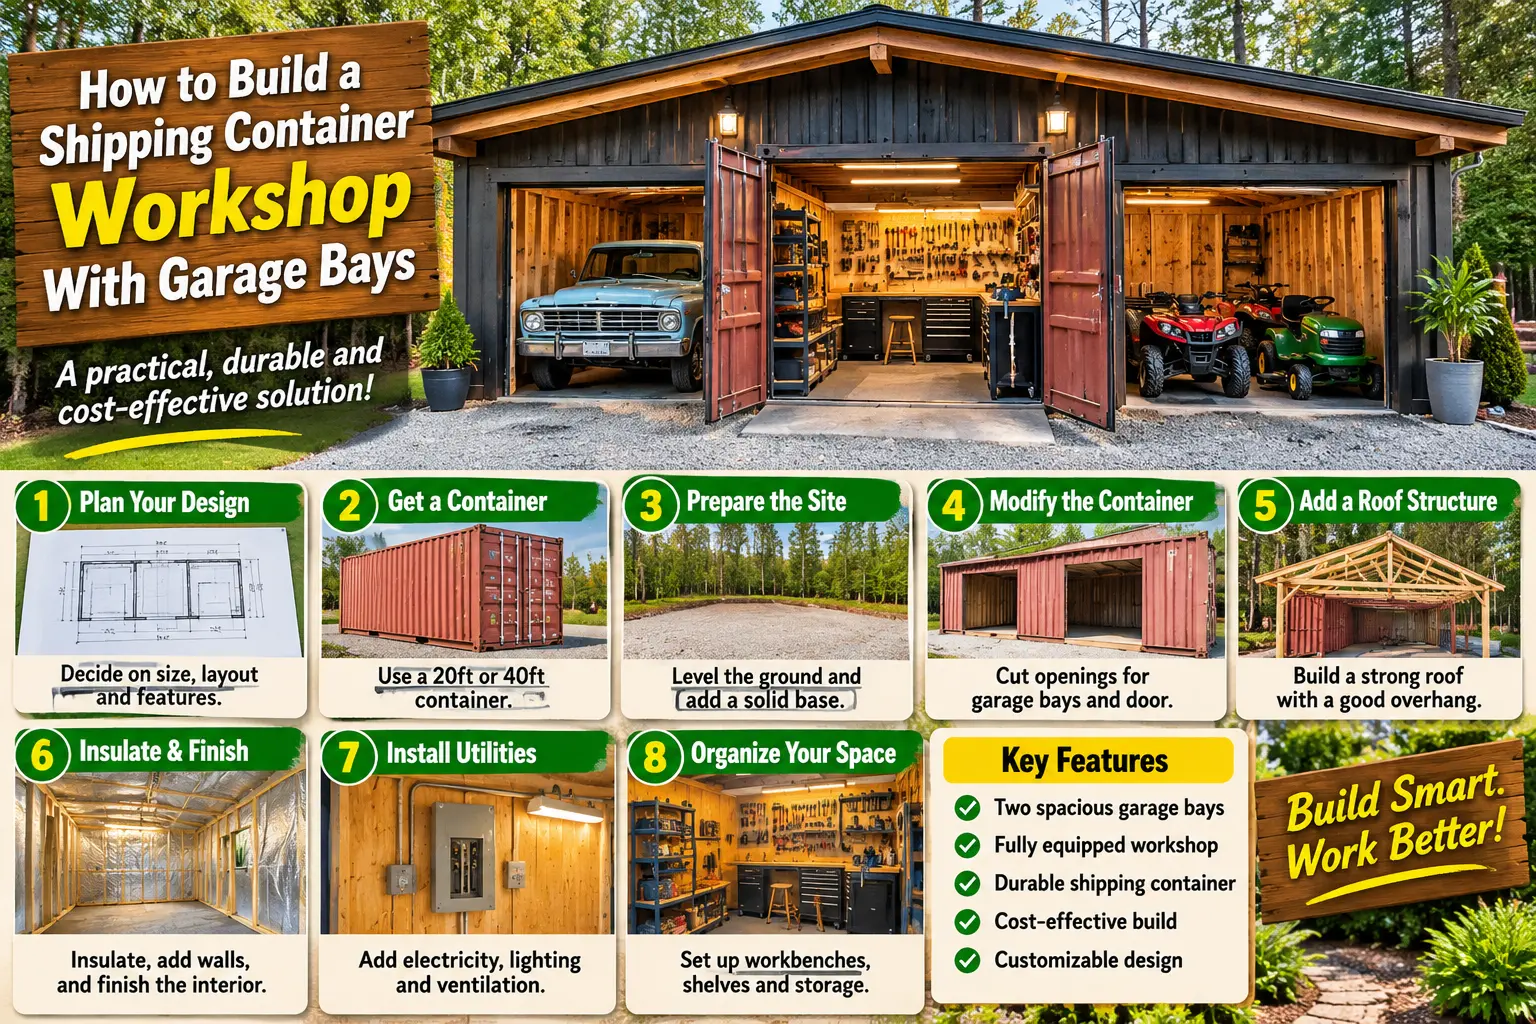
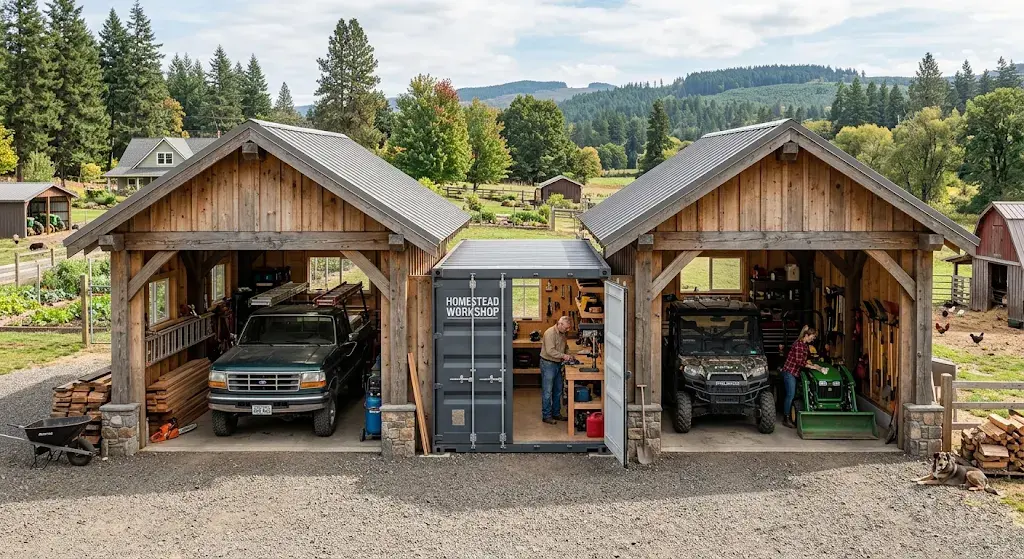
A shipping container can make a useful central workshop, while framed garage bays on either side provide covered space for vehicles, tractors, mowers, ATVs, or larger homestead equipment. But the container, roof, foundations, framing, electrical system, ventilation, and fire safety all need to be planned as one building—not as separate DIY pieces.
The Pinterest project shows a clever three-zone layout: a shipping container in the center becomes an enclosed tool workshop, while two timber-framed wings create open garage bays. After siding and roofing, the finished building looks like one large workshop rather than a container with lean-tos attached.
Best way to think about this project: the shipping container can provide a durable enclosed room, but the garage wings and roof still need their own safe load path into properly designed foundations. Do not assume the container roof can carry everything added around it.
Why This Layout Works for a Homestead
A central workshop with open equipment bays solves several storage problems at once.
The enclosed center can hold:
- Hand tools
- Power tools
- Replacement parts
- Fasteners
- Workbench equipment
- Chargers
- Clean garden supplies
The side bays can hold larger equipment that does not need a fully conditioned room, such as:
- Tractors
- Riding mowers
- ATVs
- Trailers
- Utility carts
- Vehicles
- Large implements
1. Decide What Goes in Each Zone Before You Build
The Pinterest design works because each space has a different job.
| Zone | Best Use |
|---|---|
| Central container | Workbench, tools, parts, secure storage |
| Left bay | Vehicle, tractor or project space |
| Right bay | Mower, ATV, implements or additional vehicle |
Planning this first affects bay width, door height, slab dimensions, lighting, electrical outlets, ventilation, shelving, and roof structure.
2. Start With the Equipment Dimensions
Do not design garage bays from a Pinterest photo.
Measure the equipment you actually own—or realistically expect to own.
Measure:
- Total width
- Height
- Length
- Mirror width
- Attachment width
- Turning space
- Door-opening clearance
A bay that technically fits a tractor but gives you no room to walk beside it becomes frustrating very quickly.
3. The Container Needs a Proper Foundation
Shipping containers are strong, but they still need stable support when they become permanent buildings.
Foundation design depends on:
- Soil conditions
- Drainage
- Frost depth where applicable
- Wind loads
- Local seismic conditions
- Building size
- Roof connections
Depending on the project, that may mean engineered piers, footings, grade beams, or a slab.
4. Keep the Site High and Well Drained
A workshop full of tools and machinery should not sit in the lowest wet spot on the property.
Before placing the container, check where water moves after heavy rain.
Grade the surrounding site so water moves away from:
- The container
- Wood framing
- Garage entrances
- Electrical equipment
- Foundation edges
5. Build the Side Bays as Real Structures
The unfinished Pinterest photo shows extensive conventional timber framing around the container.
That framing needs to resist:
- Roof dead load
- Wind
- Snow where applicable
- Rain
- Door loads
- Lateral movement
Posts, beams, rafters, bracing, connectors, and foundations should be sized as a building system rather than copied visually from the photo.
6. Do Not Assume the Container Carries the Entire Roof
This is one of the most important structural questions in a project like this.
Shipping containers were designed to carry loads through specific structural elements, especially their corner posts and frame.
A new roof should have a clearly designed load path into structural supports and foundations.
Do not attach heavy roof framing anywhere on the thin container skin and assume it is structural. Connections should be designed around structural members and the loads involved.
7. Cutting Openings Changes the Container Structure
The original cargo doors are useful because they give the center workshop a very large opening without requiring you to cut away an entire side wall.
If you later cut openings for windows, personnel doors, ventilation, or connections to the side bays, remember that the corrugated steel panels contribute to the container’s structural system.
Large modifications may require steel framing and structural analysis.
8. The Original Container Doors Can Be Useful
Keeping the original cargo doors provides several advantages:
- Large access opening
- Good security
- Easy movement of workbenches and equipment
- Minimal structural modification
The downside is that cargo doors are heavy and not as convenient as a normal personnel door for everyday entry.
For a frequently used workshop, a separate properly framed man door can improve daily access.
9. Add a Weatherproof Roof Above the Container
The finished Pinterest design extends the main roof across the entire building.
That is useful because it can:
- Shade the steel roof
- Reduce direct solar heating
- Move rain away from container seams
- Create a unified building appearance
- Provide space for insulation and ventilation
- Create useful eaves
10. Install Gutters Before Runoff Becomes a Problem
A large workshop roof collects a significant volume of water during storms.
Without gutters, water can dump beside foundations and garage entrances, creating:
- Mud
- Erosion
- Standing water
- Foundation moisture
- Ice in cold climates
A homestead workshop may also provide a useful roof area for rainwater harvesting where local rules and intended uses allow it.
11. Steel Containers Get Hot and Cold Fast
A bare steel shipping container is not automatically a comfortable workshop.
In direct summer sun, the shell can become extremely hot. During cold weather, interior steel surfaces can become cold enough for condensation to form.
If the workshop will be used regularly, plan the building envelope rather than simply attaching thin interior panels.
12. Control Condensation
Metal condensation can damage tools even when rain never enters the container.
Moist indoor air contacting cold steel can create water droplets on walls and ceilings.
Long-term moisture can contribute to:
- Tool rust
- Corrosion
- Mold on stored materials
- Damaged cardboard boxes
- Wet insulation
A proper insulation, air-sealing, vapor-control, and ventilation strategy should match your climate.
13. Consider Continuous Insulation
Steel is an excellent conductor of heat.
If insulation is simply placed between interior framing while large portions of steel remain exposed to outdoor temperatures, thermal bridging can reduce overall performance.
Continuous insulation around the exterior or another carefully designed assembly can reduce thermal bridging and help manage condensation.
14. Ventilate the Workshop
A tool workshop can generate dust, fumes, heat, and moisture.
Ventilation becomes especially important if you:
- Paint
- Weld
- Sand wood
- Run engines
- Use solvents
- Charge large batteries
Different activities may require different ventilation or dust-collection systems. An open door alone should not be treated as the answer to every workshop hazard.
15. Never Run a Vehicle Engine in a Closed Workshop
Gasoline, diesel, and other combustion engines produce dangerous exhaust gases, including carbon monoxide.
Do not idle vehicles, tractors, generators, or similar equipment inside a closed container or garage unless the space and equipment are specifically designed with appropriate exhaust capture and ventilation.
16. Treat Electrical Work as Permanent Building Wiring
A serious workshop should not rely on extension cords permanently draped across the floor.
Plan outlets according to where equipment will actually sit.
Possible electrical loads include:
- Bench tools
- Air compressor
- Battery chargers
- Welder
- Lighting
- Garage door openers
- Dust collection
- Heating or cooling equipment
Have circuits sized and installed according to the electrical code and actual equipment loads.
17. Give the Workbench Plenty of Light
The finished Pinterest workshop uses bright task lighting over the central work area, which is exactly what a useful workshop needs.
Use a combination of:
- General overhead lighting
- Task lighting above benches
- Lighting inside shelving zones
- Exterior lights at garage entrances
18. Put the Workbench Along One Long Wall
Container interiors are narrow, so circulation matters.
A practical arrangement is:
- Workbench along one long wall
- Shallow storage opposite it
- Frequently used tools above the bench
- Heavy equipment low
- A clear central aisle
Avoid installing deep shelving on both sides until you confirm there will still be comfortable working space between them.
19. Use Vertical Storage
The narrow shape of a shipping container makes wall storage especially valuable.
Useful systems include:
- Pegboard
- French cleats
- Wall cabinets
- Shallow shelves
- Magnetic tool holders
- Labeled parts bins
Keep the floor as open as possible for repairs and moving large objects.
20. Separate Hazardous Products From Everyday Tools
A homestead workshop may contain fuels, paints, solvents, pesticides, oils, batteries, propane, and other hazardous products.
Do not mix these casually with:
- Food-storage equipment
- Animal feed
- Seeds
- Harvest baskets
- Kitchen preservation supplies
Follow the original product labels and applicable local requirements for hazardous-material storage.
21. Fuel and Ignition Sources Need Special Attention
Garages and workshops can accumulate a significant fire load because they often contain vehicles, fuels, batteries, power equipment, oils, and flammable products.
Keep fuels and flammable materials away from:
- Welding
- Grinding sparks
- Open flames
- Heaters
- Other ignition sources
22. Think Carefully Before Adding a Wood Stove
A wood stove may seem perfect for a rustic workshop, but a small container puts combustible materials, fuels, tools, and walls close together.
Any solid-fuel heater needs appropriate listing, clearances, floor protection, chimney installation, combustion air, permits where required, and a workshop layout that keeps flammable materials away from heat.
23. Garage Doors Need Framing and Wind Resistance
Large garage openings remove much of a wall that would otherwise help resist lateral loads.
Headers, posts, braced wall sections, connections, and foundations around garage doors need to be designed for the building and local wind conditions.
Choose door sizes before finalizing framing rather than building the wall first and cutting the opening later.
24. A Gravel Floor and a Concrete Floor Serve Different Jobs
The construction photo appears to use a gravel work area around the container.
Compacted gravel can work well for simple equipment storage, but a concrete slab is easier for:
- Rolling floor jacks
- Using mechanic creepers
- Sweeping
- Finding dropped hardware
- Anchoring equipment
- Controlling dust
Choose the floor based on how each bay will actually be used.
25. Leave Space Around Machinery
The garage bays in the finished image look generously sized, and that matters.
You need working clearance to:
- Open doors
- Service equipment
- Remove attachments
- Walk around machinery
- Move tools safely
26. Keep Clean Homestead Storage Separate
A workshop is not the ideal place to store everything associated with a homestead.
Keep clean food-related equipment such as canning supplies, harvest containers, animal feed, and seed stock away from areas where they can be exposed to exhaust, fuel, solvents, metal dust, or paint.
27. Check the Container Before You Buy It
A cheap used container is not always a bargain.
Inspect for:
- Severe rust
- Damaged corner posts
- Twisted frame
- Roof dents that hold water
- Door problems
- Floor damage
- Major repairs
If you are converting the container into a permanent building component, documentation and condition matter more than simply finding the cheapest box available.
28. Check Permits Before the Container Arrives
A shipping container used as part of a permanent garage or workshop may fall under local zoning and building rules.
Before delivery, check requirements for:
- Setbacks
- Accessory-building size
- Foundation
- Structural plans
- Electrical work
- Height
- Fire separation
- Stormwater
- Shipping-container use
A Better Build Order
- List the vehicles, equipment, and tools the building must hold.
- Measure the required bay widths and heights.
- Check local zoning and permit requirements.
- Evaluate drainage and soil conditions.
- Design the foundation and structural framing.
- Select and inspect the shipping container.
- Prepare foundations and floor surfaces.
- Set and anchor the container.
- Build structural posts, beams, walls, and roof framing.
- Install roofing, flashing, gutters, and drainage.
- Install garage doors and exterior doors.
- Complete container insulation and condensation control.
- Install permanent electrical circuits and lighting.
- Add ventilation and dust control as needed.
- Build the workbench and wall-storage system.
- Move hazardous products into appropriate dedicated storage.
- Move tools and equipment in only after the building is dry and secure.
What This Pinterest Workshop Gets Right
- Uses the container as secure enclosed workshop space.
- Keeps large equipment in wider side bays.
- Provides a dedicated central workbench area.
- Uses vertical storage efficiently.
- Creates large equipment entrances.
- Adds a conventional roof over the complete structure.
- Turns separate utility spaces into one cohesive building.
What the Photo Does Not Show
| What You See | What Must Be Planned |
|---|---|
| Shipping container | Condition, foundation, anchoring, corrosion |
| Large timber wings | Posts, beams, bracing and foundations |
| One continuous roof | Wind, snow, rain and load path |
| Tool-filled workshop | Electrical load, ventilation and fire safety |
| Steel walls | Insulation and condensation control |
| Vehicle bays | Exhaust, fuel, doors, floor and clearances |
Shipping Container Workshop FAQ
Is a shipping container good for a workshop?
Yes. It provides a durable, lockable shell with plenty of wall space for tools. For regular use, however, insulation, ventilation, lighting, electrical service, and condensation control make a major difference.
Can you build a garage beside a shipping container?
Yes, but the garage framing, roof, connections, and foundations need to be designed as structural building components rather than simply fastened to the container skin.
Can the container support the garage roof?
Possibly as part of an engineered design, but do not assume it can. Roof loads need a defined structural path into appropriately designed structural members and foundations.
Do shipping container workshops need insulation?
Not every storage container needs full insulation, but a workshop used in hot, cold, or humid weather usually benefits from a properly designed insulated enclosure and condensation-control strategy.
How do you stop condensation inside a shipping container?
Control interior humidity, provide appropriate ventilation, manage air leakage, and use an insulation and vapor-control assembly suited to your climate. Simply lining the inside with wood does not solve the problem.
Can I weld inside a container workshop?
Welding creates sparks, fumes, and intense heat. A welding area needs appropriate ventilation, fire-safe clearances, removal of combustible and flammable materials, suitable protective equipment, and compliance with applicable safety requirements.
Can I store gasoline in the workshop?
Fuel and other flammable materials require careful storage in approved containers and locations consistent with product labels, fire codes, and local requirements. Keep them away from ignition sources such as welding, grinding, heaters, and open flames.
Is a container workshop cheaper than a normal garage?
It can be economical when the container is used largely intact. Savings can shrink quickly after transportation, crane placement, foundations, extensive modifications, insulation, structural framing, roofing, electrical systems, garage doors, and interior finishing are added.
The Bottom Line
The Pinterest project is a smart homestead workshop concept because it gives expensive enclosed space to the tools that need security while using larger framed bays for vehicles and equipment.
The mistake would be treating it as a weekend project where a shipping container automatically becomes the structural center of a large garage.
Plan the foundation, roof loads, framing, container modifications, drainage, insulation, ventilation, electrical system, fire safety, and equipment clearances first. Then use the container’s narrow interior to create an efficient tool wall and workbench instead of wasting it as general storage.
Sources
- International Code Council — Guideline for the Safe Use of ISO Intermodal Shipping Containers Repurposed as Buildings and Building Components
- International Code Council — Intermodal Shipping Container Building Provisions
- U.S. Environmental Protection Agency — Indoor Air Quality Guidance for Garage Pollutants
- National Fire Protection Association — Garage Fire Hazards