FARMSOLO • CANNING & FOOD PRESERVATION
Drying herbs is one of the simplest ways to save more of your garden harvest. Rosemary, thyme, sage, oregano, mint, parsley, basil, and many other kitchen herbs can be preserved at home without filling the freezer or canning jars. The trick is choosing the right drying method, giving the herbs enough airflow, and storing them only after the leaves are completely dry.
Best for: garden herbs • small harvests • pantry storage • homestead kitchens • reducing garden waste
Best for Air Drying
Rosemary, sage, thyme, summer savory, and parsley are among the easier herbs to dry in small hanging bundles.
Dry These Faster
Basil, mint, oregano, tarragon, and lemon balm hold more moisture and can mold if thick bundles dry too slowly.
Quick Answer
To dry herbs at home, harvest healthy leaves, rinse them gently when needed, remove excess surface moisture, and then dry them with warm, dry, moving air. Sturdy herbs can be hung in small bundles. Tender, moisture-rich herbs often do better on mesh trays or in a dehydrator. Store the herbs only when the leaves are crisp and crumble easily.

Why Dry Herbs Instead of Letting Them Go to Waste?
Herbs have a habit of producing more than you need at exactly the same time.
One week you are buying a tiny package of thyme at the store. A few weeks later, the thyme plant in your garden looks like it is trying to take over the path.
Drying lets you capture some of that extra growth for soups, sauces, seasoning blends, roasted vegetables, marinades, and winter cooking.
Unlike fresh herbs, properly dried herbs do not take up refrigerator space and can be stored in small jars in a cool, dark pantry.
FarmSolo Tip: Do not wait until the herbs are old, damaged, or already turning brown. Preserving the best leaves gives you a better dried herb later.
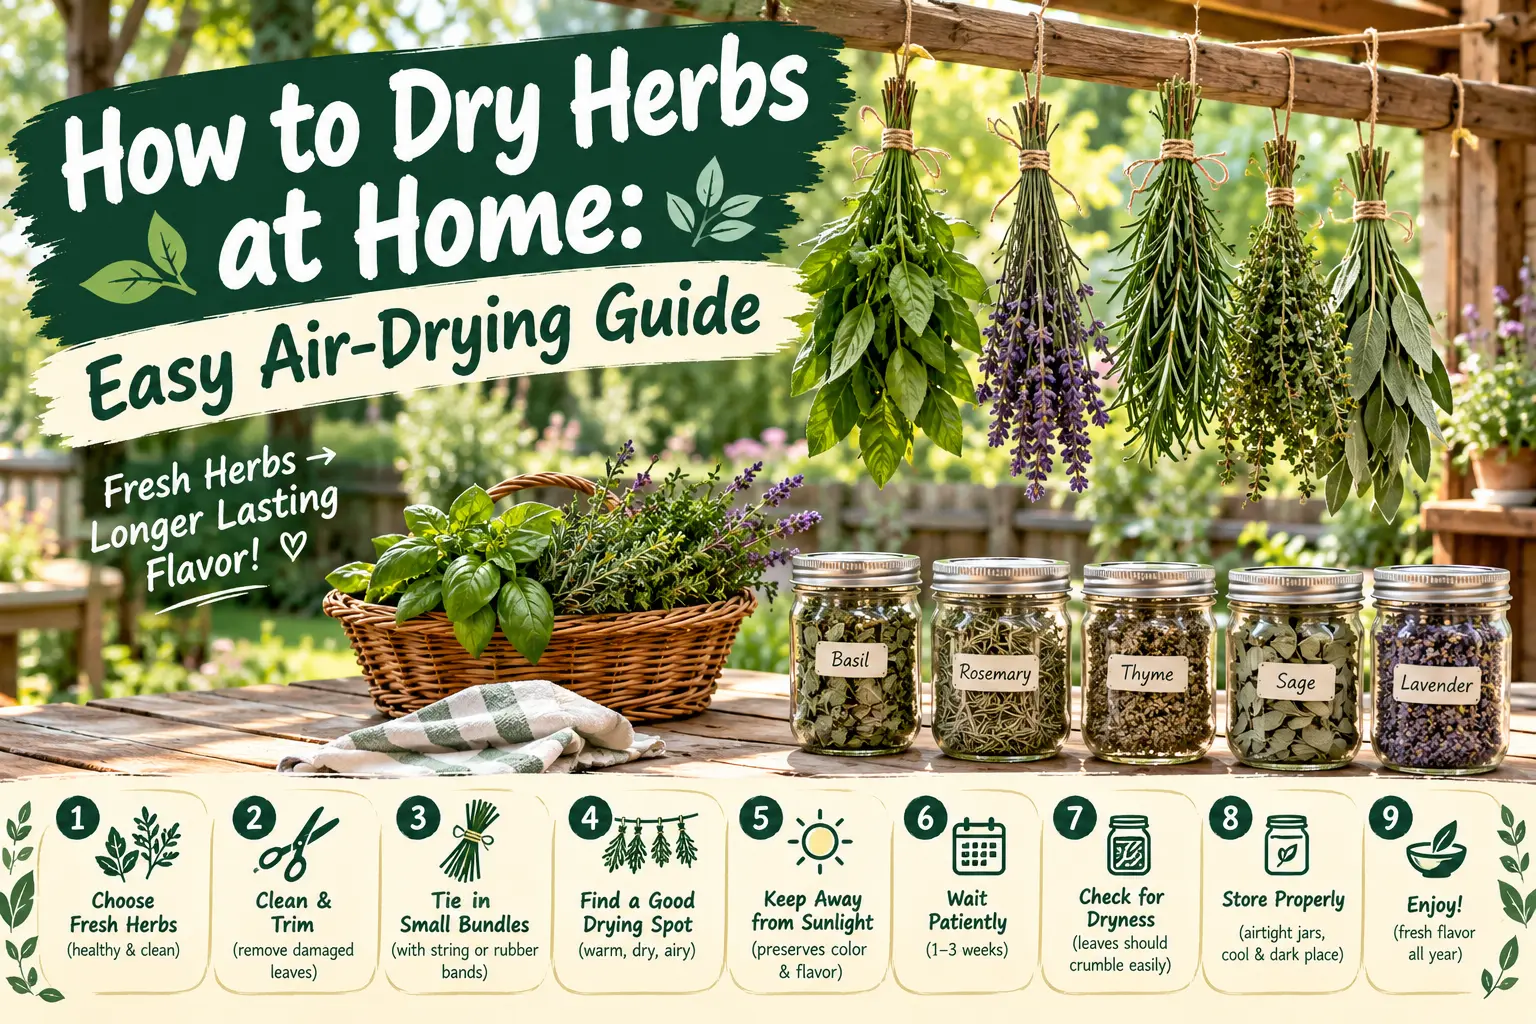
9 Steps for Drying Herbs at Home
01 • HARVEST
Pick Herbs at the Right Time
For many culinary herbs, harvest when the leaves are healthy and flavorful, generally before the plants put too much energy into flowering.
The National Center for Home Food Preservation recommends gathering most herbs in the morning after the dew has evaporated.
Use clean scissors or pruners and handle the leaves gently. Crushing the harvest unnecessarily can damage the leaves before they reach the drying rack.
02 • SORT & CLEAN
Remove Damaged Leaves and Surface Moisture
Sort the herbs before drying. Remove leaves that are yellow, bruised, badly damaged, dirty, or showing signs of disease.
If the herbs need washing, rinse them gently under cool water and shake away the excess. A salad spinner used gently can help with leafy herbs, or you can spread them on clean towels until the obvious surface moisture is gone.
Do not tie dripping-wet herbs into thick bundles. Extra moisture slows drying and makes mold more likely.
03 • SMALL BUNDLES
Keep Hanging Bundles Small
One of the biggest mistakes in pretty herb-drying photos is tying together enormous bundles.
The outside leaves may become crisp while moisture stays trapped in the center.
Use small, loose bundles instead. Rosemary, sage, thyme, parsley, and other sturdier herbs are particularly well suited to this method.
Secure the stems firmly because they shrink as moisture leaves the plant.
04 • TENDER HERBS
Use Trays for Moisture-Rich Leaves
Basil, mint, oregano, tarragon, and lemon balm contain more moisture than many woody herbs.
Instead of creating a dense bunch, remove good leaves and spread them in a shallow single layer on a clean drying screen or dehydrator tray.
Leaves should not be piled in thick layers. More exposed surface area means moisture can escape faster.
05 • AIRFLOW
Choose Warm, Dry, Moving Air
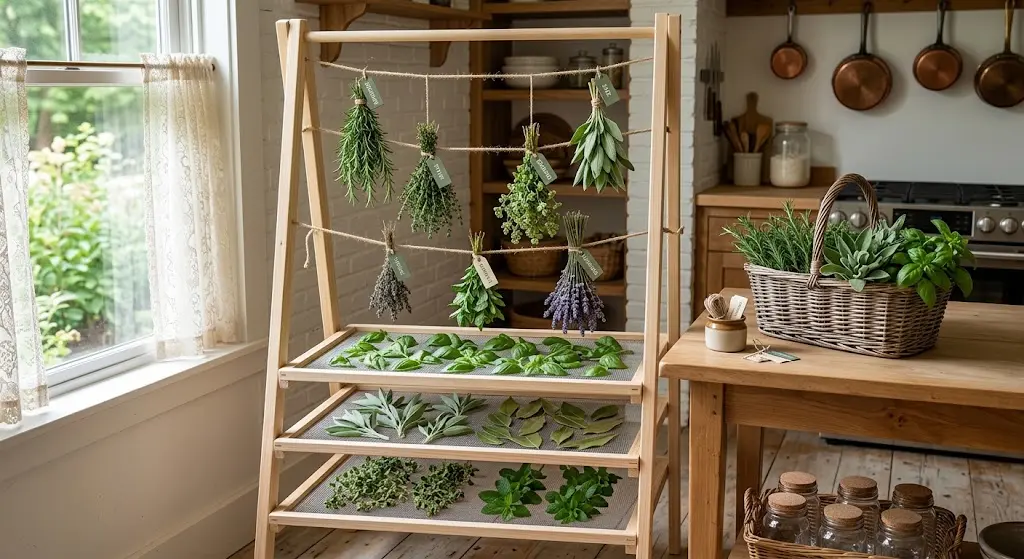
Air movement is one of the most useful parts of the drying rack shown in the inspiration image.
You do not need hurricane-force wind. You want gentle circulation that carries moisture away from the leaves.
A clean room with natural airflow can work. A small fan positioned nearby can also help when the air is still, but avoid blasting dusty air directly onto the herbs.
Keep the drying station away from cooking grease, smoke, pet traffic, damp basements, and other sources of contamination or humidity.
06 • LIGHT
Keep Herbs Out of Direct Sun
Bright sunlight may seem like the obvious way to make herbs dry faster, but direct sun is not the best choice for preserving culinary herbs.
The National Center for Home Food Preservation does not recommend sun drying herbs because color and flavor can suffer.
A bright room is fine, but position the rack away from strong direct sunlight through the window.
07 • DEHYDRATOR
Use a Dehydrator When You Need More Control
A dehydrator is useful when your kitchen is humid, the harvest is large, or tender herbs are taking too long to air dry.
Research-based home-preservation guidance recommends low temperatures for herbs. A common dehydrator range is about 95°F to 115°F, with somewhat higher temperatures sometimes used in humid conditions.
Arrange herbs in a single layer and follow the dehydrator manufacturer’s instructions because airflow and drying performance vary by machine.
08 • CHECK DRYNESS
Do Not Jar Herbs While They Are Still Soft
Drying time changes with the herb, room humidity, bundle size, leaf thickness, airflow, and drying method, so the calendar is less useful than checking the herb itself.
Leaves are ready when they feel crisp and crumble easily between your fingers. Stems should feel dry rather than flexible and damp.
If you seal herbs while moisture remains inside, that trapped moisture can support mold during storage.
09 • STORAGE
Store Dried Herbs Away From Heat, Light, and Moisture
Let dried herbs cool completely before packaging them.
Then transfer them to clean, completely dry airtight containers. Glass jars work especially well because you can see if moisture begins to collect inside.
Store the containers in a cool, dry, dark cupboard away from the stove, sink, and sunny windows.
Keeping the leaves mostly whole until you need them can also help preserve their aroma better than crushing everything immediately.
Which Herbs Are Best for Hanging?
| Herb | Good method | What to watch for |
|---|---|---|
| Rosemary | Small hanging bundles or dehydrator | Usually air dries well because the leaves are less tender |
| Thyme | Small hanging bundles | Use a tray underneath to catch loose leaves |
| Sage | Bundles or individual leaves | Large leaves need airflow around both sides |
| Parsley | Bundles or dehydrator | Do not make bundles too thick |
| Oregano | Tray or very small bundles | Moist leaves can mold when drying is slow |
| Mint | Tray or dehydrator | Spread leaves loosely for faster moisture removal |
| Basil | Dehydrator or shallow tray | High moisture makes slow bundle drying more difficult |
| Tarragon | Tray or dehydrator | Dry promptly rather than using a dense bundle |
One Rack, Two Drying Zones
The smartest part of the inspiration image is not how many herbs it holds. It is the combination of hanging rails above and shallow drying trays below. Use the rails for sturdy herbs and the trays for individual leaves or higher-moisture herbs.
How to Build a Simple DIY Herb Drying Rack
You do not need to copy the large rack in the photo exactly.
The useful idea is simply a freestanding frame with open sides, horizontal rails for hanging herbs, and removable mesh trays for loose leaves.
Simple Materials
- Clean untreated lumber for the frame
- Wood dowels or smooth rails
- Screws suitable for the lumber
- Clean food-safe or appropriate washable mesh for trays
- Lightweight wooden frames for removable screens
- Food labels or paper tags
- Clean clips, hooks, or cord for herb bundles
- Optional small fan for gentle room circulation
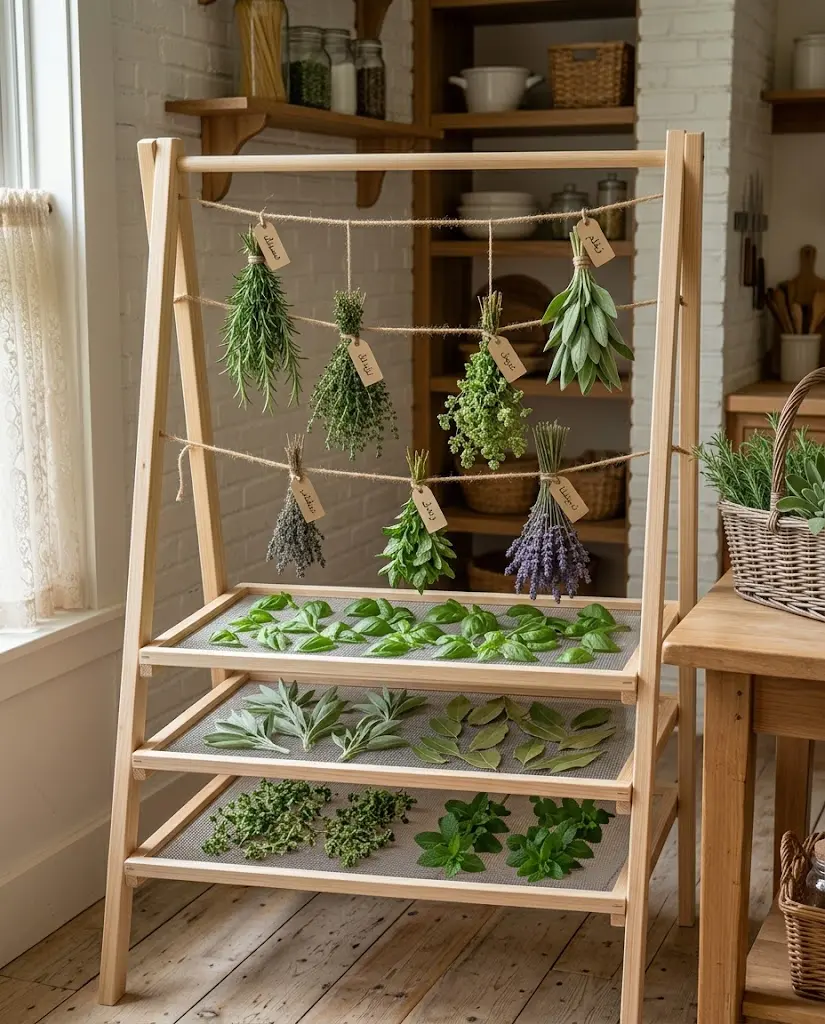
Build the rack tall enough that bundles can hang without touching the trays below. Keep enough space between each horizontal rail so air can move around the leaves.
Removable trays are particularly useful. You can carry fresh herbs to the rack, spread them out on a work surface, and then slide the entire tray into position.
Avoid unknown reclaimed wood, heavily treated lumber, dirty screen material, or surfaces that are difficult to clean around food.
Should You Put a Fan Next to Drying Herbs?
A fan can help in a still room, especially when the air is humid, but think of it as circulation rather than a hair dryer for herbs.
Place it far enough away that the leaves are not being whipped around or blown off the trays.
Keep the fan itself clean. Blowing dust, pet hair, kitchen grease, or workshop debris over food defeats the purpose of creating a clean drying station.
How Long Does It Take to Air-Dry Herbs?
There is no single drying time that works for every herb or every kitchen.
Thin thyme leaves in a dry room may finish much sooner than thick sage leaves in humid weather.
Bundle thickness matters too. A loose bunch allows air to move through the center; an oversized bunch holds moisture.
Instead of relying on a fixed number of days, check the herbs regularly and judge them by dryness. They are ready for storage when the leaves are crisp and crumble easily.
How to Store Dried Herbs Without Losing Flavor
Once the herbs are completely dry, strip the leaves from tough stems and place them in airtight containers.
I prefer storing most herbs as whole leaves rather than immediately grinding them into powder. Crushing exposes more surface area, so aroma tends to disappear faster.
Label each jar with the herb name and drying date. Then store it somewhere cool, dry, and dark.
Avoid the shelf directly over your stove. Heat and steam are exactly what dried herbs do not need.
Check before storing: If a jar develops visible moisture or condensation, the herbs were not dry enough when packed. Moldy dried food should be discarded rather than tasted or mixed into another batch.
How Much Dried Herb Replaces Fresh?
Dried herbs are more concentrated than fresh leaves because most of the water has been removed.
Simple Kitchen Starting Point
When a recipe calls for fresh herbs, a useful starting point is roughly ¼ to ⅓ as much dried herb, then adjust to taste.
The actual strength changes with the herb, how fresh the dried batch is, and how it was stored, so taste matters more than perfect arithmetic.
Air Drying vs. Dehydrator vs. Freezing
| Method | Best for | Main advantage |
|---|---|---|
| Air drying | Rosemary, thyme, sage and small herb harvests | No special appliance required |
| Mesh trays | Loose leaves and tender herbs | More airflow around individual leaves |
| Dehydrator | Humid conditions or larger batches | Better control of temperature and airflow |
| Freezing | Herbs you want for cooked dishes | Keeps a flavor closer to fresh in many recipes |
Freezing is worth remembering too. The National Center for Home Food Preservation recommends washing, draining, drying, wrapping, and freezing fresh herbs for later use in cooked dishes, though thawed herbs usually become too limp for fresh garnish.
Common Herb Drying Mistakes
- Making huge bundles. Thick bunches trap moisture in the center.
- Hanging dripping-wet herbs. Remove excess surface water first.
- Drying in direct sunlight. Strong sun can reduce color and flavor quality.
- Putting leaves in thick piles. Use shallow layers with space for airflow.
- Drying in a damp basement. High humidity makes moisture removal much harder.
- Using too much heat. High temperatures can damage flavor and aromatic oils.
- Ignoring tender herbs. Basil and mint need faster drying than sturdy woody herbs.
- Storing herbs too early. Soft leaves can still contain enough moisture to cause problems.
- Leaving jars beside the stove. Heat, steam, light, and repeated opening reduce quality.
From garden to pantry: If you are still building your herb-growing setup, see FarmSolo’s Vertical Herb Garden guide. When harvest time arrives, the Garden Harvest Basket guide includes practical tips for bringing herbs and vegetables indoors without crushing them.
Drying Herbs FAQ
What is the easiest way to dry herbs at home?
For sturdy herbs such as rosemary, thyme, and sage, tying small bundles and hanging them in a warm, dry, well-ventilated room is one of the easiest methods.
Should you wash herbs before drying them?
Research-based home-preservation guidance recommends rinsing herbs under cool water and removing excess moisture before drying. Discard damaged or soiled leaves.
Can you dry basil by hanging it?
You can air dry basil, but because the leaves contain more moisture, it needs to dry quickly. A shallow tray or dehydrator can be easier and reduces the risk of moisture staying trapped inside a bundle.
How do I know when herbs are completely dry?
The leaves should feel crisp and crumble easily between your fingers. If they still feel soft, cool, leathery, or flexible, continue drying before putting them into an airtight container.
What temperature should I use in a dehydrator?
A common research-based range for drying herbs is about 95°F to 115°F. In more humid conditions, somewhat higher temperatures may be needed. Follow the instructions for your dehydrator.
Can I dry herbs in direct sunlight?
Indoor drying away from direct sun is generally better for maintaining herb color and flavor. Strong sun can reduce the quality of the finished herbs.
How should dried herbs be stored?
Place fully dried herbs in clean airtight containers and store them in a cool, dry, dark location. Keep them away from heat, steam, and direct sunlight.
Turn a Summer Herb Harvest Into a Winter Pantry
You do not need a giant drying room to preserve herbs. A few small bundles, one or two mesh trays, and a clean place with good airflow can handle a surprising amount of garden growth.
Match the method to the herb: hang the sturdy ones, spread tender leaves out, and use a dehydrator when humidity or a large harvest makes air drying unreliable.
The goal is simple: completely dry herbs, good aroma, clean storage, and less of your garden harvest going to waste.