DIY Water Tank Plumbing: Simple Setup Guide for Beginners
DIY Water Tank Plumbing: How I Set Up Mine Without Making a Huge Mess
The first time I tried DIY water tank plumbing, I thought it was going to be one of those easy Saturday jobs.
You know the kind.
Buy some pipe. Add a few fittings. Connect the tank. Turn on the water. Done.
Yeah… no.
By the end of that Saturday I was standing in a puddle, holding a wrench in one hand and wondering why water was coming out of a fitting I hadn’t even touched.
You’re gonna laugh, but I actually forgot to put a shutoff valve where I needed one. That little mistake made every future repair much more annoying.
After more than ten years of backyard gardening, homesteading, rainwater projects, chickens, composting and general DIY experimenting, I’ve learned that water tank plumbing isn’t really complicated. But you do need to slow down and plan it before you start cutting pipe.
So lemme show you how I think about a simple DIY water tank plumbing setup, what parts matter, and the mistakes I’d avoid if I was starting again.
What Does a Basic Water Tank Plumbing System Need?
Let’s keep this simple.
A basic water tank system usually has a way for water to enter the tank, a way for water to leave, an overflow, and a vent or other means of allowing the tank to equalize pressure when appropriate for the tank design.
Depending on what you’re doing with the water, you may also have a pump, filter, pressure tank, check valve, pressure regulator, hose connection, or irrigation system.
My backyard setup isn’t fancy. That’s actually one thing I like about it.
I can look at the pipes and understand where the water is going.
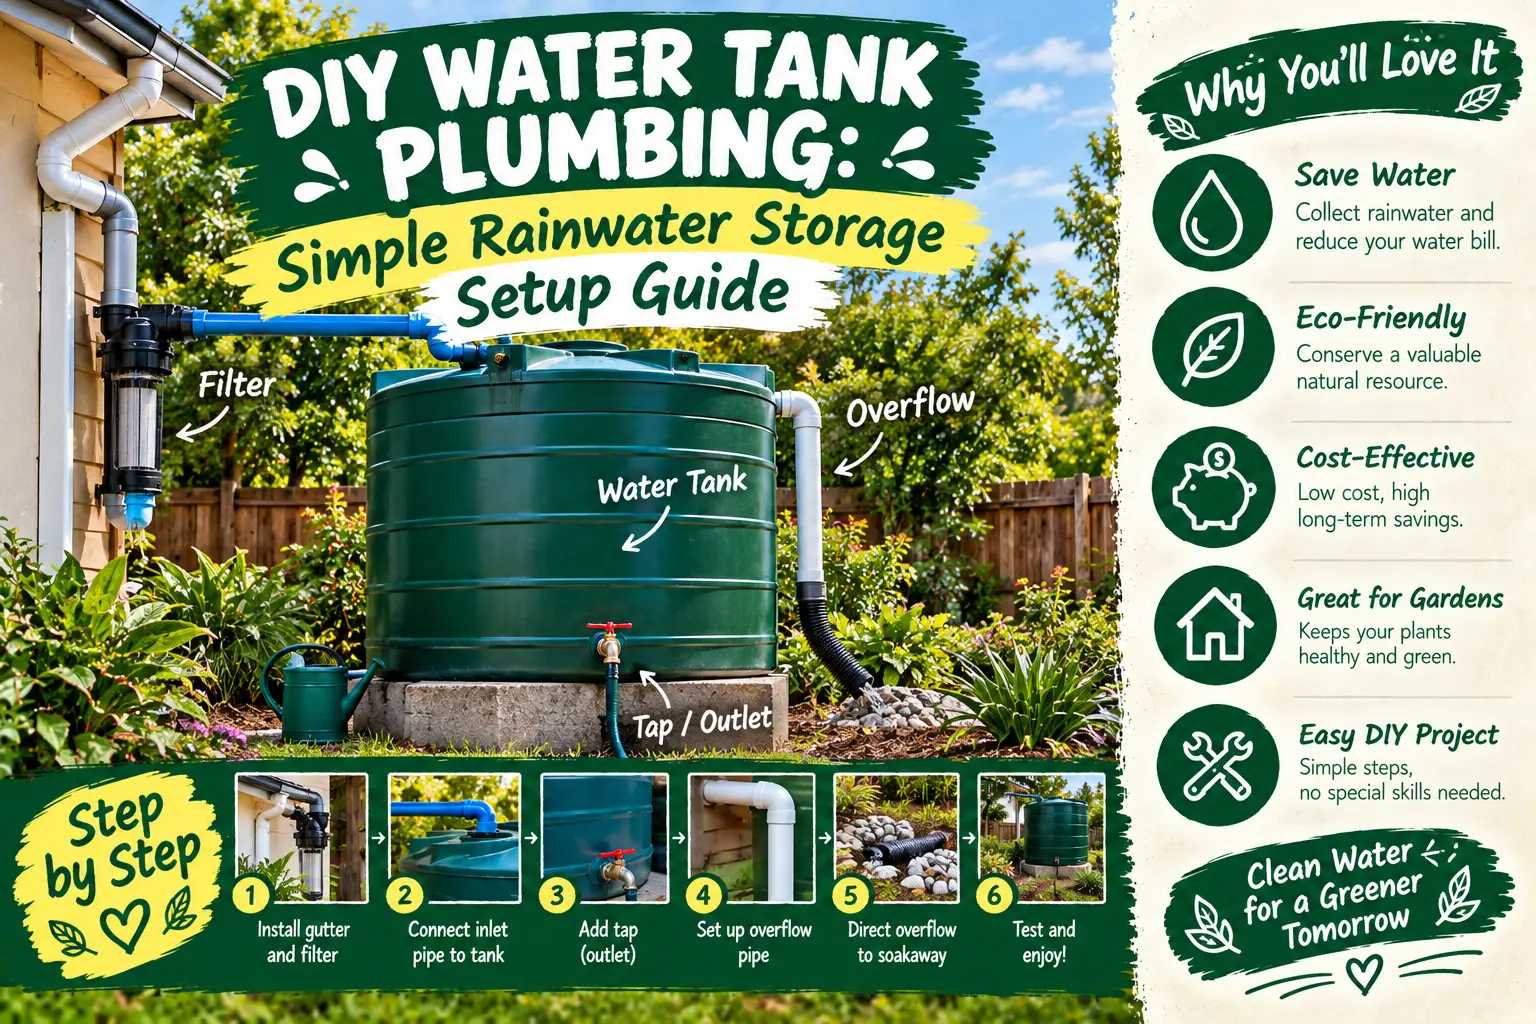
For a simple tank, I like thinking about the plumbing as three basic paths:
- Inlet: water going into the tank.
- Outlet: water leaving the tank.
- Overflow: water leaving if the tank gets too full.
Then there is the venting arrangement, which helps the tank breathe as the water level changes.
Don’t try to make one pipe do every job. That’s where things can get messy.
Start With the Tank Before Buying Any Pipe
This sounds obvious, but I learned it the hard way.
I once bought fittings first because I thought I knew what size I needed.
Then I got home and realized the tank connection wasn’t what I expected.
So now I do it backwards.
I look at the tank first.
Check the manufacturer’s instructions and find out:
- Where the inlet connection is.
- Where the outlet is located.
- What size the tank fittings are.
- Whether the fittings are threaded or another connection type.
- Where the overflow should go.
- Whether the tank requires a particular vent arrangement.
- What materials are suitable for the intended water use.
Then I buy the plumbing parts.
It’s boring, but it saves a lot of trips to the hardware store.
My Most Important DIY Water Tank Plumbing Tip: Install a Shutoff Valve
If you only remember one thing from this article, remember this.
Put a shutoff valve where you can actually reach it.
I know that sounds too simple, but believe me, you’ll thank yourself later.
Imagine your tank is full and you suddenly discover a leaking fitting near the pump.
Without a shutoff valve, you’re fighting gravity, water pressure and a whole lot of swearing.
With a valve, you turn the water off and work on the problem.
I like having a valve on the main outlet from the tank so I can isolate the tank from the rest of the plumbing.
If your system has multiple branches, you may also want additional shutoff valves so you can work on one part without shutting everything down.
How I Plan the Tank Outlet
The outlet is the part that carries water from the tank to wherever you’re using it.
That might be a garden hose, drip irrigation, livestock watering system, pump, outdoor faucet or another part of an off-grid water setup.
Before connecting anything, I ask myself a simple question:
What am I actually trying to power with this water?
If it’s just gravity-fed garden irrigation, you may not need the same plumbing arrangement as somebody trying to supply pressurized household fixtures.
Don’t build a complicated system because you saw one on YouTube.
Build the system you actually need.
Gravity-Fed Water Tank Plumbing Is Surprisingly Useful
One thing I really like about water tanks is that you don’t always need a pump for every little job.
If the tank is elevated enough and the irrigation system is designed for low pressure, gravity can move water downhill.
I’ve used gravity-fed water for garden jobs and it can be wonderfully simple.
No motor humming.
No electrical connection.
No pump to troubleshoot.
But here’s the catch.
Gravity doesn’t create unlimited pressure.
The pressure depends on the difference in height between the water surface and the outlet. If your tank is sitting almost at ground level, don’t expect it to behave like a pressurized household water system.
For drip irrigation, the pressure requirements also depend on the specific irrigation equipment you’re using.
So test it before you build the whole garden around it.
When You Need a Pump
If you need stronger or more consistent pressure, you’ll probably be looking at a pump system.
This is where DIY water tank plumbing starts getting more interesting.
A typical pumped system can include the tank outlet, shutoff valve, pump, appropriate filtration, pressure controls, and the distribution plumbing.
The exact arrangement depends heavily on the pump and what you’re trying to supply.
And please read the pump instructions.
I know, I know. Nobody likes reading those things.
But pumps have specific requirements for inlet size, flow, priming, pressure, electrical supply and installation. Guessing here can turn an easy project into a damaged pump.
Don’t Forget the Water Tank Overflow
This is another pipe people sometimes ignore.
Your tank needs a safe way to deal with water if the inlet keeps running after the tank is full.
That’s what the overflow is for.
I learned to think about the overflow before connecting the inlet, not after.
Because if you wait until the tank is full and water is pouring over the top, you’re already having a bad day.
The overflow should discharge somewhere that won’t damage your foundation, garden bed, electrical equipment or neighboring property.
On a rainwater harvesting setup, I like thinking about where all that extra water will go during a really heavy storm.
A little drizzle isn’t the problem.
It’s the storm you weren’t expecting.
The Vent Is Small but Don’t Ignore It
If your tank is an atmospheric storage tank, it needs proper ventilation as part of its design.
As water enters and leaves, air needs to move in and out so the tank can equalize pressure.
I’ve seen people focus so much on the inlet and outlet that they forget about the vent completely.
Don’t do that.
The vent should also be protected appropriately from insects, debris and rain, especially when the tank is storing water for important household use.
Follow the tank manufacturer’s design rather than drilling random holes into the tank.
What Kind of Pipe Should You Use?
This is one place where I don’t recommend grabbing whatever happens to be sitting in your garage.
The correct material depends on the water, temperature, pressure, location and local plumbing requirements.
For irrigation and other non-potable projects, people commonly use plastic piping systems designed for outdoor water service.
For drinking water, be much more careful.
Use components that are approved for potable-water use and appropriate for the pressure and application. Don’t assume that because a pipe carries water, it’s automatically suitable for drinking water.
Also pay attention to sunlight.
Some plastic piping isn’t meant to sit exposed to strong UV for years. If the manufacturer requires protection, give it protection.
Here’s How I Lay Out a Simple Tank System
Before cutting anything, I usually put the pieces on the ground.
Literally.
I’ll lay out the tank connection, valve, fittings, pipe and destination so I can see what I’m about to build.
Then I look for problems.
Can I reach the valve?
Can I disconnect the pipe later?
Is there enough room for a wrench?
Will the pipe be sitting where somebody can step on it?
Can I drain the line if I need to?
That last one matters more than you think if you live somewhere that gets freezing weather.
Use Unions or Removable Connections Where They Make Sense
Here’s a little trick I wish somebody had taught me earlier.
Make important components removable.
If your pump, filter or another piece of equipment needs maintenance, you don’t want to cut a pipe every time you need to remove it.
Depending on the plumbing system you’re using, unions or other approved disconnect fittings can make maintenance much easier.
It costs a little more at the beginning.
But when you’re standing outside in cold weather trying to repair a pump, you’ll be very happy you spent the extra few bucks.
Don’t Make Every Pipe Run Perfectly Straight
This is something I had to get over.
I used to think every pipe needed to run perfectly straight and look like it came from a professional plumbing brochure.
Not true.
It needs to work.
A clean layout is good, but leave room for maintenance and expansion where appropriate. Support pipes properly and avoid unnecessary bends and fittings.
Every extra connection is another place that could potentially leak.
Simple is usually better.
My Leak Test Before I Trust the System
I never connect everything and immediately walk away anymore.
I test it.
First, I look over every connection.
Then I introduce water slowly.
I watch the fittings.
Then I check them again after the system has been operating for a while.
And I put my hand around connections where appropriate to feel for moisture.
You’d be surprised how often a tiny drip shows up only after the system has been running for a little while.
Don’t be in a hurry.
Water has plenty of time to find the one place you forgot to tighten.
Three DIY Water Tank Plumbing Mistakes I’d Avoid
1. Too many fittings
Every elbow, adapter and connection adds complexity. If you can make the plumbing simpler, do it.
2. No accessible shutoff valve
I’ve already talked about this one, but it deserves repeating. Put the valve somewhere you can actually reach when something goes wrong.
3. Building before thinking about maintenance
This is probably my biggest lesson.
Don’t just ask, “Can I build it?”
Ask, “Can I repair it?”
That’s a much better question for a homestead.
What About Filters?
If you’re using a tank for irrigation, your filtration needs may be different from a household drinking-water system.
But even garden systems can benefit from filtration when small particles could clog drip emitters or other equipment.
With rainwater collection, leaves, dirt and other debris can enter the system before the water even reaches the tank.
That’s why I like dealing with filtration as part of the whole system instead of treating it like an afterthought.
And remember, a filter isn’t magic. It needs maintenance.
A dirty filter can restrict flow and make a pump work harder.
DIY Water Tank Plumbing for a Backyard Garden
If your goal is simply watering vegetables, fruit plants, herbs and landscaping, you can keep things pretty simple.
A tank can feed a hose or irrigation line through a properly sized outlet and valve. If gravity doesn’t provide enough pressure, a pump can be added.
I like running garden water separately from household plumbing whenever possible.
It makes the system easier to understand and reduces the temptation to connect things together that shouldn’t be connected.
For a homestead, simple systems are easier to troubleshoot.
A Little Maintenance Goes a Long Way
Once the plumbing is working, don’t forget about it.
I have a habit of checking the tank whenever I’m already walking around the backyard.
I look for:
- Leaks around fittings.
- Cracked or damaged pipe.
- Loose connections.
- Blocked screens or vents.
- Problems around the overflow.
- Unusual pump noises.
- Water collecting where it shouldn’t.
It takes a few minutes.
That’s a pretty good trade for avoiding a flooded corner of the backyard.
DIY Water Tank Plumbing FAQ
Can I install water tank plumbing myself?
For a basic non-potable garden or irrigation system, many homeowners can handle simple plumbing work if they understand the tank, fittings, pipe and equipment involved. More complicated systems, especially potable household plumbing, electrical pump connections, or installations governed by local plumbing codes, may require a licensed professional.
Do I need a pump for a water storage tank?
Not always. A properly designed gravity-fed system can work for some irrigation and garden applications. If you need more pressure or a consistent supply to fixtures, you may need a pump.
Where should I put the shutoff valve?
I like putting the main shutoff where it’s easy to reach near the tank outlet. The exact location depends on your layout, but the important thing is being able to isolate the tank without making a giant mess.
The Best DIY Water Tank Plumbing System Is the One You Can Understand
After years of building little projects around my backyard and homestead, I’ve stopped trying to make everything fancy.
I want to know where the water comes from.
I want to know where it’s going.
I want to know where I can shut it off.
And if something breaks, I want to be able to see the problem without taking half the garden apart.
That’s really the secret with DIY water tank plumbing.
Plan before you cut. Use the right parts for the job. Give yourself shutoff points. Think about overflow and ventilation. Test everything slowly before you trust it.
And don’t be embarrassed if your first attempt isn’t perfect. Mine wasn’t either.
Trust me, I learned the hard way that a five-dollar fitting can create a fifty-dollar headache if you install it in the wrong place.
If you’re building a water tank system for your backyard garden, rainwater harvesting project or off-grid homestead, keep it simple and make it easy to maintain.
That’s what has worked best for me.
Got a weird plumbing problem? Leave a comment. I may have already made the same mistake you’re fighting with.
Safety note: Water tanks connected to household plumbing, drinking-water systems, pumps, electrical equipment, or regulated plumbing installations can have specific code and safety requirements. Follow the tank and equipment manufacturer’s instructions and your local plumbing requirements. When you’re dealing with electrical pump wiring or potable water, getting qualified help is worth it.