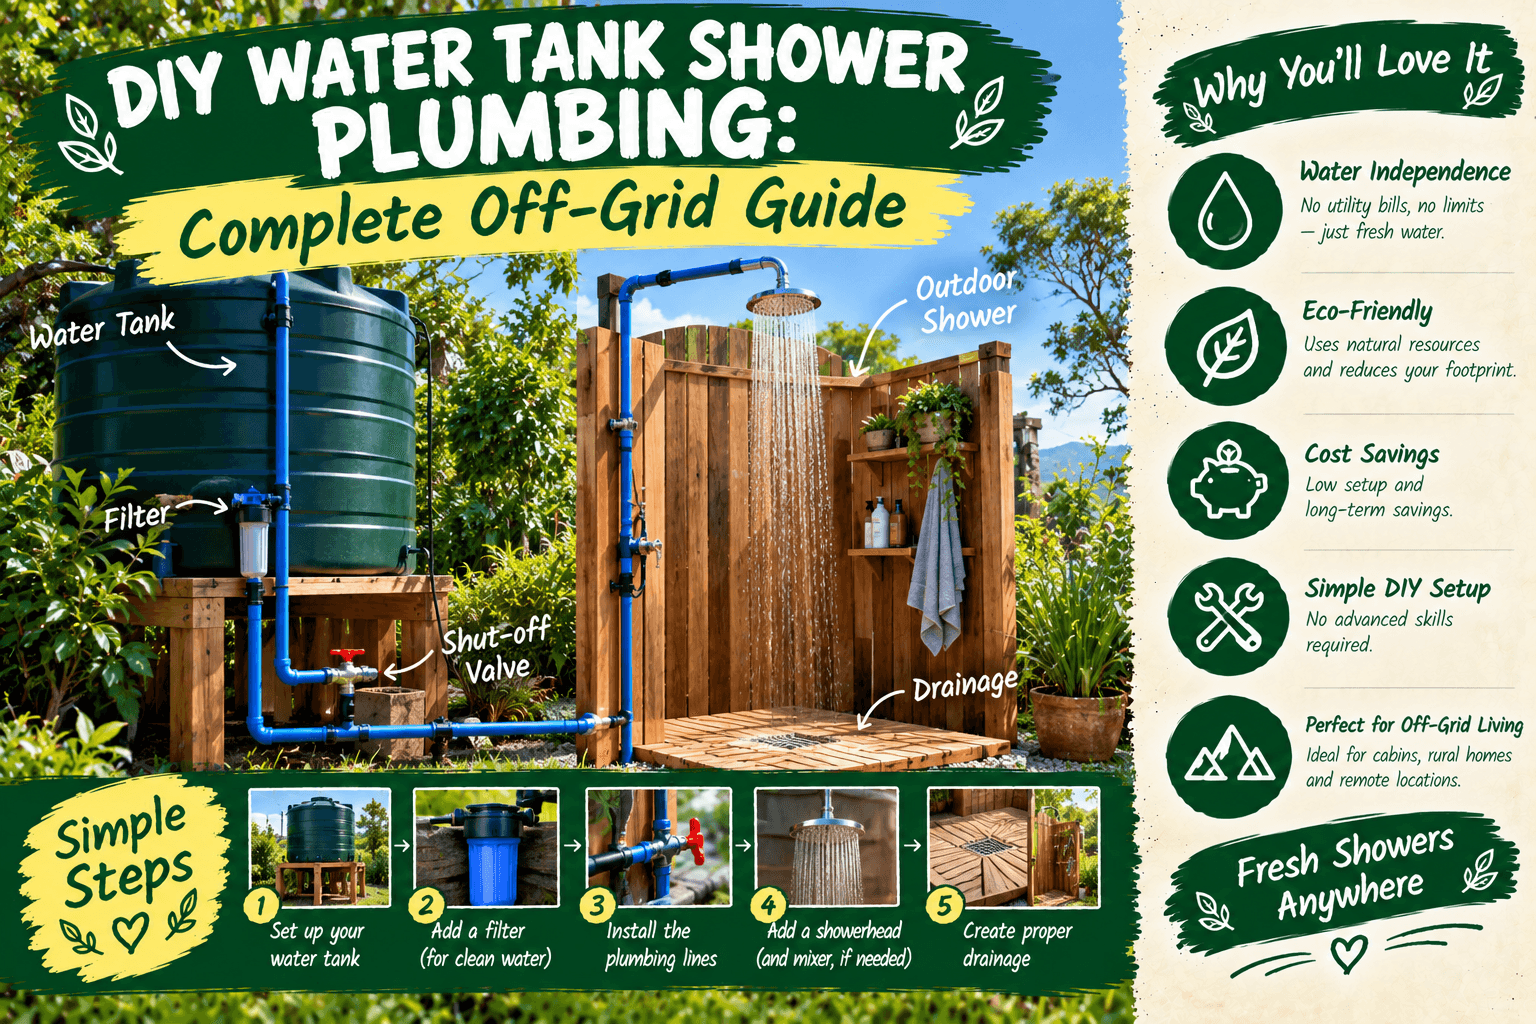
DIY Water Tank Shower Plumbing: How I Built a Simple Off-Grid Shower
The first time I tried DIY water tank shower plumbing, I thought it was going to be one of those easy Saturday projects. You know the kind. A few pipes, a water tank, a shower head and boom, you’re done.
Yeah… no.
I learned pretty quickly that getting water into a shower is easy. Getting the right water pressure, safe temperature, good drainage, and no surprise leaks is where things get interesting.
After messing around with off-grid water systems and backyard projects for years, I’ve learned that a simple shower doesn’t need to be fancy. It just needs to work when you turn the handle.
So let me show you how I think about a DIY water tank shower plumbing system, what parts you actually need, and a few mistakes I really wish somebody had warned me about first.
Why Would You Use a Water Tank for a Shower?
For me, the whole point of a water tank shower is having water available when I don’t have a normal household water connection nearby.
Maybe you’re building an outdoor shower beside a garden. Maybe you’ve got a small cabin, workshop, guest area, greenhouse or off-grid homestead.
Or maybe you’re like me and just don’t want muddy garden boots walking through the house after a long day outside.
A water tank gives you a place to store water before you need it.
The tricky part is moving that water from the tank to the shower at a useful pressure.
Gravity or Pump? This Is the Big Question
This is probably the first decision I’d make before buying anything.
Gravity-Fed Water Tank Shower
A gravity system is the simpler setup.
You place the tank higher than the shower and let gravity move the water downhill through the pipe.
Sounds easy, right?
Well, it is simple, but there is a catch.
The higher the tank is compared with the shower, the more pressure you can get. A tank sitting just a few feet above your shower isn’t going to give you the same feeling as a normal pressurized house shower.
I tried a gravity setup once that looked great on paper. In real life, the water came out of the shower head like it was tired.
It technically worked.
I just stood there thinking, “Well… this is gonna take awhile.”
Pump-Fed Water Tank Shower
A pump gives you much more control.
The basic idea is simple: the tank stores the water, the pump moves the water, and the plumbing carries it to the shower.
For an off-grid shower that needs a more normal shower feel, this is usually the direction I’d look at.
What Parts Do You Need for DIY Water Tank Shower Plumbing?
You don’t need a mountain of parts, but there are a few pieces I wouldn’t skip.
My basic setup looks something like this:
- Water storage tank suitable for the intended water use
- Tank outlet fitting
- Shut-off valve
- Appropriate water pipe or tubing
- Water pump if gravity pressure isn’t enough
- Filter if your water source requires filtration
- Pressure control equipment when needed
- Hot and cold supply lines if using heated water
- Temperature-mixing valve or appropriate shower valve
- Shower head and controls
- Drain and proper wastewater disposal
- Electrical protection and weather-rated connections if a pump is powered electrically
That’s the basic skeleton.
The exact components depend on whether you’re building a cold-water garden shower, an outdoor hot shower, an off-grid cabin shower, or a more permanent setup.
Where Should You Put the Water Tank?
This sounds like a boring question until you’ve got a full tank sitting in the wrong place.
Water is heavy. Very heavy.
One thing I learned from homesteading is that “I’ll figure out the support later” is usually how a simple project becomes an expensive project.
Put the tank on a strong, stable base designed to support its full weight.
Don’t just stack blocks underneath it because that’s what you have lying around.
And think about where the water is going if a fitting breaks.
You don’t want hundreds of gallons of water heading toward your house, shed, chicken coop or garden bed.
How I Would Lay Out the Plumbing
Before cutting a single piece of pipe, I like to draw the system on paper.
Nothing fancy. A piece of cardboard works too.
I’d draw it like this:
Water tank → shut-off valve → filter if needed → pump → pressure control → hot/cold system → shower valve → shower head
Then separately:
Shower drain → approved drainage/disposal area
This little drawing can save you from a whole lot of crawling around under a deck later.
Step 1: Install the Tank Outlet
Start at the tank
Your tank needs a proper outlet connection at the location intended by the tank manufacturer.
Install a shut-off valve close to the tank so you can stop the water without draining everything.
Trust me, you want this valve.
The first time you have a leaking connection and you’re trying to remember where the main shutoff is, you’ll understand why.
Step 2: Run the Supply Line
Run the water line from the tank toward the shower location.
Keep the route as simple as possible.
Every unnecessary bend, restriction and tiny fitting can make your plumbing harder to troubleshoot.
Also protect exposed pipes from weather, physical damage and freezing conditions where applicable.
Step 3: Add the Pump if Needed
If gravity doesn’t provide enough pressure, install a pump designed for your water system.
This is one place where I wouldn’t guess.
Check the pump’s flow and pressure specifications and make sure they’re appropriate for your shower and plumbing layout.
A pump that’s too small can give you disappointing pressure. One that’s badly matched to the system can cause other problems.
Step 4: Add Filtration When Appropriate
If you’re using collected rainwater, well water, surface water, or another source that may contain sediment or contaminants, don’t assume a basic screen makes the water safe for bathing.
Choose filtration and treatment based on the actual water source and intended use.
Step 5: Connect the Shower
From the supply system, run the appropriate lines to your shower controls.
If you’re using both hot and cold water, make sure the mixing arrangement is designed to control temperature safely.
What About Hot Water?
This is where an outdoor shower can get really nice.
There are several ways to heat water, including a properly installed electric water heater, propane system, solar water-heating setup, or other purpose-built equipment.
But here’s where I’m going to be the boring guy for a minute.
Hot water and DIY plumbing can get dangerous fast.
Don’t improvise a homemade pressure vessel or connect electrical equipment near water without proper protection.
If your system uses electricity, follow applicable electrical codes and use appropriate ground-fault protection and weather-rated equipment where required.
Don’t Forget the Shower Drain
Here’s another mistake people make.
They spend hours thinking about getting water to the shower and almost no time thinking about where the water goes afterward.
That’s backwards.
Four people taking showers can send a surprising amount of water down the drain.
You don’t want that water collecting beside the shower foundation or turning the ground into a muddy mess.
Your drainage system needs to be appropriate for the amount of water and local rules.
And if you’re using soap, shampoo, or other products, don’t assume the water can simply be dumped anywhere in your garden.
My Biggest DIY Water Tank Shower Plumbing Mistake
My biggest mistake wasn’t actually a broken pipe.
It was putting too much faith in a connection that “looked tight.”
I turned the water on, walked away, came back later and found a little puddle.
Not a flood. Not a disaster.
Just enough water to make me realize that checking every connection after pressurizing the system is not optional.
Now I test slowly.
I open the valve, watch the connections, let the pump run as appropriate, and check everything again after the system has been operating for a while.
It’s boring.
But boring plumbing is good plumbing.
How Much Water Does a Shower Tank Need?
That depends on how many people are using the shower, how long they shower, the shower flow rate, and whether you’re using the tank for anything else.
Don’t just pick a tank because it looks big enough.
Think about your actual daily use.
For example, if the tank is also supplying a sink, outdoor washing station or other fixtures, your shower isn’t the only thing using the water.
I like to calculate the expected daily use and then leave some breathing room rather than running the tank nearly empty every day.
Can Solar Power Run the Shower Pump?
Yes, a properly designed solar setup can power a small water pump.
This is one of the parts of off-grid living I really enjoy.
You can have solar panels producing electricity, a battery storing energy, a water tank storing water, and a pump moving that water when you need it.
But don’t forget that pumps have specific electrical requirements.
Check the pump’s voltage, wattage, starting requirements and operating time before sizing your solar and battery system.
Don’t buy a giant solar system just because you saw a pump online that said “low power.” Check the actual numbers.
Three Things I Would Do Differently Now
1. Make the Plumbing Easy to Reach
Don’t bury every valve and connection behind a wall.
Leave yourself access for maintenance.
2. Install Shut-Off Valves
Put shut-offs where they make sense.
Being able to isolate one part of the system is a lifesaver when something needs fixing.
3. Test Before Finishing the Walls
This one sounds obvious, but it’s worth saying.
Run the system before you close everything up.
Look for leaks. Check pressure. Test the shower temperature. Watch the drain.
Do it all before you decide the project is finished.
What About an Off-Grid Shower in Winter?
This depends heavily on your climate.
If freezing temperatures are possible, exposed pipes and pumps need protection or a way to be drained.
Water expands when it freezes, and trapped water inside plumbing can cause expensive damage.
I’ve learned that the hard way with outdoor plumbing.
Now I think about winterizing the system before winter actually arrives. Waiting until the first hard freeze is a bad plan.
DIY Water Tank Shower Plumbing FAQ
Can I run a shower directly from a water tank?
Yes, but the pressure may be too low if you’re relying only on gravity. A properly selected pump can provide more useful pressure.
Can I use a rainwater tank for a shower?
It can be possible, but don’t assume collected rainwater is automatically safe for bathing. The water source, collection surface, storage tank, filtration, treatment and local regulations all matter.
Do I need a pump for an outdoor shower?
Not always. A properly designed gravity system may work if the tank is high enough and the plumbing is suitable. If you want stronger and more consistent pressure, a pump may be the better option.
Is a DIY Water Tank Shower Worth Building?
For me, absolutely.
There’s something really satisfying about walking out to the garden after a dirty day, turning a handle and getting a warm shower without dragging mud through the house.
It also fits nicely into an off-grid or self-sufficient setup when the water storage, energy and drainage systems are designed properly.
But don’t rush the plumbing.
Take your time with the tank location. Think about pressure before buying the pump. Plan your drain. Make sure hot water and electricity are handled safely. And test every connection before you call the job finished.
That’s what I’ve learned from DIY water tank shower plumbing. The simple part is getting water into the tank. The smart part is building the whole system so it works safely, reliably, and doesn’t make you regret your Saturday afternoon.
Got an Off-Grid Shower Question?
If you’re planning your own water tank shower, don’t overthink it, but don’t skip the important stuff either.
Draw the system first. Start small. Test everything.
And if you get stuck, ask. I’ve made enough plumbing mistakes over the years that somebody might as well learn from them.
Got a weird question about your setup? Leave a comment below. I actually read them.