The first DIY rustic cabin window seat I built wasn’t really planned.
I had an empty spot underneath a cabin window that wasn’t doing anything. It was basically collecting dust, a couple of old books, and one sock that nobody claimed.
I kept looking at it thinking, That could be a nice place to sit.
So one Saturday morning, I grabbed some leftover boards from another project and decided to build a simple bench.
Three hours later, I had a window seat.
It wasn’t perfectly square. One board was slightly different in color, and I measured one piece wrong and had to cut it again. But when I threw an old cushion on top, sat down with a cup of coffee, and looked out the window, I didn’t care anymore.
That’s the funny thing about rustic DIY projects. They don’t need to look perfect.
They need to feel good.
Over the years, I’ve built and fixed plenty of things around my homestead, and a DIY rustic cabin window seat is one of those small projects that can completely change how a room feels without needing a huge budget.
Why I Wanted a Window Seat in the Cabin
Cabins have a way of making you slow down.
At least mine does.
There’s always something outside that needs attention. Firewood needs moving, chickens need checking, the garden needs watering, and somehow there’s always a shovel leaning against something it shouldn’t be leaning against.
But sometimes I just want to sit.
The window seat became my favorite place to do that.
I drink coffee there in the morning. Sometimes I read. Sometimes I just stare outside and watch the weather.
And yes, sometimes I sit there doing absolutely nothing.
That’s allowed too.
A window seat also gives you useful storage if you build the base correctly. In a small cabin, that’s a big deal.
You get seating and storage in the same space.
Pick the Right Window First
Before you grab your saw, take a good look at the window.
I learned this after nearly building mine too high.
Measure the width of the opening, but don’t stop there.
Check:
- Window height
- Window trim
- Wall depth
- Floor space
- Radiators or heaters
- Electrical outlets
- Doors nearby
- How the window opens
That last one matters.
You don’t want to build a beautiful bench and then discover you can’t open the window anymore.
Trust me, that would be a pretty dumb mistake.
I also recommend checking the wall carefully before attaching anything permanently. Older cabins can have unusual framing, uneven walls, and sometimes surprises hiding behind old paneling.
Cabins have character.
Sometimes too much character.
How High Should a Rustic Window Seat Be?
For me, comfort matters more than following an exact number.
You want the finished seat to feel natural when you sit down. If your feet are dangling several inches above the floor, it’s probably too high.
If it’s extremely low, you’ll feel like you’re sitting on the floor.
Remember that the cushion adds height too.
I made my wooden base first and then tested it with the cushion before permanently finishing everything.
That’s a little trick I use now with furniture projects.
Build.
Test.
Sit down.
Then decide.
It’s much easier to change something before you’ve painted it.
What Materials Do You Need?
You don’t need expensive furniture-grade lumber for a rustic cabin project.
Actually, some imperfections can make the finished seat look better.
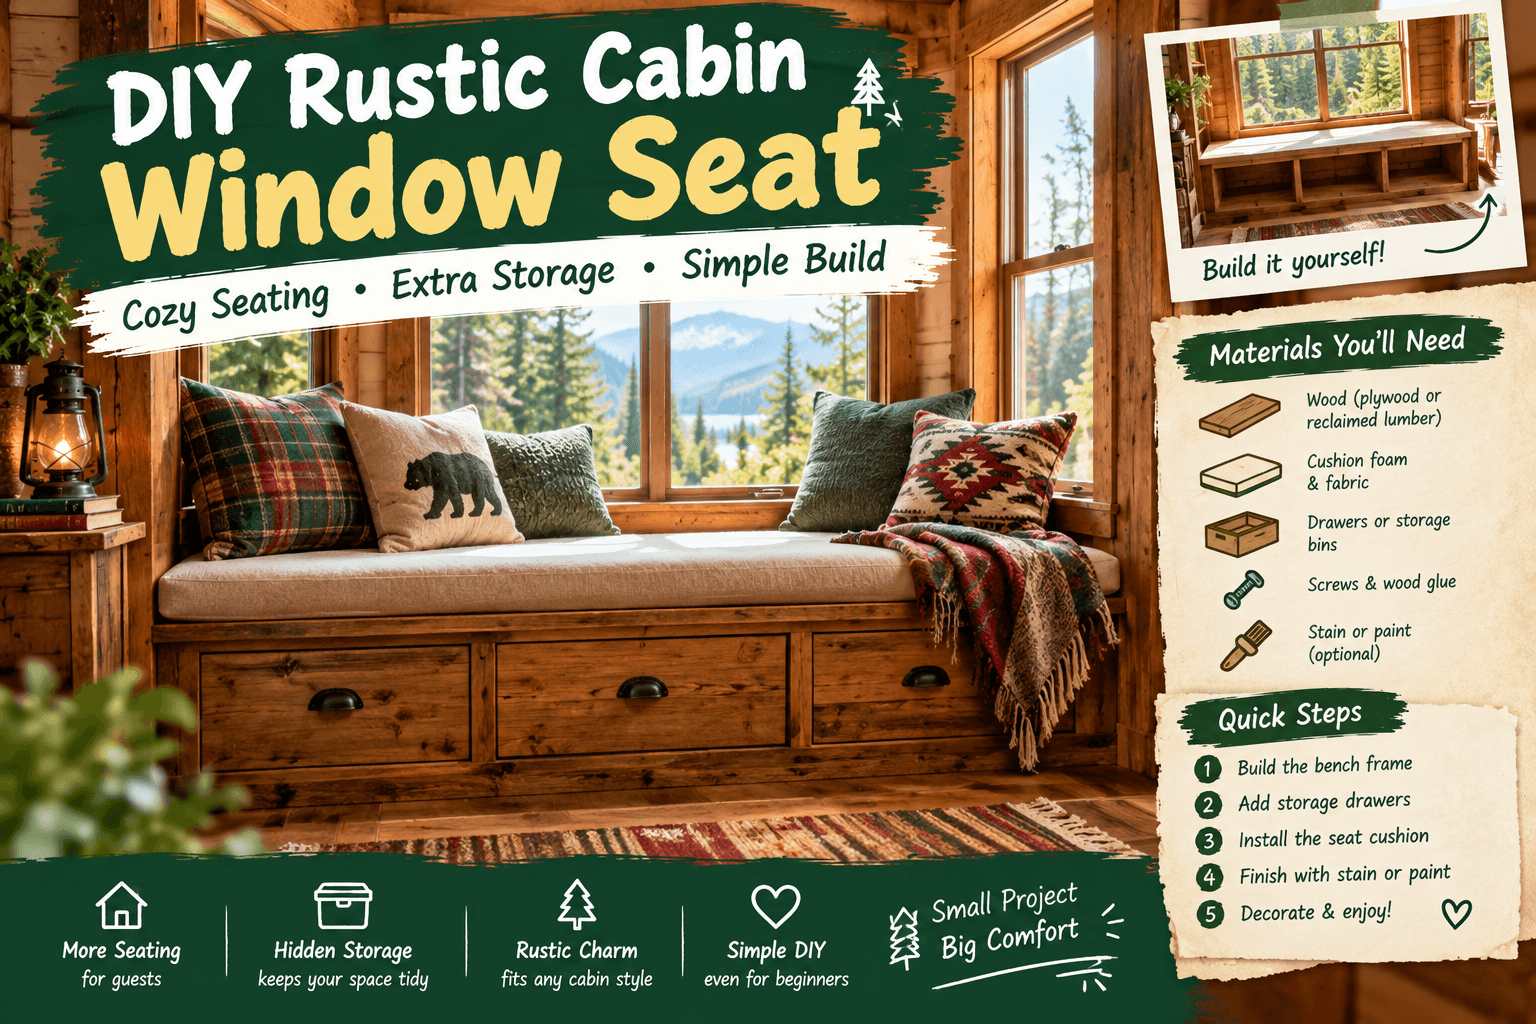
For a basic window seat, you might use:
- Framing lumber
- Plywood
- Boards for the visible front
- Screws
- Wood glue
- Sandpaper
- Hinges if you want lift-up storage
- Paint or wood stain
- A cushion
I-up storage
- Paint or wood stain
- A cushion
I like using leftover wood when I can.
One of my favorite window seats was made partly from boards that had been sitting in my shed for months.
They weren’t all exactly the same color.
That’s fine.
If you’re going for rustic, those differences become part of the look.
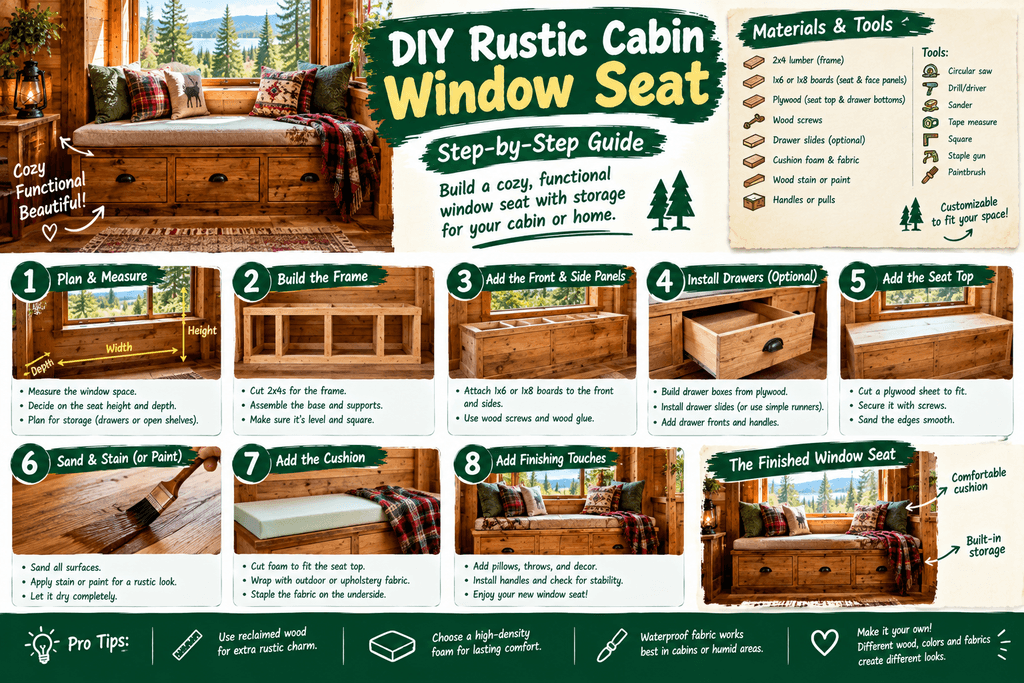
Build a Strong Box First
Here’s the easiest way I think about it.
You’re basically building a strong wooden box that can hold your weight.
The frame needs to be solid because people aren’t gentle with furniture.
We sit down carrying books, bags, blankets, tools, kids, dogs…
Well, maybe not all at once.
I start with a rectangular frame and add vertical supports where needed.
Then I attach the top.
If you’re making a wider seat, don’t leave the top unsupported in the middle. Add enough framing underneath so the seat doesn’t flex.
Give it a good shake when you’re done.
If the whole thing moves, don’t tell yourself, “The cushion will hide it.”
It won’t.
Fix the structure first.
The Storage Is the Best Part
This is probably my favorite thing about a DIY rustic cabin window seat.
You can hide a surprising amount underneath it.
I use mine for blankets, extra pillows, books, and a few things I don’t need every day.
If you’re working with a small cabin or tiny home, this is valuable space.
You can make the top lift up using hinges.
Or you can build drawers.
Or you can leave part of the front open and use baskets.
I went with a simple lift-up top because I didn’t want to spend forever building drawers.
Just make sure the lid is supported properly and doesn’t slam down on little fingers.
If children will use the seat, think about safe hinges or lid-support hardware.
Don’t Forget Insulation
Here’s something I wish I’d thought about earlier.
A window seat sits against an exterior wall.
Depending on the cabin construction, that area can get cold.
Before closing everything up, think about insulation and drafts around the window and wall.
If the cabin is already well insulated, you may not need to do anything unusual.
But if you’re renovating an older cabin, this is a good time to inspect the area.
There’s no point building the coziest seat in the world if you’re sitting on top of an ice-cold draft.
I learned that one while drinking coffee in my winter jacket.
Very cozy.
Very stupid.
Choosing the Wood Finish
For a rustic cabin, I usually prefer a natural-looking finish.
A clear finish lets the wood show through.
A darker stain can make the seat feel older and more traditional.
You can also paint it if that fits your cabin.
But don’t forget that this is furniture people are going to touch constantly.
Use a finish appropriate for the type of wood and the location.
And sand the edges.
Please.
Nobody wants to discover a sharp splinter while reaching for their coffee.
I learned that lesson with one particularly rough board.
What Kind of Cushion Should You Use?
This is where you can make the window seat really comfortable.
A simple foam cushion works great.
You can have one custom cut, or you can adapt foam to fit your space.
For the cover, I like something durable and washable.
Cabin life gets dirty.
You might come inside after working in the garden, sit down without thinking, and suddenly there’s half the backyard on your pants.
I’ve done it plenty of times.
A removable cover is worth the effort.
If you’re making the cushion yourself, measure the finished seat instead of guessing from the original window measurements.
Woodworking and fabric don’t always cooperate.
Make It Feel Like a Real Cabin
The window seat itself is only half the fun.
Add a few things around it that make you actually want to use the space.
I’ve found that simple works best.
A wool-style blanket.
A couple of pillows.
A small wooden side table.
Maybe a basket underneath.
And a stack of books.
You don’t need twenty decorations.
The view outside is already part of the decoration.
That’s one reason I love cabin spaces.
They don’t need much.
What About a Small Cabin?
This project works especially well in small spaces.
If you don’t have enough room for a full sofa, a window seat can give you a comfortable place to sit without taking up much floor space.
You can also make it narrower if necessary.
For a tiny cabin, I’d focus on two things:
Storage and comfort.
If the seat can hold blankets and other supplies while giving you a place to sit, you’re getting two jobs out of one piece of furniture.
That’s exactly the kind of thing I like in a homestead.
My Biggest Mistake
You’re gonna laugh at this.
I built the first version before checking the window trim properly.
The bench looked fine from across the room.
Then I tried to open the window.
The trim got in the way.
So I had to take part of the top apart and make a small adjustment.
Not a disaster.
Just annoying.
Now I always measure the actual window, trim, wall, and opening before cutting anything.
Measure twice.
Cut once.
And if you’re like me, measure a third time anyway.
How I Use My Window Seat
I thought I’d mostly use it for reading.
I don’t.
I use it for everything.
Coffee in the morning.
Checking the weather.
Sorting seeds.
Looking through garden notes.
Taking a break after splitting firewood.
Sometimes I’ll bring my laptop there, although the cabin Wi-Fi has a personality of its own.
During rainy days, it becomes my favorite place in the whole cabin.
You can hear the rain hitting the roof while you’re sitting next to the window.
That’s hard to beat.
And that’s something I didn’t expect from such a simple DIY project.
It changed the way I used the room.
A Few Things I’d Do Differently
If I built another DIY rustic cabin window seat, I’d make the storage opening a little larger.
I’d also spend more time choosing the cushion fabric.
And I’d make absolutely sure the finished height works with the cushion before attaching everything.
I’d probably add a small reading light nearby too.
Other than that, I’d keep it simple.
The rustic look doesn’t need fancy woodworking.
In fact, little imperfections can make it better.
Quick FAQ
Can I build a DIY rustic cabin window seat without advanced woodworking skills?
Yes. A basic box-style window seat is one of the more approachable furniture projects. You mainly need accurate measurements, a sturdy frame, and basic cutting and fastening skills.
Can a window seat be used for storage?
Absolutely. A hinged top, drawers, or open cubbies can turn the space underneath into useful storage for blankets, books, pillows, and other cabin supplies.
Does a window seat need to be attached to the wall?
Not always. The best approach depends on the design, size, and structure of the seat. A freestanding bench can work, but if you’re building a large permanent seat, make sure it’s structurally secure and properly supported.
Would I Build Another One?
Yep.
Without hesitation.
A DIY rustic cabin window seat isn’t the biggest project I’ve done around the homestead. It isn’t going to grow food or produce electricity.
But sometimes the little projects matter too.
A place to sit.
A place to store blankets.
A warm cup of coffee.
A window looking out toward the garden, trees, chickens, or whatever happens to be outside that day.
That’s the kind of simple stuff I appreciate more now than I did years ago.
So if you’ve got an empty window area in your cabin, tiny home, shed, or even a rustic backyard room, don’t ignore it.
Build yourself a seat.
Make it sturdy.
Make it comfortable.
Make it a little imperfect.
That’s what makes a DIY rustic cabin window seat feel like yours.
And if you cut one board too short?
Don’t worry.
We’ve all done it.
Just don’t tell your neighbor.