The first time I tried to make a DIY water filter, I thought I was being pretty clever.
I had an old bucket, some sand, gravel, and a bag of charcoal. I figured, “How hard can this be?” Famous last words.
The water coming out the bottom looked much clearer than what went in, so naturally I thought I had solved the whole problem.
I hadn’t.
That little experiment taught me something important about homesteading: clear water isn’t necessarily safe water. A homemade filter can be useful for removing dirt and sediment, but it shouldn’t automatically be treated as a drinking-water purifier. The CDC specifically warns that many filters don’t remove bacteria or viruses, and water contaminated with chemicals or toxins can’t be made safe simply by filtering or boiling.
So let me show you how I approach how to make a DIY water filter now, what materials I’d use, where I went wrong the first time, and most importantly, how I’d handle the water afterward.
Why I Wanted a DIY Water Filter in the First Place
On a homestead, water seems to end up everywhere.
Garden watering. Chickens. Cleaning tools. Washing muddy boots. Filling buckets. Emergency storage. And if you’re trying to live a little more self-sufficient, you start thinking about backup water pretty quickly.
I wanted something simple that didn’t depend completely on electricity.
That’s where a gravity-fed DIY water filter seemed interesting.
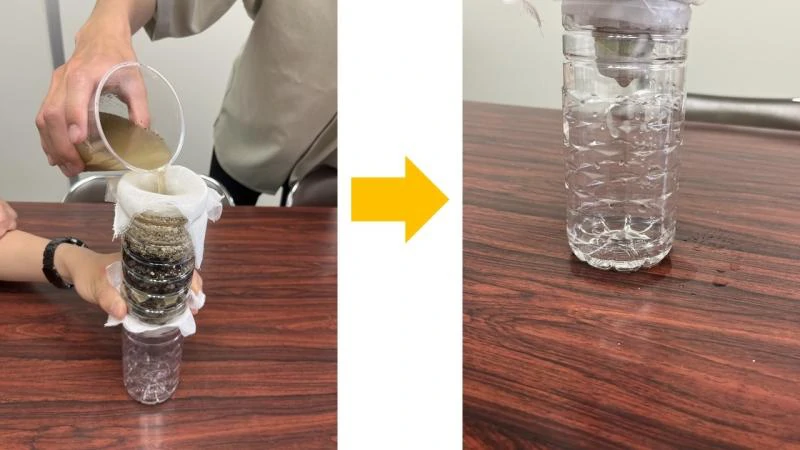
There’s no fancy pump. Water goes into the top, slowly passes through different filtering materials, and collects underneath.
Simple.
But there’s a big difference between filtering dirty water and making water safe to drink.
I learned that distinction the hard way.
What a DIY Water Filter Can Actually Do
Here’s the easiest way I think about it.
A homemade filter is good at improving the physical quality of water.
It can help reduce things like:
- Dirt
- Sand
- Sediment
- Some particles
- Cloudiness
- Some unpleasant odors, depending on the carbon used
But that’s not the same thing as removing every harmful microorganism or chemical.
A homemade bucket full of sand and gravel isn’t something I’d trust by itself for drinking water.
If you’re dealing with questionable water, especially floodwater, sewage contamination, fuel, pesticides, or industrial chemicals, don’t gamble with it. The CDC says water contaminated with harmful chemicals or toxins cannot be made safe by boiling, disinfecting, or filtering.
That’s one part of this project I don’t mess around with anymore.
The Simple DIY Water Filter Setup I Like
For a basic gravity filter, you don’t need much.
Here’s what I’d gather:
- One food-grade bucket or container
- A second clean container to collect the filtered water
- A food-safe spigot
- Clean gravel
- Clean sand
- Activated carbon intended for water filtration
- Clean filter cloth or another suitable pre-filter
- A lid
And please don’t grab random charcoal from your fireplace.
That’s not the same thing as properly prepared activated carbon for water treatment.
I also wouldn’t use an old chemical bucket just because it’s free. If something previously contained pesticides, solvents, cleaners, or other chemicals, I don’t want it anywhere near my water.
Food-grade containers are cheap compared with the headache of contamination.
Step 1: Start With a Clean Container
This sounds boring, but don’t skip it.
Wash the container thoroughly and rinse it well.
If the container is going to hold water for household use, I want it clean before I start adding anything.
One mistake I’ve made with homesteading projects is getting excited about the clever part and forgetting the boring part.
Clean containers matter.
A dirty bucket can turn a good-looking project into a bad idea pretty quickly.
Step 2: Add Your Filtering Layers
This is where things get interesting.
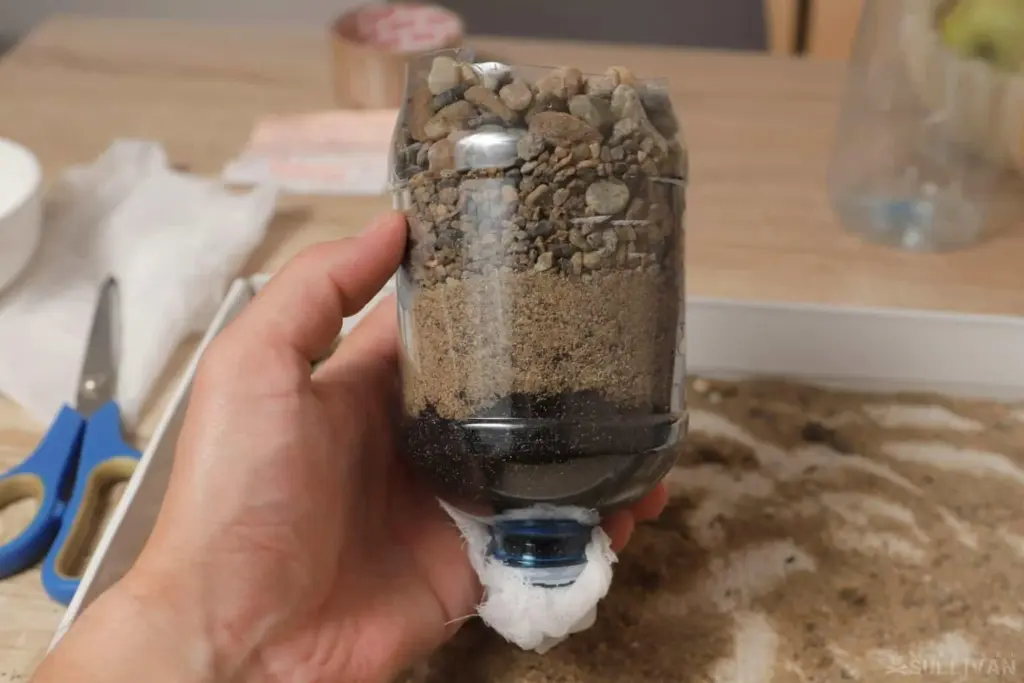
The basic idea is to have larger material catch larger particles first, then finer material catch smaller particles.
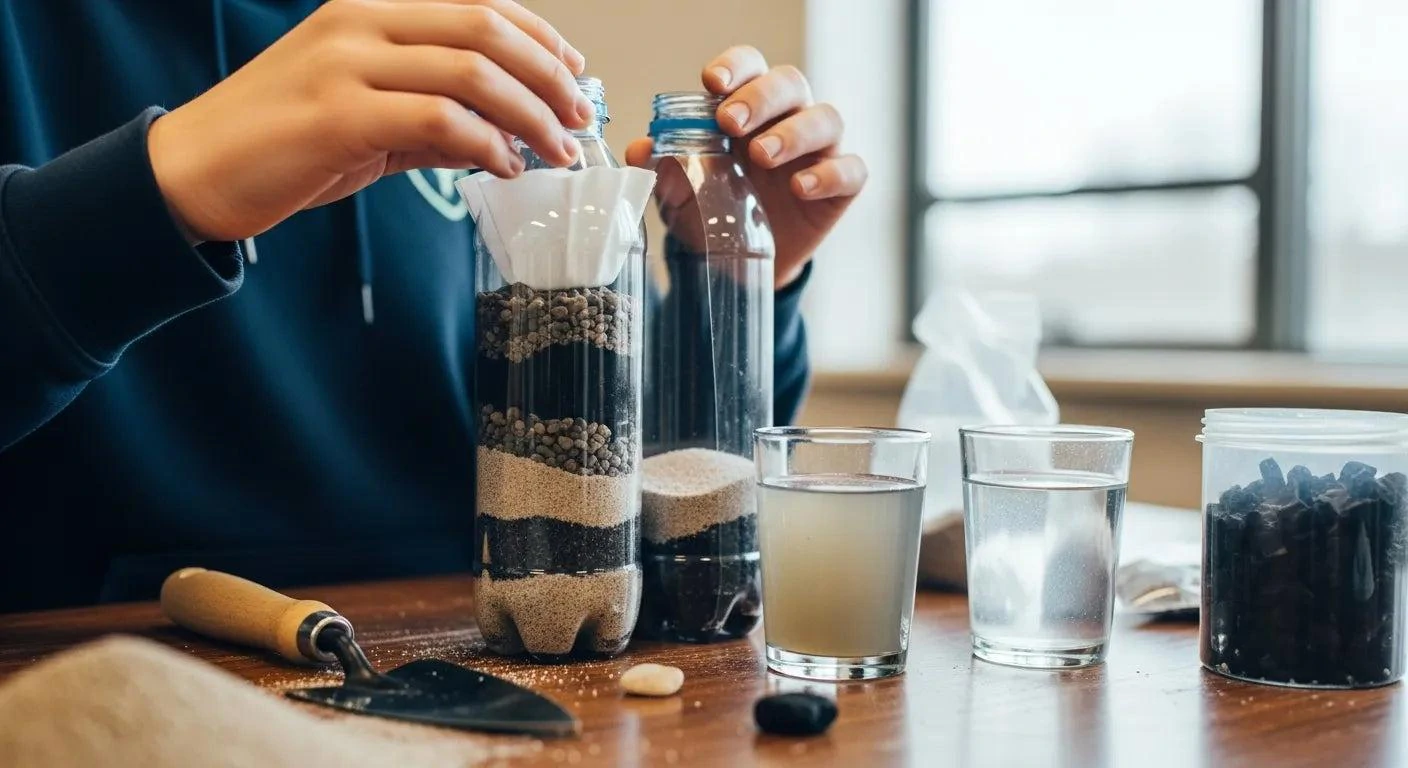
For a simple gravity setup, I’d arrange the layers roughly like this, starting from the outlet and working upward:
Bottom:
Filter cloth
Activated carbon
Fine sand
Coarser sand
Clean gravel
The water enters from the top and moves slowly downward.
The gravel catches larger pieces of debris. The sand catches finer sediment. The activated carbon can help with certain tastes, odors, and some chemicals, depending on the specific carbon and contaminant.
But again, don’t assume carbon removes everything.
Different filters are designed for different contaminants. The EPA recommends choosing certified filtration systems based on the specific contaminant you’re trying to reduce.
Step 3: Wash the Sand and Gravel First
This is one of those jobs nobody wants to do.
You put the sand in a bucket, rinse it, stir it around, dump the dirty water, and repeat.
And repeat.
And repeat.
The first time I did this, I thought, “Surely that’s enough.”
Then I ran water through the filter and got something that looked like cloudy milk.
Great.
I had built a dirt machine.
So now I rinse the materials until the rinse water is much cleaner before putting them into the filter.
Don’t use materials that may have been exposed to chemicals or other contaminants.
Step 4: Add the Activated Carbon
Activated carbon is one of the more useful parts of a filtration system, but it’s also one of the most misunderstood.
People sometimes say, “Charcoal removes everything.”
Nope.
It doesn’t.
Activated carbon can adsorb certain contaminants, and granular activated carbon is used in certified drinking-water filters for specific treatment purposes. But effectiveness depends on the contaminant, the carbon, contact time, and the filter design.
So I buy carbon intended for water filtration rather than making assumptions about some random charcoal.
And when a filter has a replacement schedule, follow it.
An old saturated filter isn’t something I’d keep using just because water still comes out the other end.
Step 5: Let the Water Move Slowly
Gravity filters aren’t supposed to behave like a garden hose.
Slow is good.
If water blasts through the system, it doesn’t have as much contact with the filtering materials.
I learned this while trying to speed up the process.
I opened everything up, water started pouring through, and I thought I’d improved my design.
Nope.
I’d basically turned my carefully layered filter into a bucket with holes.
A slow, steady flow is what you’re after.
Step 6: Throw Away the First Few Batches
When you first assemble the filter, don’t immediately collect water and start using it.
Run water through the system and discard the initial output.
You’ll probably see some fine particles and carbon dust.
Keep flushing until the water is coming out reasonably clear.
And remember, clear doesn’t mean safe to drink.
That’s probably the most important sentence in this whole article.
Where I Would Use a Homemade Filter
For my homestead, I’d think of a DIY filter as a pre-filtration or utility-water tool, not a complete drinking-water treatment system.
For example, it can be useful for improving water used for certain non-drinking purposes, depending on the source and contamination risk.
But if I’m preparing water for drinking, cooking, brushing teeth, or making ice, I’m much more careful.
If the water source is questionable, I want a treatment method appropriate for the actual contaminants.
The CDC says boiling is highly effective against bacteria, viruses, and parasites; its emergency guidance recommends bringing water to a rolling boil for one minute, or three minutes at elevations above 6,500 feet.
And boiling doesn’t fix chemical contamination.
That’s why knowing your water source matters so much.
My Biggest DIY Water Filter Mistakes
I’ve made a few.
Mistake #1: Thinking Clear Water Was Safe
This was the big one.
The water looked beautiful.
That tells you very little about microorganisms or dissolved contaminants.
Mistake #2: Using Random Charcoal
Don’t.
Use activated carbon designed for water filtration.
Mistake #3: Making the Filter Too Fast
More flow isn’t automatically better.
Gravity filtration needs time.
Mistake #4: Forgetting Maintenance
A filter isn’t something you build once and forget about forever.
Materials can become dirty, clogged, or exhausted.
If you’re using a commercial certified filter for drinking water, follow the manufacturer’s replacement instructions. The EPA specifically emphasizes maintenance because filter performance can decline when filters aren’t replaced as directed.
Mistake #5: Not Testing the Water
If you’re using a private well or another questionable source, testing is a much smarter first step than guessing.
The EPA recommends using certified laboratories for drinking-water testing.
Can You Use a DIY Filter for Rainwater?
This is where things get interesting for homesteaders.
Rainwater collection can be useful around a backyard or off-grid property, but the collection surface, storage tank, gutters, animals, dust, roofing materials, and surroundings can all affect water quality.
I wouldn’t collect rainwater and assume a homemade sand-and-carbon filter magically makes it drinking water.
For garden irrigation or other suitable non-potable uses, filtration can be part of a system.
For drinking, I’d want proper treatment based on the intended use and water quality.
That’s especially important if you’re collecting from a roof.
What About an Emergency?
This is where having a simple filtration setup can still make sense.
Imagine your normal water supply gets interrupted and you have a container of cloudy water.
A basic filter can make the water physically cleaner by reducing sediment.
But if you need drinking water, filtration may need to be followed by another appropriate treatment step. The CDC notes that many portable filters remove parasites but don’t remove bacteria or viruses, so additional treatment may be necessary.
If there’s any possibility of chemical contamination, I’d find another water source rather than trying to engineer my way out of it.
Sometimes the best homesteading trick is knowing when not to use the trick.
A Better Option for Drinking Water
If your goal is specifically drinking water, I’d strongly consider a certified commercial filter instead of relying on a homemade one.
Look for a system certified for the contaminant you’re actually concerned about.
For example, the EPA points consumers toward independently certified filters for specific contaminants such as lead and PFAS.
That’s a lot better than buying a filter because the package says “purifies everything.”
There isn’t one magic filter that handles every possible water problem.
FAQ: DIY Water Filters
Can I drink water straight from a homemade sand and charcoal filter?
I wouldn’t.
A homemade filter can remove sediment and improve appearance, but it hasn’t been proven to make unknown water safe for drinking.
Does boiling filtered water make it safe?
Boiling can kill many disease-causing microorganisms, but it does not remove chemical contamination. If the water may contain fuel, pesticides, industrial chemicals, or other toxins, use a different safe water source.
Is activated carbon the same as regular charcoal?
No. For water treatment, use activated carbon intended for that purpose. Don’t assume charcoal from a grill or fireplace is suitable.
Final Thoughts: Would I Build Another DIY Water Filter?
Absolutely.
But I’d build it knowing exactly what it is.
A DIY water filter can be a handy little homestead project. It can reduce sediment, make dirty-looking water clearer, and teach you a lot about gravity filtration and water management.
What I wouldn’t do is build a bucket filter on Saturday and start drinking questionable creek water from it on Sunday.
That’s not being self-sufficient. That’s just taking unnecessary chances.
The whole point of homesteading, at least for me, is learning how things work and making smarter choices over time. How to make a DIY water filter is a useful skill, but knowing its limits is even more important.
If you’re building one for your backyard, garden, chickens, rainwater system, or off-grid setup, start with the water source and what you actually need the water for.
And trust me, don’t learn the hard way like I did.