DIY Garden Bridge: How I Built One Without Making My Backyard Look Like Disneyland
The first time I decided to build a DIY garden bridge, I had no pond, no fancy Japanese garden, and honestly, no real reason to build a bridge.
I just thought it would look cool.
That’s how a lot of my backyard projects start.
I had a little low spot between two parts of the garden where rainwater would collect. It wasn’t exactly a stream, but after a heavy rain it looked like one. So I started thinking, “Why not make that little ugly spot useful?”
And that’s how the bridge project started.
Now, before you picture some giant wooden bridge with fancy railings and a waterfall underneath it, let me stop you. Mine was much simpler. I wanted something practical, inexpensive and strong enough to walk over without wondering if I’d end up sitting in the mud.
It turned out pretty good.
But I also learned a few things the hard way, especially about making sure a garden bridge is actually safe and not just pretty.
Why Build a DIY Garden Bridge?
A small garden bridge can do more than just look nice.
You can use one to cross a shallow drainage area, connect two parts of a backyard garden, go over a small dry creek bed, or simply create a little focal point in your landscaping.
For a homestead or backyard garden, I like projects that actually have a purpose.
If something can look good and make the garden easier to use, even better.
A bridge can also make a small backyard feel more interesting. You don’t need acres of land. A little bridge over a dry creek, gravel path or planted drainage channel can make the space feel like there’s more going on.
My First Mistake Was Making It Too Pretty
You’re gonna laugh at this.
I spent way too much time thinking about how the bridge would look and not enough time thinking about how I was going to walk across it.
I wanted a rustic look, so I started looking at curved boards and decorative ideas.
Then I stood there holding a board and thought, “Wait a minute… where exactly am I going to put my feet?”
That’s when I changed the plan.
For a garden bridge, especially one you’re building yourself, function comes first.
It needs to be stable, level enough to walk safely, made from appropriate outdoor materials, and strong enough for the people who will actually use it.
After that, you can make it pretty.
Where Should You Put a Garden Bridge?
Before buying wood, walk around your backyard.
Seriously.
Look at how you actually move through the garden.
Do you have a drainage ditch?
A small pond?
A dry creek bed?
A low spot that gets muddy?
Maybe there’s a path that would look better with a bridge crossing it.
For my project, I chose a shallow drainage area where water naturally moved after storms. I didn’t try to stop the water. I just wanted to create a safe crossing over it.
That’s important.
If your bridge crosses an area where water actually flows, don’t block the drainage path. A beautiful little bridge isn’t worth creating a backyard flood problem.
How Big Should a DIY Garden Bridge Be?
There’s no magic size.
The bridge should match the space you’re crossing and the way you’re going to use it.
A small decorative bridge might only need to be wide enough for one person.
If you’re pushing a wheelbarrow, carrying buckets, moving garden tools or bringing compost from one side to another, you’ll want something wider.
This is another mistake I almost made.
I measured the gap but forgot to think about carrying a full watering can across it.
Thankfully I caught that before building.
Measure the actual space, then think about the biggest thing you regularly carry through the garden.
What Wood Should You Use?
This is not the place to use a random piece of old wood that has been sitting behind your shed for ten years.
Trust me.
I love reusing materials, but a bridge is different from a garden decoration. You’re putting your body weight on it.
Use structurally appropriate outdoor lumber or another material specifically suitable for the project and local conditions.
For an outdoor garden bridge, moisture resistance matters. Wood that’s constantly exposed to rain and soil contact can deteriorate over time.
If you’re unsure whether your lumber is suitable for structural use, don’t guess.
And if you’re building a bridge large enough for significant loads, check local building requirements or get advice from someone qualified. My little backyard crossing is one thing. A bridge over a deep pond is another story completely.
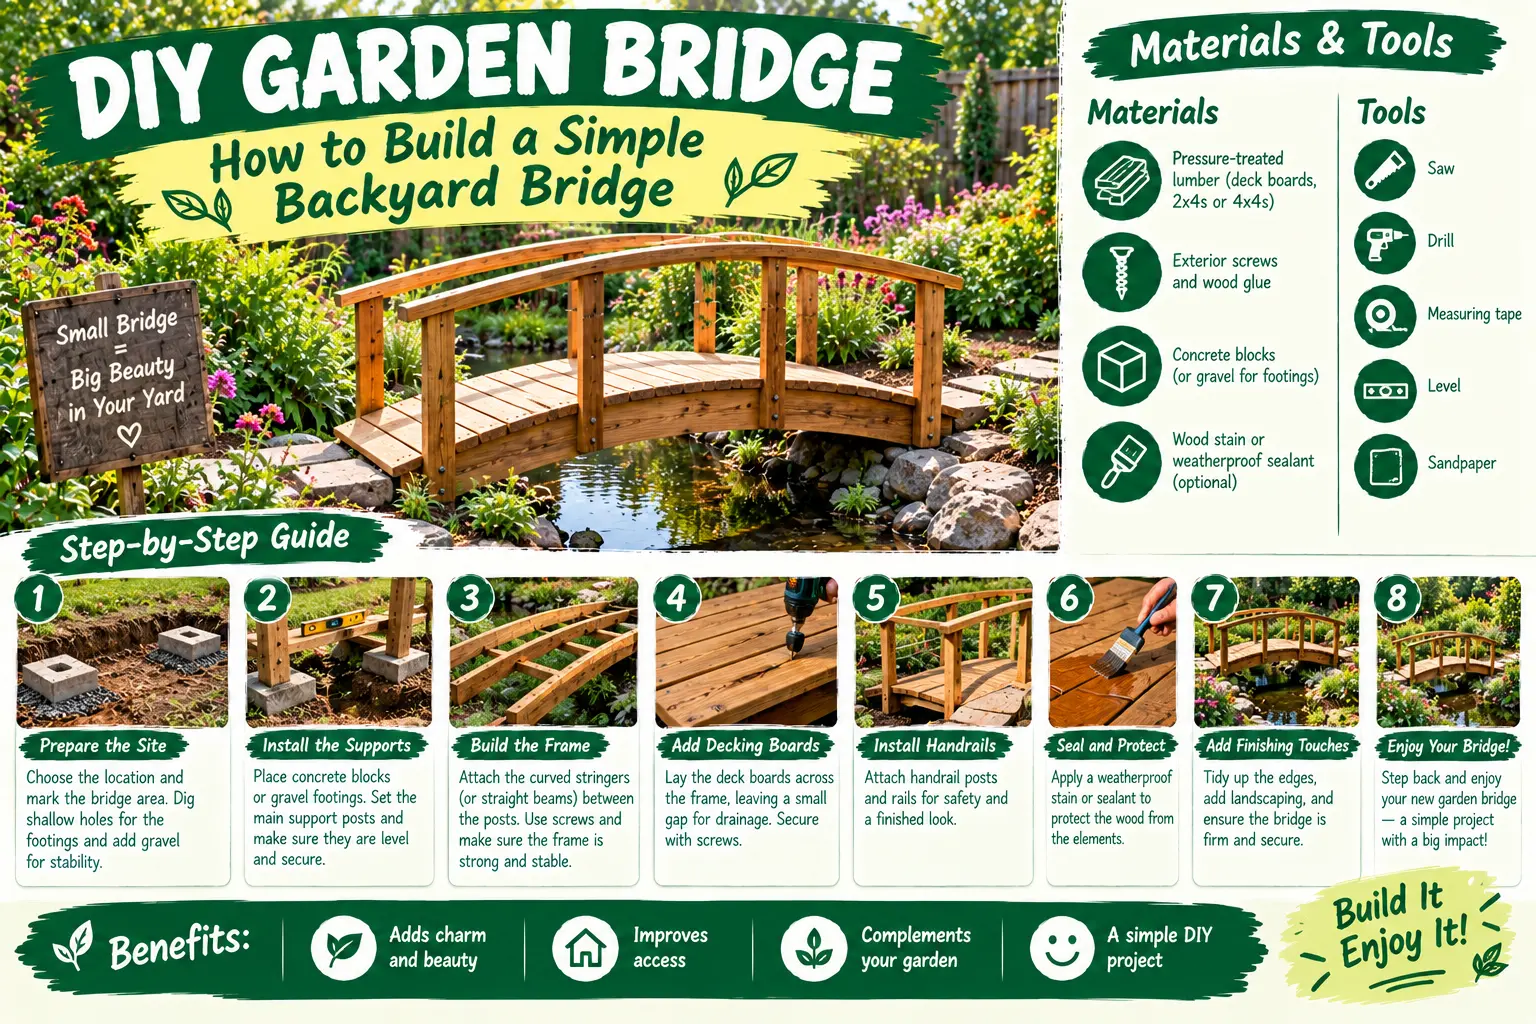
My Simple DIY Garden Bridge Design
I kept mine pretty basic.
The basic parts were:
- Strong structural supports underneath
- Outdoor-rated decking boards
- Exterior-rated fasteners appropriate for the materials
- Simple side edging
- Gravel and landscaping material around the ends
I wasn’t trying to build a highway bridge.
I wanted a small garden crossing that looked like it belonged in the backyard.
The important thing is that the main supporting members carry the load. The boards you walk on are not the only thing that makes the bridge strong.
Start With the Supports
This is the part where I tell you to slow down.
Don’t rush this stage because you’re excited to see the finished bridge.
I’ve done that with other backyard projects, and it usually means taking something apart later.
The supports need to sit securely and remain stable when the ground gets wet.
If the bridge ends sit directly on soil, you need to think about drainage and ground movement.
A bridge that feels solid in July can feel very different after several days of rain if the ground underneath it isn’t prepared properly.
Depending on your design and site, a compacted gravel base or appropriate support system may help keep things stable.
Keep the Walking Surface Simple
Once the structure is stable, the walking surface is much easier.
I like simple boards with enough spacing to let water drain away.
Don’t leave huge gaps, though. You don’t want a shoe, toy, garden tool or small animal finding its way between the boards.
And here’s something people sometimes forget: sand the edges.
A garden bridge can look rustic without having splinters sticking out everywhere.
Run your hand over the boards before you call the job finished. If something catches your hand, fix it.
Do You Need Railings on a Garden Bridge?
This depends on the bridge.
A very low decorative bridge over a dry garden bed is different from a bridge over a pond or a deeper drop.
For anything with a meaningful fall risk, railings or other protective features may be appropriate, and local safety requirements can apply.
Don’t skip safety just because you’re going for a rustic look.
I know the temptation.
You see pictures online of a beautiful bridge with no rails and think, “That looks awesome.”
Then you remember your uncle who always trips over absolutely nothing.
Yeah. Think about the people actually using your backyard.
How I Made My Bridge Look Natural
This part was actually fun.
I didn’t want the bridge to look like I had dropped a piece of construction equipment into the garden.
So I worked on the landscaping around it.
I added gravel around the approach and planted low-growing plants near the sides.
Then I used some natural stones around the drainage area.
That helped blend the bridge into the garden.
The trick is not making the bridge the only interesting thing in the area.
Let plants, rocks, mulch and paths connect everything together.
Can You Build a Garden Bridge Over a Dry Creek?
Absolutely, and this is one of my favorite ways to use one.
A dry creek bed can help direct rainwater through part of a landscape while also creating an attractive garden feature.
The bridge can then become a natural crossing point.
But don’t assume every drainage project is harmless.
Heavy rainfall can move a surprising amount of water. If you’re changing where water flows, especially near foundations, property boundaries or public drainage, you need to understand what happens during a serious storm.
My advice is simple: watch your yard during heavy rain before you start moving dirt.
You’ll learn more in one rainy afternoon than you will from staring at a dry backyard for a week.
Adding Plants Around a DIY Garden Bridge
This is where you can bring in some permaculture thinking.
You don’t need to plant twenty different species.
Use plants that fit the sunlight, moisture and soil conditions you already have.
Near a damp area, moisture-loving plants may work better. In a dry sunny spot, choose plants that can handle those conditions.
I also like adding herbs and pollinator-friendly flowers nearby when appropriate.
A bridge surrounded by greenery looks much better than a bridge surrounded by bare dirt.
Don’t Put a Bridge Where You Don’t Need One
Here’s an honest tip from somebody who’s built too many unnecessary things.
Don’t build a bridge just because Pinterest made it look cool.
Ask yourself what problem it solves.
Does it help you cross the garden?
Does it connect two paths?
Does it cover a drainage channel?
Does it create access to a pond?
If the answer is yes, great.
If the answer is “I just want a bridge because bridges are cool,” well…
That’s also a valid reason, honestly.
Just don’t spend $800 solving a problem you didn’t have.
My Top 5 DIY Garden Bridge Tips
If you’re planning your own, here’s what I’d pay attention to first:
- Measure twice. Don’t guess the width or length.
- Build the supports properly. The pretty boards come later.
- Use suitable outdoor materials. Especially for anything carrying people.
- Think about rain. Water changes everything in a backyard.
- Make the walking surface safe. Sand rough edges and avoid slippery surfaces.
And one more thing…
Don’t forget maintenance.
Every year, I like to inspect outdoor wood, fasteners, supports and the ground around the bridge.
Look for rot, loose boards, movement, rusting hardware, drainage problems and anything that feels different.
Five minutes of checking can save you from a much bigger repair later.
DIY Garden Bridge FAQ
Can I build a DIY garden bridge without a pond?
Yes. You can build one over a dry creek bed, drainage area, gravel path, garden bed or small landscape feature. You don’t need a pond.
How much does a DIY garden bridge cost?
It depends heavily on the size, materials and design. A tiny simple bridge can be fairly inexpensive, especially if you already have suitable materials. Larger bridges, decorative lumber, railings and proper foundations can get expensive quickly.
Is a DIY garden bridge safe?
It can be, if it’s properly designed, supported, constructed and maintained. Don’t treat a decorative bridge like a toy. If there’s a significant height, water hazard or structural load involved, get appropriate professional advice and follow local requirements.
Would I Build Another One?
Yep, I probably would.
Not because my backyard suddenly needed five bridges.
One is plenty.
I like this kind of project because it sits right in that sweet spot between useful and fun. It helps you move around the garden, handles an awkward little area, and adds some personality without turning the backyard into a theme park.
And that’s really what I like about homesteading.
You take what you’ve got and make it work better.
A weird drainage ditch becomes a garden feature. A pile of rocks becomes an edging wall. An old path becomes a better path. And sometimes a muddy little section of backyard becomes the perfect place for a DIY Garden Bridge.
Just remember what I learned: make it strong first, make it safe second, and worry about making it pretty after that.
Got a garden bridge project you’re thinking about? Leave a comment and tell me what you’re trying to cross. If you get stuck, ask. I’ve messed up enough backyard projects to probably recognize the problem.