FARMSOLO • BACKYARD LANDSCAPING
A DIY key wind chime is one of those garden projects that looks far more special than the materials suggest. A weathered branch, a handful of forgotten keys, and strong outdoor cord can become a rustic hanging feature that moves gently in the breeze and gives old objects a useful second life.
Best for: garden gates • covered porches • fences • cottage gardens • upcycled outdoor decor
Easy Weekend Project
You can make the basic version without cutting or drilling the keys because most already have a hole for hanging.
One Important Upgrade
Natural twine looks beautiful, but outdoor-rated cord or coated wire usually lasts longer in a wind chime that stays outside.
Quick Answer
To make a simple key wind chime, hang several old metal keys at different lengths from a strong branch or wooden bar. Space them close enough that neighboring keys can lightly touch in the breeze. Use a balanced hanger at the top and choose cord that can handle outdoor moisture and sun.

Why This Old-Key Wind Chime Looks So Good
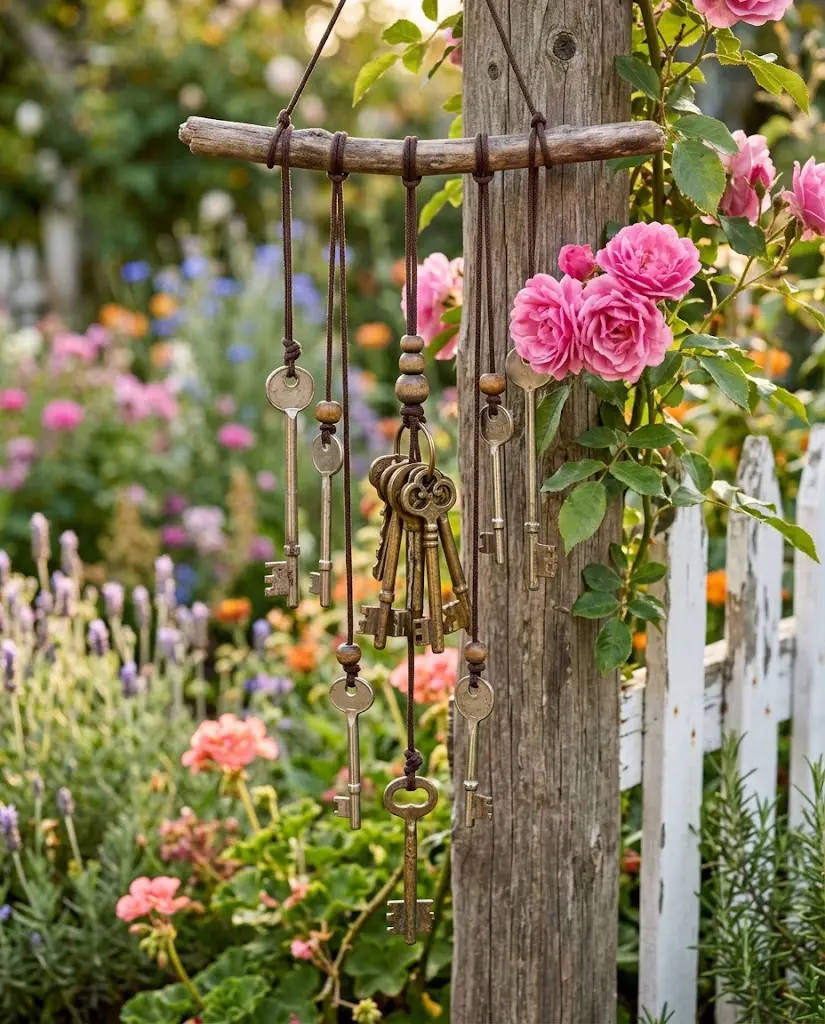
The inspiration image works because it does not try to make every part match.
Some keys are long and narrow. Others are short and heavy. Brass, silver, darkened steel, and weathered finishes all hang together from one rough piece of wood.
That imperfect mix is exactly what gives the project its cottage-garden character.
The staggered strands are useful too. They stop the design from looking like a flat row of keys and give nearby pieces more opportunities to touch when the breeze moves them.
FarmSolo Tip: Do not use a key that still opens your house, shed, vehicle, gate, mailbox, or other active lock. Use duplicates you no longer need or decorative keys instead.
9 DIY Key Wind Chime Ideas
01 • RUSTIC BRANCH
Hang the Keys From a Weathered Branch
This is the idea closest to the inspiration image and probably the easiest to recreate.
Choose a dry, solid branch without soft rot or loose bark. The branch does not have to be perfectly straight. A little natural shape makes the finished piece feel less manufactured.
Wrap decorative cord around a few parts of the wood if you want the handmade look shown in the photo, but use the strongest material for the actual load-bearing knots.
02 • STAGGERED LENGTHS
Let the Key Lengths Rise and Fall
Avoid cutting every strand to exactly the same length.
A staggered layout creates more visual movement and lets the different key shapes remain visible instead of overlapping in one straight row.
You can create a gentle V shape, a random cottage look, or place longer keys toward the center and shorter keys near the ends.
03 • MIX THE KEYS
Combine Modern Keys With Vintage-Looking Keys
You do not need a complete collection of antique skeleton keys.
Ordinary old house keys can add brighter silver tones, while decorative or older-style keys create the vintage shapes that make the wind chime visually interesting.
Different weights can also move differently in the breeze, which gives the hanging arrangement a less uniform feel.
04 • COLOR PALETTE
Keep the Natural Brass, Copper, and Silver Tones
The mixed metal colors in the inspiration image are part of its charm.
You can clean loose dirt from the keys without polishing away every mark. A little patina can make the piece look as if it has always belonged in the garden.
If a key has sharp rust flakes or rough burrs, smooth those areas before handling and hanging it.
05 • COTTAGE GARDEN
Hang It From a Garden Gate or Rustic Post
A weathered fence post, arbor, pergola, or covered gate can make the project look like part of the landscape instead of an ornament added afterward.
Leave enough clear space below and around the keys so they can move without hitting the fence, plants, or the post itself.
06 • GENTLE SOUND
Space the Keys for a Soft Clink
A key wind chime does not need to be loud.
Hang neighboring keys close enough that some can touch when the wind moves them, but avoid bunching everything into one heavy cluster.
Test the arrangement before making the final knots. A small change in spacing can make the movement much more natural.
07 • ROUND VERSION
Use a Wooden Hoop for a Fuller Wind Chime
If you want more movement than a straight branch provides, use a sturdy wooden hoop or round wooden piece as the top.
Arrange the key strands around the perimeter so wind can reach the piece from several directions.
A round version can also support a lightweight center striker if you want more frequent contact between the metal pieces.
08 • PERSONAL VERSION
Use Keys That Have a Story
Old keys often survive long after the lock, cabinet, shed, or house they belonged to is gone.
A wind chime can be a simple way to keep a small collection visible instead of leaving it forgotten in a drawer.
Just make sure none of the keys are still needed and remove labels or tags that reveal addresses or other private information.
09 • SHELTERED DISPLAY
Give It Some Protection From the Weather
The chime still needs moving air, but it does not have to hang in the most exposed corner of the yard.
A covered porch, arbor, garden entrance, or partially sheltered pergola can reduce constant soaking and harsh weather while still allowing enough breeze to move the keys.
What You Need
- 8–20 old or decorative metal keys
- One dry branch, wooden dowel, hoop, or other sturdy top support
- Outdoor-rated cord, braided nylon, waxed polyester cord, or suitable coated wire
- Scissors or appropriate cutters
- Small split rings if you do not want to tie directly through the keys
- A strong hanging cord or chain for the top
- Sandpaper for any rough wood or sharp metal edges
- Optional outdoor wood finish for the support
How to Make a Key Wind Chime Step by Step
- Sort the keys. Remove anything still in use and set aside pieces with unsafe sharp edges.
- Prepare the wooden support. Clean the branch and remove loose bark or splinters without trying to make it perfectly smooth.
- Lay everything out on a table. Arrange the keys in the order you want before cutting any cord.
- Cut different cord lengths. Vary them enough to create movement without letting the lowest keys hang excessively far below the others.
- Attach each key securely. Tie through the existing key hole or use a small split ring.
- Tie the strands to the support. Begin near the center and work outward so you can keep the visual weight balanced.
- Test the spacing. Lift the support and gently move it. Adjust neighboring keys until some can lightly contact each other.
- Add the top hanger. Use two balanced attachment points on a branch or three evenly spaced points on a round support.
- Hang it and inspect it again. Confirm that the hook, cord, support, and knots comfortably carry the entire weight.
What Cord Should You Use Outdoors?
| Material | Look | Outdoor use |
|---|---|---|
| Natural jute or twine | Very rustic and attractive | Best where protected; may weather and weaken faster |
| Braided nylon cord | Simple and less noticeable | Good choice when rated for outdoor use |
| Polyester cord | Clean, available in many colors | Useful for a more weather-resistant project |
| Coated wire | Minimal and industrial | Durable when suitable hardware is used |
| Fishing line | Almost invisible | Can work, but inspect regularly for wear and UV damage |
For the Look in the Pinterest Photo
Use a thin brown or copper-colored outdoor cord rather than ordinary untreated garden twine. You keep the warm handmade appearance while improving durability.
How Do You Make the Keys Chime?
Keys need movement and contact to create much sound.
If every strand is widely separated, the finished piece may move beautifully but remain almost silent.
Begin by hanging the keys close enough that a gentle sideways movement allows neighboring pieces to touch. Larger and heavier keys can be mixed with smaller ones to create different metallic sounds.
For a round wind chime, you can also add a lightweight central metal washer or other suitable striker so moving keys have another surface to touch.
Where Should You Hang a Key Wind Chime?
Choose a place with occasional moving air but enough protection that the piece is not repeatedly slammed around during storms.
A porch edge, pergola, garden arbor, fence post, or tree branch can work when the support is stable.
Avoid hanging it directly over a walkway or seating area where a broken strand could drop a metal key onto someone below.
Also think about neighbors and bedrooms. Even a gentle wind chime can become less charming at 2 a.m. during a windy night.
Will Old Keys Rust Outside?
It depends on the metal and finish.
Some keys may darken or develop surface corrosion outdoors, while brass-colored and plated keys may age differently.
A weathered appearance can suit this project, but heavily flaking corrosion or sharp edges are a reason to remove a key.
Inspect the cord and the top hanger at the same time. In most homemade wind chimes, the hanging material is more likely to need replacement before the keys do.
More rustic garden inspiration: If you like giving old natural materials a second purpose, see FarmSolo’s Tree Stump Planter Ideas. For another simple backyard wood project, see the DIY Garden Bridge guide.
Common Key Wind Chime Mistakes
- Using keys that are still active. Double-check before turning real keys into garden decor.
- Using weak indoor string. Moisture, UV exposure, and repeated movement can eventually break it.
- Spacing every key too far apart. The keys need some opportunity to contact each other if you want sound.
- Putting every strand at the same height. Staggered lengths usually look more natural.
- Ignoring the weight. A large collection of metal keys can become surprisingly heavy.
- Using a rotten branch. The support should remain solid even if its appearance is rustic.
- Hanging it above a busy path. Choose a location where a failed strand will not create a hazard.
- Leaving damaged cord in place. Check knots and hanging lines periodically.
- Making it too loud for the location. A softer design is usually better near windows, neighbors, or sleeping areas.
DIY Key Wind Chime FAQ
Can you make a wind chime from old keys?
Yes. Most keys already have holes, which makes them easy to hang from cord, wire, split rings, a branch, wooden hoop, or another suitable support.
Do keys actually make a good wind chime sound?
They can produce a light metallic clinking sound when they are close enough to touch. The exact sound depends on the key size, metal, spacing, and how freely the strands move.
What is the best string for an outdoor key wind chime?
Outdoor-rated nylon or polyester cord is a practical option. Natural twine gives a more rustic appearance but may need replacement sooner when exposed to repeated moisture and sun.
How many keys do I need?
There is no fixed number. Around 8–12 keys can make a simple small chime, while a longer branch can hold a much larger collection as long as the branch and hanger can safely carry the weight.
Do I need to drill the keys?
Usually not. Most keys already have a suitable opening in the head. A split ring can make attachment easier when you do not want to tie cord directly to the metal.
Can I leave the key wind chime outside all year?
You can use outdoor materials, but weather still causes wear. Inspect the cord, hanger, wood, and keys periodically and consider bringing the chime under cover during severe storms or harsh winter conditions.
Where is the best place to hang it?
A location with light airflow and some weather protection usually works well, such as a porch, pergola, arbor, or sturdy garden post. Keep it away from busy walkways and places where the sound could disturb sleeping areas.
Let the Old Keys Become Part of the Garden
The best thing about this project is that it does not need perfect materials. Scratched keys, uneven colors, weathered wood, and slightly different hanging lengths are what make it interesting.
Use a strong support, choose cord that suits the weather, give the keys enough room to move, and hang the finished piece somewhere you can actually enjoy it.
A drawer full of forgotten keys can become one of the simplest and most personal pieces of garden decor you make.