DIY Tire Pond: How I Turned an Old Tire Into a Backyard Water Feature
I almost threw this old tire away.
It was sitting behind my shed, half buried in weeds, looking like it had already lived three different lives. One day I looked at it and thought, “There’s gotta be something I can do with that thing.”
That’s how my DIY tire pond started.
And I’ll be honest with you, the first attempt wasn’t exactly beautiful. The pond leaked, the soil around it sank a little, and I somehow managed to get mud on my boots, pants, and the dog.
You’re gonna laugh at this part. I spent more time cleaning mud off myself than I did actually digging the hole.
But after fixing a few things, I ended up with a little backyard water feature that looked surprisingly good. It gave an old tire a second life and made a boring corner of the yard feel much more alive.
So if you’ve got an old tire sitting around, lemme show you how I made mine.
Why Build a DIY Tire Pond?
There are plenty of fancy backyard ponds you can build, but not every homesteader has the space, money, or desire to dig a giant pond.
A tire pond is different.
It’s small, inexpensive, and can fit into a backyard garden, urban homestead, patio area, or even a small landscaping project.
And I like projects that reuse things instead of sending them straight to the landfill.
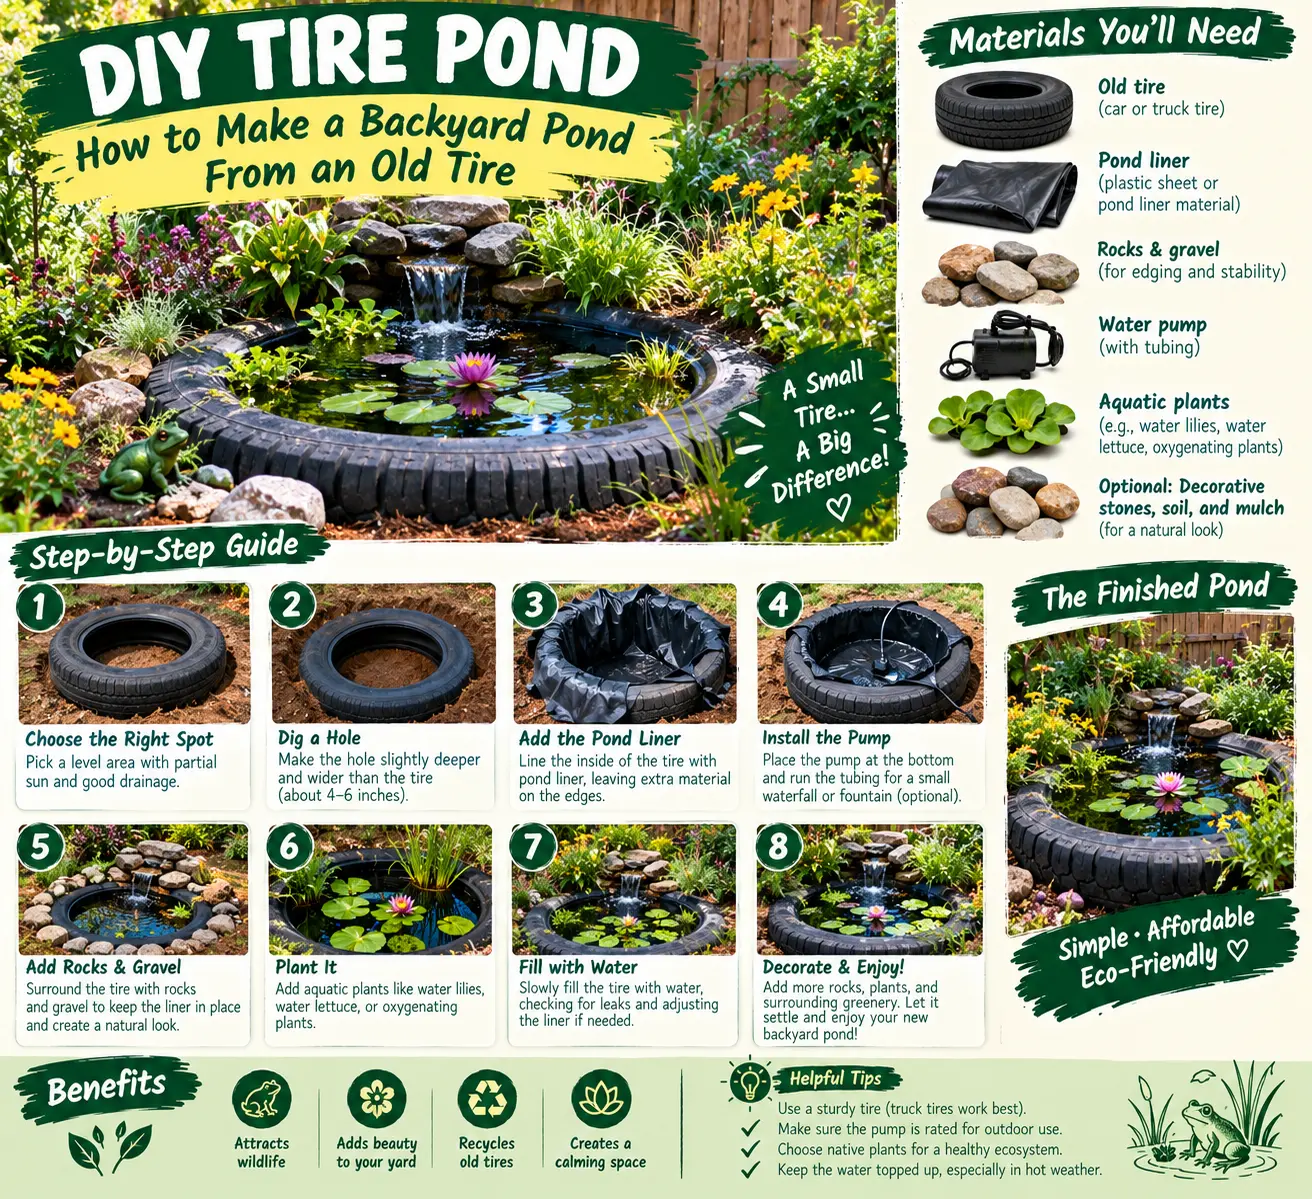
An old tractor or car tire can become the basic shape of your pond. Add a proper pond liner, some gravel, plants around the outside, and you’ve got yourself a little water feature.
What You’ll Need for a DIY Tire Pond
Before you start digging, gather everything first.
I learned that lesson after starting projects with half the materials missing. Then you’re standing in the backyard with a shovel in your hand wondering why you didn’t make a list first.
My basic materials
- One large old tire
- Pond liner or heavy-duty pond-safe liner
- Shovel
- Level
- Sand or fine soil for cushioning
- Decorative rocks or stones
- Gravel
- Water
- Optional pond plants
- Optional small solar water pump
- Utility knife for trimming the liner
You don’t need every item on the list. It depends on the size and style you’re going for.
First, Pick the Right Tire
This sounds simple, but the tire makes a big difference.
I like using a larger tire because it gives you more room for water and makes the finished pond easier to see.
Small car tires can work too, especially for a tiny garden feature, but don’t expect them to hold a huge amount of water.
Whatever tire you use, inspect it first.
You don’t want one that’s falling apart, badly cracked, or contaminated with something nasty from its previous life.
Where Should You Put a Tire Pond?
This is one of those things that’s easy to ignore until it’s too late.
I put my first little pond in a spot that looked perfect from the kitchen window.
Problem was, it got way too much afternoon sun.
The water warmed up quickly and algae showed up faster than I could say, “What the heck happened?”
So think about sunlight before digging.
A little sunlight is fine. But depending on your climate and what you’re growing around the pond, too much direct sun can make maintenance harder.
- Pick a fairly level area.
- Avoid places where dirty runoff flows directly into the pond.
- Don’t put it right beside a downspout.
- Leave enough room around it for maintenance.
- Think about how you’ll refill it.
- Make sure the location is safe around children and pets.
Step 1: Dig the Hole
Place the tire where you want the pond.
Then mark around it.
Move the tire out of the way and start digging.
You want the hole deep enough that the tire sits securely and doesn’t stick ridiculously high above the ground.
I usually leave the top edge slightly above the surrounding soil rather than burying everything completely. That helps reduce soil and dirty runoff washing straight into the pond during heavy rain.
Use your level as you dig.
And yes, you’ll probably check it about fifteen times.
That’s normal.
Step 2: Make a Soft Base
Once the hole is dug, remove sharp rocks, sticks, roots, and anything else that could damage the liner.
This is where I made my first mistake.
I thought one little sharp rock couldn’t possibly matter.
Guess what?
It mattered.
Use a layer of sand or fine soil to make the bottom smoother. The idea is to give your liner some protection from sharp objects underneath the tire.
Take your time here
Run your hand over the bottom carefully and remove anything sharp. A few extra minutes now is much easier than draining your pond later because you discovered a tiny puncture.
Step 3: Put the Tire Into the Hole
Now comes the part where you find out just how heavy an old tire can be.
Roll it over instead of trying to carry it if it’s large.
Set the tire into the hole and check the level again.
Check it from different directions.
If one side is noticeably higher, take the tire out and adjust the ground underneath.
Don’t try to fix a crooked tire by piling rocks around it afterward.
I’ve tried that.
It looked terrible.
Step 4: Install the Pond Liner
This is the most important part of the whole DIY tire pond.
The tire gives you the shape, but the liner is what actually holds the water.
Place the liner inside the tire and push it down into the center.
Don’t pull it tight like you’re wrapping a birthday present.
Let it fold naturally around the inside of the tire.
You’ll have some wrinkles. That’s okay.
Try to make the wrinkles reasonably smooth so there aren’t giant folds taking up half your pond.
Leave extra material around the top until the pond is filled and you’ve checked everything. Once you’re sure the liner is sitting correctly, you can trim the excess carefully.
Step 5: Add Water Slowly
This is my favorite part because the project finally starts looking like something.
Add water slowly.
As the water enters, the liner will settle into the shape of the tire.
Stop occasionally and check the edges.
Make sure the liner isn’t pulling heavily to one side.
Also check the level of the water around the tire.
If the water is dramatically higher on one side, your tire probably isn’t sitting level.
It’s much easier to fix that now than after you’ve added rocks, plants, and everything else.
Step 6: Hide the Tire
Now we get to the fun part.
Because let’s be honest, an exposed black tire isn’t exactly the prettiest garden decoration.
This is where rocks and landscaping can make a huge difference.
I like using natural-looking stones around the outside. You can also use gravel, larger rocks, ground-cover plants, or small ornamental plants around the pond.
Should You Add Plants to a DIY Tire Pond?
You can, but keep it simple.
For a small pond, too many plants can quickly take over the water.
I’d start with one or two suitable aquatic plants rather than turning the tire into a miniature jungle.
And always make sure the plants you choose are appropriate for your climate and legal to grow in your area.
If you’re trying to create a more natural backyard, plants around the outside can be just as useful visually as plants inside the pond.
What About a Small Solar Pump?
This is something I really like.
A small solar water pump can add gentle movement to the water and give your pond a little more life.
You don’t need some giant fountain shooting water ten feet into the air.
A small bubbling pump is enough.
It also gives you another chance to use a little solar power in the backyard without running a permanent electrical cable across your garden.
How I Keep My Tire Pond Clean
Small ponds don’t magically stay clean.
Leaves fall into them.
Dust gets in.
Sometimes a bug decides it’s a swimming pool.
That’s normal.
I remove leaves by hand when I notice them and keep an eye on the water level during hot weather.
If you have a pump, check it regularly for debris.
And don’t dump random chemicals into the water because you saw a little algae.
Figure out why the algae is there first. Too much sunlight, excess nutrients, and stagnant water can all contribute to water-quality problems.
My Biggest DIY Tire Pond Mistakes
I Didn’t Level the Ground Enough
The pond looked fine when it was empty.
Once filled with water, I could clearly see it wasn’t level.
Water has a funny way of exposing your mistakes.
I Used Too Many Rocks
I got carried away.
One rock looked good, then another, then another.
Before I knew it, the pond looked like I was building a stone wall instead of a little water garden.
Less can be better.
I Put It Too Close to the Garden
This wasn’t a disaster, but soil and mulch kept falling into the water.
Now I leave a little breathing room between my pond and heavily worked garden beds.
Is a DIY Tire Pond Good for a Small Backyard?
Yes, that’s actually one of the reasons I like the idea.
You don’t need acres of land.
A tire pond can fit into a small backyard, urban homestead, cottage garden, or even a compact landscaping area.
Just remember that a small pond is still a water feature that needs some maintenance.
And if you have young children, think carefully about safety. Even shallow water can present a drowning hazard to small children.
Can You Make a Tire Pond Look Beautiful?
Heck yes.
That’s actually what surprised me most.
The tire itself isn’t pretty. But once you add the right rocks, plants, mulch, and surrounding landscaping, you stop noticing that it’s a tire.
It starts looking like part of the backyard.
And that’s what I like about homesteading projects.
You don’t always need expensive materials.
Sometimes you just need to look at something old and think about what else it could become.
DIY Tire Pond FAQ
Can I make a tire pond without a pump?
Yes. A pump isn’t required for a simple decorative pond. Just remember that stagnant water can need more attention, especially during hot weather.
Can I put fish in a tire pond?
I wouldn’t automatically assume a small tire pond is suitable for fish. The water volume, temperature, oxygen, filtration, and local conditions all matter. For a very small pond, I prefer keeping things simple with plants and a water feature.
How deep should a DIY tire pond be?
It depends on the tire and the design. You don’t need a very deep hole for a basic decorative tire pond. The important thing is making the structure stable and the liner properly supported.
Can I use an old car tire?
You can use a suitable clean tire as the outer structure, but the tire shouldn’t be relied upon to hold the water. Use a proper pond liner and inspect the tire before using it.
Would I Build Another Tire Pond?
Yep, and I’d probably make the second one a little bigger.
My first one taught me something I keep learning over and over again with homesteading: simple projects are usually the ones I enjoy the most.
You don’t need a giant backyard makeover.
You can take an old tire, dig a small hole, add a proper liner, surround it with rocks and plants, and create something that makes your backyard feel completely different.
And every time I walk past mine, I remember that ugly old tire sitting behind the shed.
Funny how things change.
Give That Old Tire Another Life
If you’ve got an old tire sitting around, don’t throw it away just yet.
With a little digging, a good liner, some rocks, and a Saturday afternoon, you can turn it into a simple backyard water feature.
Just take your time with the level, don’t cut the liner too early, and don’t skip the safety part.
And if you build one, I’d love to hear how it went. Got a weird question? Comment below. I mess up too, so you’re definitely not alone.
A DIY tire pond doesn’t have to be fancy. It just has to work, look good in your backyard, and give you something you actually enjoy looking at.