DIY Backyard Hammock Stand: How I Built a Relaxing Spot in My Backyard
Let me tell you something. After spending years working in the garden, moving chicken feed, pulling weeds, fixing fences, and generally making more work for myself than I needed to, I finally decided I needed a place to do absolutely nothing.
That’s when I built my first DIY backyard hammock stand.
And yep, I made a few mistakes. The first version leaned a little more than I liked, and I learned very quickly that a hammock stand needs to be stronger than it looks. But once I got it right, that little corner of the backyard became one of my favorite places on the whole homestead.
So lemme show you how I built mine, what I would change, and a few things you really should think about before hanging your hammock.
Why I Wanted a DIY Backyard Hammock Stand
I used to think hammocks were only for people with two perfect trees growing about 12 feet apart.
Well, my backyard didn’t cooperate.
I had one decent tree, another tree that was way too far away, and a bunch of smaller trees that I wasn’t about to trust with my backside.
So I started looking at hammock stands.
The store-bought ones were fine, but some were expensive and some just didn’t look very sturdy. I wanted something simple, strong, and something I could build with basic tools.
That’s how the DIY idea started.
How Big Should a Hammock Stand Be?
This is where I messed up the first time.
I built the stand before checking the actual length of my hammock properly. Big mistake.
A hammock isn’t stretched tight like a clothesline. It needs room to sag. If your stand is too short, you’re going to end up sitting practically on the ground.
Before cutting anything, measure your hammock from one hanging point to the other.
For many backyard hammocks, a stand around 10 to 15 feet long can work, but don’t blindly copy those numbers. Hammock sizes are different.
Measure your own hammock first.
- The total hammock length
- The distance between the hanging points
- How high the hammock needs to hang
- Where you’ll put the stand
- Whether the ground is level
What I Used for My DIY Hammock Stand
I wanted to keep mine simple. No fancy woodworking. No complicated joints that require twelve different tools.
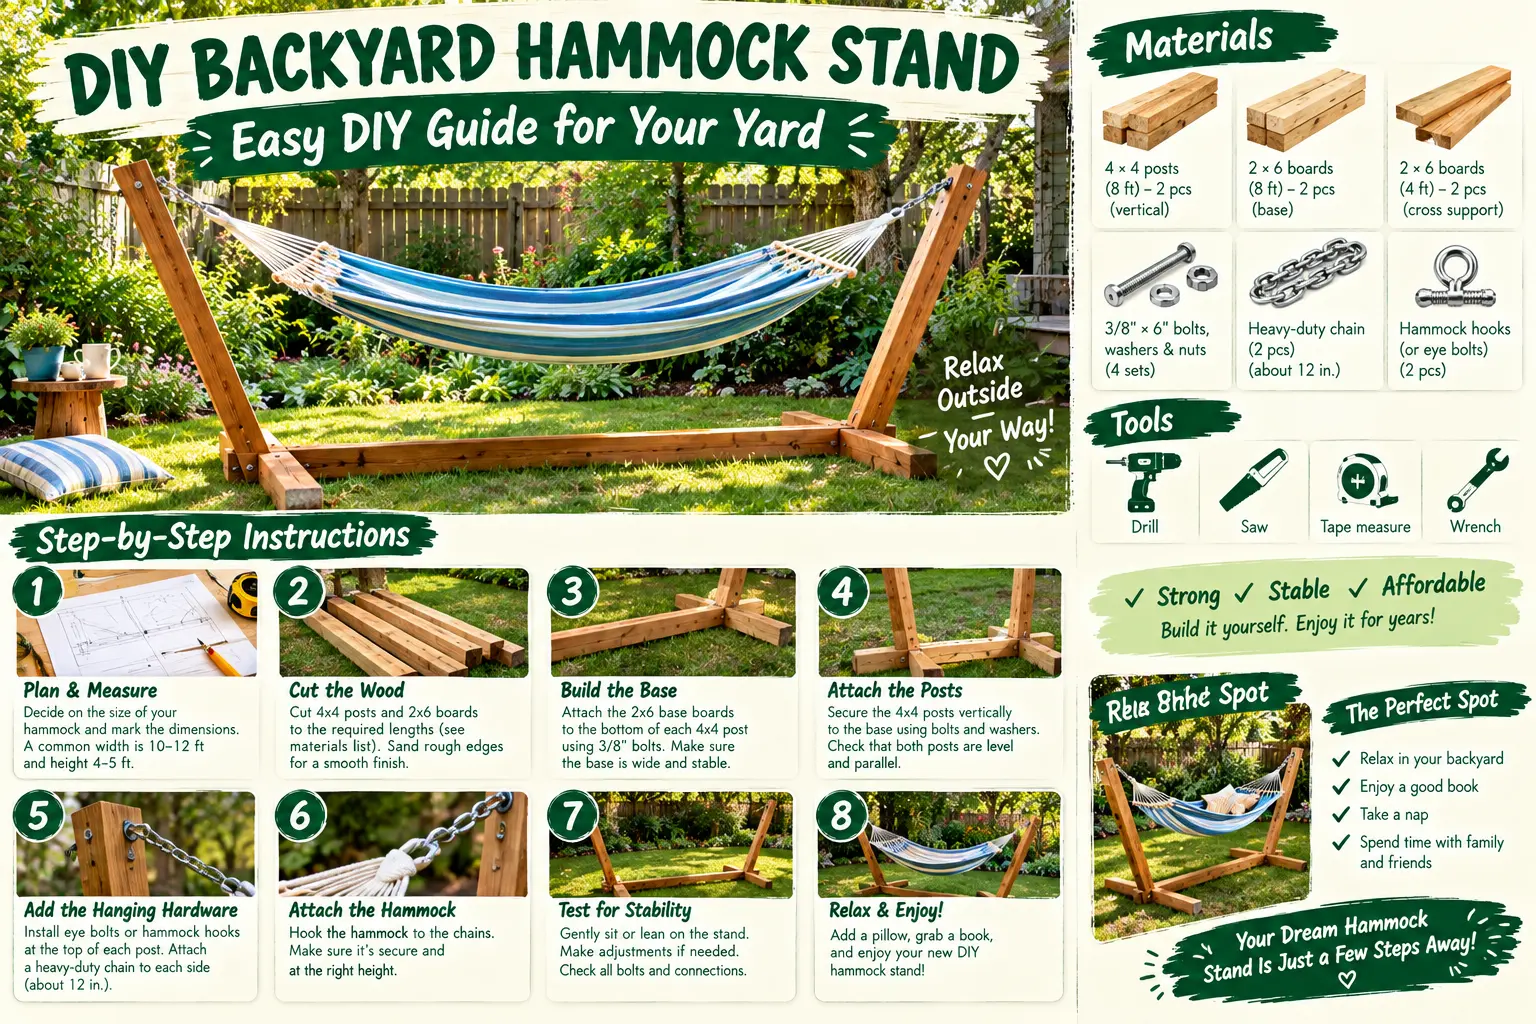
For a basic wooden stand, you’ll need strong outdoor-rated lumber, exterior screws or bolts, a drill, measuring tape, saw, level, and something to help smooth the edges.
I also recommend using strong hardware designed for outdoor loads. This isn’t the place to use the cheapest little hooks you find in the garage.
My basic material list
- Heavy-duty outdoor lumber
- Exterior-rated screws or structural bolts
- Heavy-duty hammock hooks or eye bolts
- Drill and suitable drill bits
- Saw
- Tape measure
- Level
- Sandpaper
- Wood preservative or exterior stain
If you already have leftover lumber from a garden project, you might be able to save some money. Just make sure the wood is actually strong enough and hasn’t started rotting.
And don’t use a cracked board just because it’s free.
Trust me, I learned the hard way that “it’ll probably be fine” is not a great construction plan.
Step 1: Pick the Right Spot in the Backyard
Before cutting one piece of wood, walk around your backyard.
I mean really walk around it.
Look at the sun. Look at where rainwater collects. Check the ground. Think about whether you want morning shade or afternoon shade.
My favorite hammock location ended up being close enough to the garden that I could see everything from the hammock, but far enough away that I wasn’t constantly staring at weeds that needed pulling.
That’s important.
If you put the hammock directly beside your vegetable garden, you may spend your relaxing time thinking, “I really should pull those weeds.”
Not relaxing.
Step 2: Build the Long Base
The long base is what keeps the stand from tipping or moving around.
I like making the base wider than I originally think I need. Stability matters more than saving a few inches of lumber.
Lay the base pieces on a flat surface and check everything with a level.
Then attach the supporting pieces securely using exterior-rated hardware.
Don’t rush this part.
I know, you’re excited to get the hammock hanging. I was too. But this is the part where a few extra minutes can save you a whole afternoon of fixing things later.
Step 3: Add the Upright Supports
The upright supports are the pieces that hold the hammock at each end.
This is where I would spend most of your attention.
They need to be securely attached to the base and properly supported. I prefer adding diagonal braces because they make the whole structure feel much more solid.
Think of it like a garden trellis. A tall upright post by itself can move around. Add support from the side and suddenly it becomes much stronger.
Step 4: Attach the Hammock Hardware
Once the frame is solid, install the hanging hardware.
Use hardware rated for outdoor use and appropriate for the load. The attachment point should go through a strong structural section, not just a thin piece of decorative wood.
I also like to round or sand sharp edges around the hammock area.
You don’t want to catch your arm or tear your hammock every time you walk past it.
Ask me how I know.
Step 5: Sand and Protect the Wood
This part isn’t exciting, but don’t skip it.
Sand down rough areas, especially around the edges and anywhere your hands might touch.
Then use an exterior-rated wood stain, sealer, or other suitable outdoor finish.
Your DIY backyard hammock stand is going to deal with sun, rain, humidity, dirt, and temperature changes. Even good outdoor lumber needs some care.
Step 6: Test Your DIY Backyard Hammock Stand
Here’s where I don’t recommend being brave.
Don’t immediately jump into the hammock like you’re testing a trampoline.
First, inspect every connection.
Push against the stand gently. Look for movement. Check the bolts and screws. Make sure the base isn’t rocking.
Then put some weight into the hammock gradually.
I usually sit down slowly and stay close to the ground the first time.
If something moves that shouldn’t move, get out and fix it.
That’s not the time to say, “Well, maybe it’ll settle down.”
My Biggest DIY Hammock Stand Mistakes
Since we’re friends here, I’ll tell you what I got wrong.
I Made the First Stand Too Narrow
It looked fine until I actually got into the hammock.
The stand moved more than I liked, so I rebuilt the base wider and added stronger side supports.
I Didn’t Think About the Ground
My first spot wasn’t perfectly level.
That little slope didn’t look like much when I was standing there. Once the hammock was hanging, though, I noticed it immediately.
If your yard slopes, level the area or adjust the design so the stand sits securely.
I Used Cheap Hardware
This one was just dumb.
I figured the wood was strong, so the little hardware wouldn’t matter.
It does matter.
Use quality hardware for the hanging points. That’s one place where I don’t try to save money.
Can You Build a Hammock Stand Without Fancy Tools?
Yep.
You don’t need a giant woodworking shop.
A basic saw, drill, measuring tape, level, and some patience can get you pretty far.
The important part isn’t having every tool known to mankind. It’s measuring correctly and building the frame carefully.
And please don’t feel bad if your first cut isn’t perfect.
Mine wasn’t.
That’s why God invented sandpaper. At least that’s what I tell myself.
How I Use My Hammock After Working in the Garden
This is honestly my favorite part.
After working outside, I grab a cold drink, wash the dirt off my hands, and lay down for fifteen or twenty minutes.
Sometimes I read.
Sometimes I check the garden.
Sometimes I just stare at the trees.
And sometimes I fall asleep.
That’s the nice thing about a backyard hammock. It doesn’t have to be complicated.
You don’t need a fancy outdoor living room with expensive furniture.
A sturdy stand, a comfortable hammock, a little shade and you’re good.
Can You Add Plants Around a Hammock Stand?
Absolutely, and this is where I like mixing my homesteading projects with a little backyard landscaping.
You can plant shade-tolerant plants around the area, add container herbs nearby, or use a few native plants to make the space feel more natural.
Just don’t plant anything with aggressive roots directly beside the stand foundation.
And don’t let vines grow all over the structure unless you’ve specifically designed it for that purpose.
I’ve learned that “I’ll just let this vine grow here” can turn into a full-time gardening project pretty fast.
DIY Backyard Hammock Stand FAQ
Can I build a hammock stand from regular lumber?
You can build one from suitable structural outdoor lumber, but don’t assume every cheap board is strong enough. Choose straight, sound lumber without major cracks or rot, and protect it from outdoor weather.
How much does a DIY backyard hammock stand cost?
It depends on the lumber and hardware you already have. If you’ve got leftover wood from another DIY project, you can keep the cost down. Quality hardware is one place where I wouldn’t try to save every dollar.
Is a DIY hammock stand better than using trees?
It depends on your backyard. A stand gives you flexibility because you can put the hammock where you want it without needing two suitable trees. For me, that was the whole reason I built one.
Would I Build Another DIY Hammock Stand?
Yep. Absolutely.
And I’d build the second one better than the first.
That’s kind of the fun of homesteading. You build something, discover what you did wrong, fix it, and then the next project gets a little better.
If you’re thinking about building a DIY backyard hammock stand, don’t overcomplicate it. Measure your hammock, choose a good location, build a strong base, use proper hardware, add plenty of support, and take your time testing it.
Then grab yourself a cold drink and enjoy the thing.
One Last Thing From Me
Don’t make your hammock stand another project that sits half-finished behind the shed.
Build it, make it safe, and actually use it.
You’ve earned a little time doing nothing after all that gardening, compost turning, chicken feeding, canning, fixing, planting and cleaning.
Got a weird question about building your own stand? Drop it in the comments. I actually like those questions because half the time I’ve already made the same mistake.
Now go build that DIY backyard hammock stand and enjoy your backyard.