DIY French Drain: How I Finally Stopped Water From Pooling in My Backyard
My first attempt at fixing a soggy backyard was pretty simple.
I bought some dirt.
I spread it around the wet area.
Then it rained.
Guess where the water went?
Yep. Right back to the same spot.
That’s when I finally started looking seriously at a DIY French drain. I had seen French drains before, but I always thought they were one of those projects that needed a contractor, a mini excavator and a wallet full of money.
Turns out, a simple French drain isn’t nearly as scary as I thought.
It’s still real work, though. There’s digging. Lots of digging. My back reminded me of that for about three days.
But if you’ve got standing water around your backyard, garden, chicken coop, driveway or foundation area, a properly planned French drain can give that water somewhere better to go.
First Things First: What Is a French Drain?
A French drain is basically a drainage trench designed to collect and move water away from an area where you don’t want it.
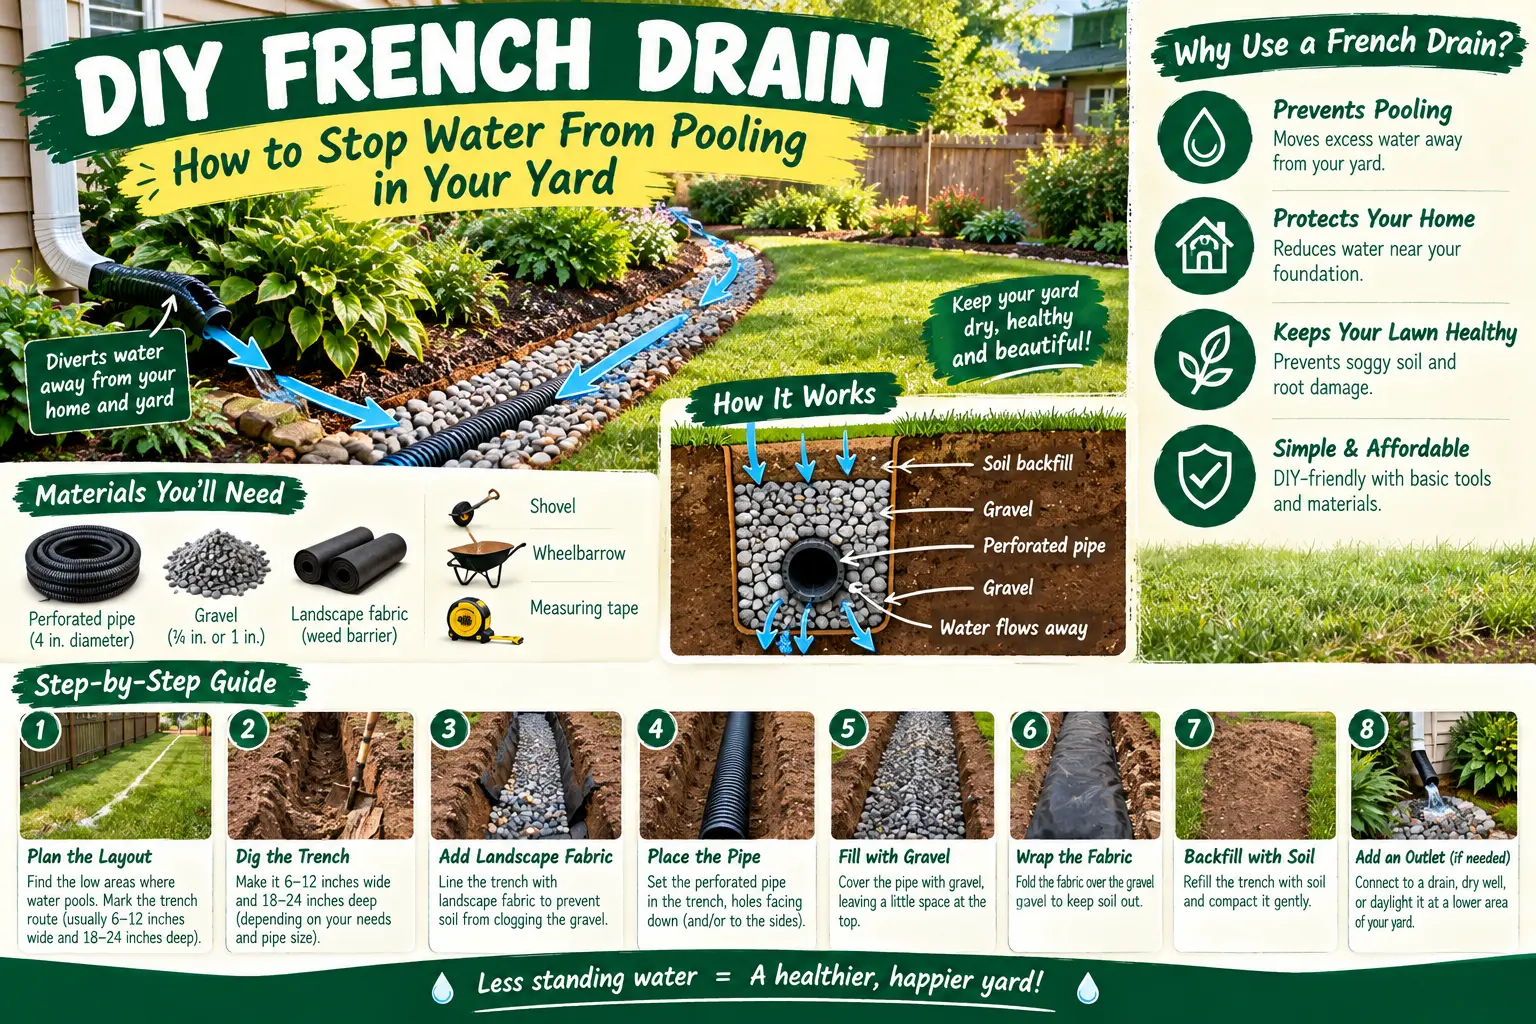
The basic setup usually includes:
- A sloped trench
- Permeable landscape fabric
- Perforated drainage pipe
- Washed drainage gravel
- A suitable outlet or discharge area
Water moves through the gravel and into the perforated pipe. The pipe then carries the collected water toward a suitable place where it can safely drain away.
It sounds complicated when you read about it online.
In the backyard, it’s basically a trench with a pipe and gravel that gives unwanted water a better path.
Don’t start digging until you’ve figured out where the water is coming from and where you want it to go.
My Backyard Had a Water Problem
The wet area in my yard wasn’t random.
After a heavy rain, water was coming down from one side of the property and collecting near the garden.
At first I blamed the soil.
Then I blamed the slope.
Then, because this is homesteading and I apparently need to make every problem harder, I blamed the chickens.
The chickens were innocent this time.
The real problem was drainage.
Once I watched the water during a storm instead of guessing, everything became much clearer. Water naturally followed the slope and collected in the lowest area.
That’s the first thing I’d recommend you do.
Watch the water.
Don’t guess.
Go outside during or shortly after a good rain and see where the water actually travels.
Before You Build a DIY French Drain, Ask These Questions
1. Where is the water coming from?
Is it roof runoff? A sloped yard? A downspout? Poor soil? A driveway?
2. Where can the water safely go?
You need a legitimate outlet. Don’t simply move the water problem into your neighbor’s yard.
3. Are there underground utilities?
This one is serious. Before digging, use your local utility-locating service or appropriate local process to identify buried utilities.
4. Is the problem actually a French-drain problem?
Sometimes a downspout extension, grading correction, gutter repair or surface swale is a better solution.
The Materials I Would Gather First
Here’s where I try not to overcomplicate things.
For a basic backyard drainage project, you’ll generally need:
- Perforated drainage pipe suitable for the project
- Washed drainage gravel
- Permeable landscape fabric
- Shovel and digging tools
- Level or laser level
- Measuring tape
- Wheelbarrow
- Gloves and eye protection
Depending on the size of your project, you may need more specialized equipment.
I started with hand tools because my drainage project wasn’t huge.
Was it hard?
Oh yeah.
Would I rent equipment for a much longer trench today?
Absolutely.
There’s no award for digging 100 feet by hand.
Step 1: Mark the Drainage Route
Before touching the shovel, mark where you want the French drain to run.
I like using string and stakes because it’s cheap and easy to change.
Walk the route.
Look at it from different angles.
Think about lawn mowing, garden paths, wheelbarrows and future projects.
This is one of those moments where planning for ten extra minutes can save you hours later.
And don’t forget the outlet.
A French drain isn’t magic.
If the pipe has nowhere appropriate to discharge, you’ve just created an underground place for water to collect.
Step 2: Give the Trench a Real Slope
This is probably the part people skip because it isn’t very exciting.
Don’t skip it.
Your drainage pipe needs an appropriate fall toward its outlet so gravity can help move the water.
You don’t necessarily need some crazy steep slope.
You need a consistent route that actually moves water in the direction you’ve planned.
Use a level, measuring method or laser level to check the elevation as you dig.
I made the mistake of eyeballing slope once.
It looked perfect.
It wasn’t.
Water has a wonderful way of exposing bad math.
Step 3: Dig the Trench
Now comes the fun part.
Dig.
And dig some more.
The exact trench dimensions depend on your drainage needs, pipe size, soil and site conditions, so don’t assume one measurement works for every backyard.
For a small garden drainage project, you may be able to manage the work with a shovel.
For a large yard or long drainage system, renting equipment can make much more sense.
Keep the bottom of the trench reasonably smooth and maintain your planned slope.
A French drain can look beautiful when finished and still fail because the trench doesn’t have the right slope or because water has nowhere useful to go.
Step 4: Line the Trench With Landscape Fabric
This is one step I wouldn’t skip.
Place a suitable permeable landscape fabric in the trench, leaving enough extra material along the sides to fold over the drainage materials later.
The idea is to help keep surrounding soil from migrating into the gravel and drainage system.
Don’t use a solid plastic sheet where you need water to move through the system.
You want water to enter the drainage area while limiting soil and sediment intrusion.
Step 5: Add the Gravel
Put an appropriate layer of clean, washed drainage gravel into the bottom of the trench.
This gives the perforated pipe a stable drainage area and allows water to move around the pipe.
And yes, you’ll probably need more gravel than you think.
I made the classic mistake of buying what looked like a mountain of gravel.
Then I started filling the trench.
Suddenly my mountain looked more like a small hill.
Measure your project before ordering materials.
Step 6: Install the Perforated Pipe
Place the perforated drainage pipe on the gravel bed.
Make sure the pipe follows the planned slope toward the outlet.
The exact pipe configuration depends on the system you’re building and the manufacturer’s instructions, so follow the pipe specifications you’re using.
Connect sections securely and make sure the discharge end is protected from blockage or erosion.
Then check the slope again.
Yes, again.
You’re probably tired of hearing me say that.
But I’d rather check it three times than bury a drainage pipe that doesn’t drain.
Step 7: Cover the Pipe With More Gravel
Once the pipe is positioned correctly, cover it with additional clean drainage gravel.
Keep adding gravel until the pipe is surrounded and protected.
Don’t throw big chunks of broken concrete or random construction debris into the trench because you happen to have some lying around.
I know the temptation.
I’ve done enough DIY projects to know how quickly a pile of “useful junk” grows.
But drainage systems work better when you use appropriate materials.
Step 8: Fold the Fabric Over the Gravel
Remember that extra landscape fabric you left on the sides?
Fold it over the gravel.
This creates a barrier between the surrounding soil and your drainage material.
Then you can finish the top of the trench with suitable soil, gravel, decorative stone or another surface that fits your yard.
Where Should a French Drain Empty?
This is probably the most important question of the entire project.
Some people focus so much on digging the trench that they forget the outlet.
You need somewhere appropriate for the collected water to go.
Depending on your property and local rules, that might be a suitable drainage area, dry well system, drainage ditch or another approved solution.
Don’t send concentrated water toward your home’s foundation, septic system, neighboring property or somewhere that can cause erosion.
And if you’re dealing with significant drainage around a foundation, retaining wall or other structural feature, I’d get professional advice instead of guessing.
French Drain vs. Surface Drain: What’s the Difference?
These two systems get mixed up a lot.
A French drain is generally designed to collect water below the surface through a gravel-and-perforated-pipe system.
A surface drain, on the other hand, collects water at the surface, often through a grate or catch basin.
Sometimes you need one.
Sometimes you need both.
For example, if a downspout dumps a huge amount of water onto your patio, a surface collection system may be more appropriate than expecting an underground French drain to handle everything by itself.
What Went Wrong With My First Attempt?
I’ll tell you exactly what happened.
I focused too much on the trench and not enough on the water source.
I thought, “I’ll just move the water over here.”
That worked for a while.
Then we got a really heavy storm and the amount of water was way more than my little system could handle.
That’s when I realized drainage isn’t about making a hole in the ground.
It’s about understanding the whole water path.
Roof.
Gutters.
Downspouts.
Ground slope.
Soil.
Garden.
Outlet.
Look at the whole picture.
Common DIY French Drain Mistakes
Using the wrong gravel
Dirty or unsuitable material can reduce drainage performance and allow sediment to build up.
Skipping landscape fabric
In many soil conditions, keeping surrounding soil separated from the drainage gravel is important.
Ignoring the slope
This is a big one. Water needs a reason to move toward the outlet.
Having no real outlet
Moving water underground doesn’t solve anything if the water can’t safely leave the system.
Digging without checking utilities
Never assume the ground is clear just because you don’t see anything above it.
Making the trench too complicated
I’ve learned that simple systems are often easier to inspect, repair and maintain.
Can a French Drain Help Around a Garden?
Yes, and this is where I find them especially useful for backyard homesteading.
Some gardens naturally sit in low areas.
Too much water can create muddy paths, soggy soil and unhappy plants.
A drainage system can sometimes help redirect excess water away from growing areas.
But don’t assume every wet garden needs a French drain.
Some plants actually like wet conditions, and sometimes the better solution is changing the garden layout, improving soil structure, building raised beds or creating a shallow swale.
That’s one reason I like permaculture thinking.
Before fighting the water, ask whether you can work with the land instead.
My Simple Drainage Routine Now
After all my mistakes, here’s what I do when I notice water problems.
First: I watch where the water comes from.
Second: I check gutters and downspouts.
Third: I look at the slope.
Fourth: I figure out where the water can safely go.
Fifth: only then do I decide whether I need a French drain.
That little checklist has saved me from digging more than once.
DIY French Drain FAQ
How deep should a DIY French drain be?
There isn’t one universal depth. It depends on the water problem, pipe size, soil, site conditions and where the drain needs to connect. The important thing is designing the trench around the actual drainage problem rather than copying a random measurement from another yard.
Does a French drain need gravel?
A typical French drain uses clean drainage gravel around the perforated pipe. The gravel creates space for water to move into the pipe and helps support the drainage system.
Can I build a French drain myself?
Small residential drainage projects can sometimes be DIY jobs if you understand the site and local requirements. But large drainage systems, foundation problems, structural concerns and complicated outlets are worth getting professional advice on.
One Last Thing Before You Grab That Shovel
A DIY French drain can be a great backyard project, but don’t start by digging.
Start by watching.
Watch the rain.
Watch the slope.
Watch where the water collects.
Then make a plan.
I’ve wasted enough weekends fixing problems that could’ve been avoided with thirty minutes of thinking first.
If you get the water path right, the rest of the project becomes much easier to understand.
And when that next big storm rolls through and you see the water moving away instead of turning your backyard into a swimming pool, you’ll probably stand there like I did and feel pretty darn proud.
That’s one of the little victories of homesteading.
You fix something yourself, learn a little bit more about your land, and hopefully don’t have to dig the same trench twice.
If you’re dealing with a muddy backyard, garden drainage problem or water pooling near your homestead, start small, watch the water and plan the outlet first. Then your DIY French drain has a much better chance of doing what you built it to do.
And if you get stuck, just ask. I’ve messed up plenty of drainage projects myself.