DIY Rabbit Hutch: How I Built a Simple Rabbit Hutch That Actually Works
The first DIY rabbit hutch I ever built looked pretty good from ten feet away.
That’s the important part, right?
Well… not exactly.
When I got closer, I started noticing all the little problems. The door didn’t swing open far enough. The roof leaked a little. Cleaning it was a pain. And somehow I had built the thing so low to the ground that every time I needed to check on the rabbits, I was practically crawling around like a guy looking for a lost wrench.
You’re gonna laugh, but the rabbits probably had a better view of me than I had of them.
After messing around with rabbit housing for a while, I learned that a good rabbit hutch doesn’t need to be fancy. It needs to be dry, secure, well-ventilated, easy to clean, and comfortable for the rabbits.
That’s it.
So if you’re thinking about building your own rabbit housing for a backyard farm or homestead, lemme show you what I’d do differently now.
Why Build a DIY Rabbit Hutch Instead of Buying One?
For me, the biggest reason is control.
When you build your own hutch, you can make it fit your space instead of trying to squeeze your rabbits into whatever size somebody decided to sell.
Maybe you’ve got a small urban backyard.
Maybe you’ve got a little shed area beside the vegetable garden.
Or maybe you’re slowly building a self-sufficient homestead and want to add rabbits without spending a pile of money.
A DIY rabbit hutch lets you choose the height, width, doors, roof, cleaning access and location.
But there’s another reason I like building things myself.
When something breaks, I know how I built it.
That makes repairs much easier.
Before You Grab the Saw, Think About the Rabbits
This is where I made one of my early mistakes.
I was thinking about lumber.
The rabbits were thinking about space, shade and food.
Those are two very different things.
Before building, think about how the rabbits will actually use the space.
They need enough room to move around naturally, stretch out, stand upright where appropriate, and get away from wet or dirty areas.
If you’re keeping more than one rabbit, don’t assume they can all share the same space. Compatibility matters, and rabbits may need separate housing or carefully managed introductions.
Also think about access for you.
If you can’t comfortably reach the back corner of the hutch, you’re going to hate cleaning it.
And when you hate cleaning something, guess what happens?
You put it off.
I’ve done that with chicken areas, compost bins, everything.
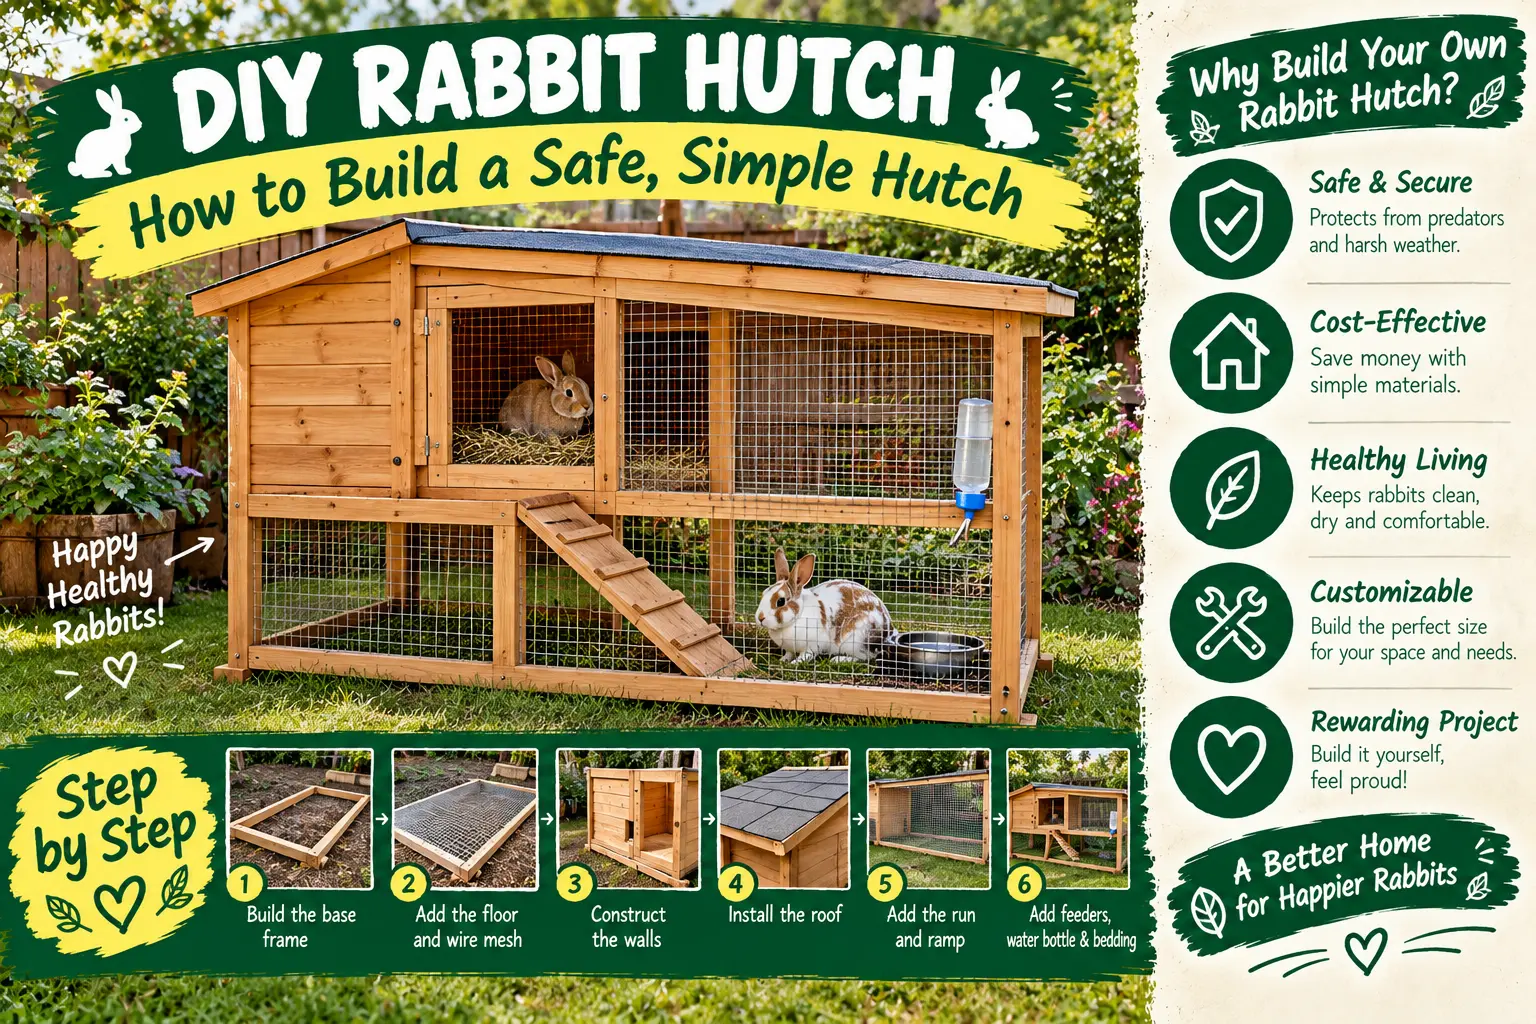
My Basic DIY Rabbit Hutch Design
If I was starting from scratch today, I’d keep the design simple.
I’d build a sturdy rectangular frame with a solid, weather-resistant roof and protected sides. I’d make the front easy to access and include enough ventilation that the hutch doesn’t become a hot, stuffy box during summer.
For outdoor rabbits, I’d also make predator protection a major part of the design rather than adding it later.
Here’s the basic idea:
- Strong wooden frame.
- Secure doors and latches.
- Weather-resistant roof.
- Good airflow without constant drafts.
- Protected sleeping/resting area.
- Easy-clean floor arrangement.
- Predator-resistant openings.
- Enough room for the rabbits to move comfortably.
Nothing fancy.
But I would spend money on the parts that protect the animals before spending money on decoration.
How Big Should a Rabbit Hutch Be?
This is one question I don’t like answering with one magic measurement because rabbit size, breed, number of rabbits and how much exercise they get all matter.
The basic rule I use is simple: don’t build the smallest possible space just because the rabbit technically fits inside.
A rabbit isn’t a garden tool you put on a shelf.
Give the animal enough room to move, stretch, rest and behave normally.
And remember that a hutch shouldn’t be the rabbit’s only opportunity for movement if the animal is kept there for long periods. A secure exercise area or run can make a big difference.
I’ve found that planning the hutch and exercise area together makes more sense than trying to make the hutch do everything.
Don’t Put the Hutch Directly on the Ground
Here’s another mistake I made.
I thought putting the hutch directly on the ground would make things easier.
Nope.
Rainwater, mud, insects and moisture all become bigger problems.
Raising an outdoor hutch can help keep it away from wet ground and make cleaning and inspection easier. It can also make it harder for some pests to reach the rabbits.
But don’t raise it so high that getting the rabbits in and out becomes awkward.
There’s always a balance.
I like having the hutch at a comfortable working height where I can check the animals without bending over all day.
What Should the Rabbit Hutch Floor Be Like?
This is one of those areas where I don’t like blindly copying old farm designs.
Some old rabbit hutches used wire floors everywhere because they made cleaning droppings easier.
But rabbits spend a lot of time standing on their feet, and inappropriate wire flooring can contribute to sore or injured feet.
That’s why I prefer giving rabbits a comfortable solid resting area and using a design that allows waste to be managed without making the rabbit stand on harsh flooring all day.
If you use any mesh or wire, choose appropriate materials and spacing for the rabbits and make sure there are no sharp edges, protruding wires or places where feet can become trapped.
This is one place where saving a few dollars isn’t worth it.
Ventilation Is More Important Than You Think
One summer I opened a small animal shelter and immediately realized I’d made it too closed up.
It was like opening a car door that had been sitting in the sun.
That taught me a lesson.
Rabbits need protection from extreme weather, but that doesn’t mean sealing the hutch up like a wooden box.
Good ventilation helps remove moisture and stale air while avoiding direct drafts blowing constantly onto the animals.
That’s especially important in warm weather.
Shade matters too.
A hutch sitting in full afternoon sun can become dangerously hot, even if the temperature outside doesn’t seem terrible.
I’d rather put the hutch somewhere naturally shaded and then add additional protection during the hottest part of the year.
Protect Your Rabbits From Rain and Wind
The roof is not the place to get creative with leftover material.
I’ve used leftover boards for plenty of homestead projects, but animal housing deserves a little more thought.
The roof should keep rain out and provide shade.
A small overhang can also help stop rain from blowing directly into the front of the hutch.
At the same time, don’t close every side because you’re worried about winter.
Rabbits need fresh air.
In cold weather, dry and sheltered is generally much better than damp and drafty.
And if you’re in an area with very hot summers, heat management may actually be a bigger concern than cold.
Predator Protection Is a Big Deal
This is where I get serious.
I’ve had enough experiences with raccoons, foxes, neighborhood dogs and other backyard visitors to know that animals are incredibly good at finding weak spots.
A rabbit hutch needs strong predator protection.
Don’t rely on a simple little twist latch if a raccoon can reach it.
Use secure latches and inspect the entire enclosure for gaps.
Check around the doors.
Check underneath.
Check the corners.
Check where the wire meets the wooden frame.
And check it again after you’ve had a storm or after moving the hutch.
One small gap can become a very big problem.
What Kind of Wire Should You Use?
Don’t think of wire mesh as just “some chicken wire.”
Different mesh products have different strengths and purposes.
For predator protection, you want a material strong enough and appropriately sized for the animals you’re trying to keep out, with openings small enough to prevent rabbits from escaping or predators from reaching through.
Hardware cloth is often much stronger than lightweight chicken wire and can be useful for protected enclosure sections.
But again, inspect every edge.
Any cut wire that sticks into the rabbit’s living area needs to be dealt with.
I learned this one while building a chicken enclosure. I thought I’d folded one piece safely until I found a sharp little point sticking out later.
Now I run my hand carefully along the outside and inside edges before I call any animal enclosure finished.
Make Cleaning Easy From Day One
This might be my favorite DIY rabbit hutch tip.
Design the hutch for the lazy version of yourself.
Not the Saturday-morning version of yourself who has coffee, a new tool and lots of energy.
I’m talking about Tuesday evening when you’re tired from work and just want to check the animals.
Can you remove bedding easily?
Can you reach every corner?
Can you clean the water container without taking the whole thing apart?
Can you inspect the rabbit without chasing it around?
If the answer is no, change the design before you build it.
A removable tray or another practical waste-management system can make cleaning much easier, as long as it doesn’t create sharp edges, gaps or uncomfortable flooring.
Keep Food and Water Clean
Rabbits need constant access to clean drinking water.
That’s one of those jobs that sounds simple until you have a water bowl full of bedding, hay and dirt.
I’ve tried different water containers over the years.
Some worked great.
Some became dirty almost immediately.
Whatever system you use, make sure the rabbit can reach it easily and that you can remove, clean and refill it without a headache.
Keep food and hay away from areas where they can become soaked or contaminated with waste.
And check water more often during hot weather.
Should the Hutch Have a Separate Sleeping Area?
I like giving rabbits a sheltered section where they can get away from weather and feel secure.
It doesn’t have to be a fancy little rabbit bedroom.
A protected, dry area is enough.
Think about how the wind moves around your property. A hutch that looks protected from the front might get hammered by wind from the side during a storm.
Sometimes simply turning the hutch a different direction makes a big difference.
My Simple DIY Rabbit Hutch Building Order
If you’re actually building one this weekend, here’s how I’d approach it.
First: choose the location.
Look for shade, drainage and protection from extreme weather.
Second: decide how much space the rabbits need, including their exercise area.
Third: build the main frame.
Fourth: install the roof and weather protection.
Fifth: add secure mesh and doors.
Sixth: build the floor and resting areas.
Seventh: install feeders and water containers.
Finally: get inside the enclosure yourself as much as practical and inspect it from the rabbit’s point of view.
Okay, maybe don’t literally climb inside if it’s tiny.
But get down low and look around.
You’ll notice things you missed while standing up.
Don’t Forget Summer Heat
This deserves its own section because rabbits can be very sensitive to heat.
Shade is important, but you also need airflow.
Don’t put the hutch against a wall where hot air gets trapped.
During very hot weather, I would check the rabbits more frequently and make sure they have plenty of clean, cool water.
Never assume that because a rabbit survived yesterday’s heat, it will be fine tomorrow.
Weather can change quickly.
What I Would NOT Spend Money On
You don’t need a fancy rabbit mansion.
I’ve seen animal housing projects where people spend more money on decorative trim than on the actual predator protection.
I’d spend the money on:
- Strong construction materials.
- Safe mesh.
- Good latches.
- A weather-resistant roof.
- Comfortable flooring.
- Easy-clean features.
Paint and decorations can wait.
The rabbit doesn’t care if your hutch has a little wooden sign saying “Bunny Palace.”
Believe me.
DIY Rabbit Hutch FAQ
Can I build a rabbit hutch from scrap wood?
Yes, but inspect the wood carefully. Don’t use wood that’s rotten, heavily contaminated, treated in a way that’s inappropriate for animal contact, or full of exposed nails and sharp edges. Reclaimed materials can be useful, but safety comes first.
Should a rabbit hutch be indoors or outdoors?
Either can work depending on your climate, housing setup and local conditions. Outdoor rabbits need protection from heat, cold, rain, wind and predators. Indoor housing also needs good ventilation, enough space, safe flooring and regular cleaning.
How often should I clean a rabbit hutch?
There’s no single schedule that works for every setup. Check it regularly and remove soiled bedding and waste before it builds up. Water and food containers should also be checked and cleaned regularly.
Build It for the Rabbit, Not Just for Your Backyard
That’s probably the biggest lesson I’ve learned.
When I started building little things around my homestead, I was always thinking about how they looked from my side.
Now I try to think about the animal first.
Is it dry?
Is it safe?
Can it move around?
Can it get away from the weather?
Can I clean it without wanting to throw the whole thing in the trash?
If the answer to those questions is yes, you’re already on the right track.
A DIY rabbit hutch doesn’t need to be perfect. Mine certainly weren’t. What matters is building something sturdy, secure, comfortable and easy enough for you to maintain every day.
And don’t rush the first build. Measure twice, cut once, and then measure it again because apparently that’s something I only learned after wasting lumber.
If you’re adding rabbits to your backyard farming plans, start simple. Build the housing properly, watch how the rabbits use it, and make improvements as you go.
That’s how most good homestead projects happen anyway.
You build it. You use it. You find the annoying part. Then you fix it.
Got a weird rabbit-hutch problem? Leave a comment. I’ve probably made the same mistake already.
Important: Rabbit housing should be adapted to your rabbit’s breed and size, local climate, predator pressure, and available exercise space. If you’re unsure about safe housing, flooring, heat, illness, or rabbit care, check guidance from a qualified veterinarian or reputable rabbit welfare organization.